Homemade Danish Pastry Dough (with Video Tutorial)
Have you ever wanted to make homemade Danish for a special breakfast or brunch? Start with my easy Danish Pastry Dough! I’ve broken the recipe down to be super-simple and there’s even a video tutorial so you can follow along. You’re moments away from the most butter-y, flaky, fruit-filled treat ever!

I am declaring this the summer of bucket-list baking!
Is there something you’ve always wanted to try? But maybe you’ve been a little afraid? Maybe there are a lot of steps, or maybe it’s just a little bit complicated?
I’ve got lots of items like that. Some I’ve yet to tackle and a few that I took the plunge on. Know what I’ve found, most times? It’s not nearly as bad as we build it up in our minds to be.
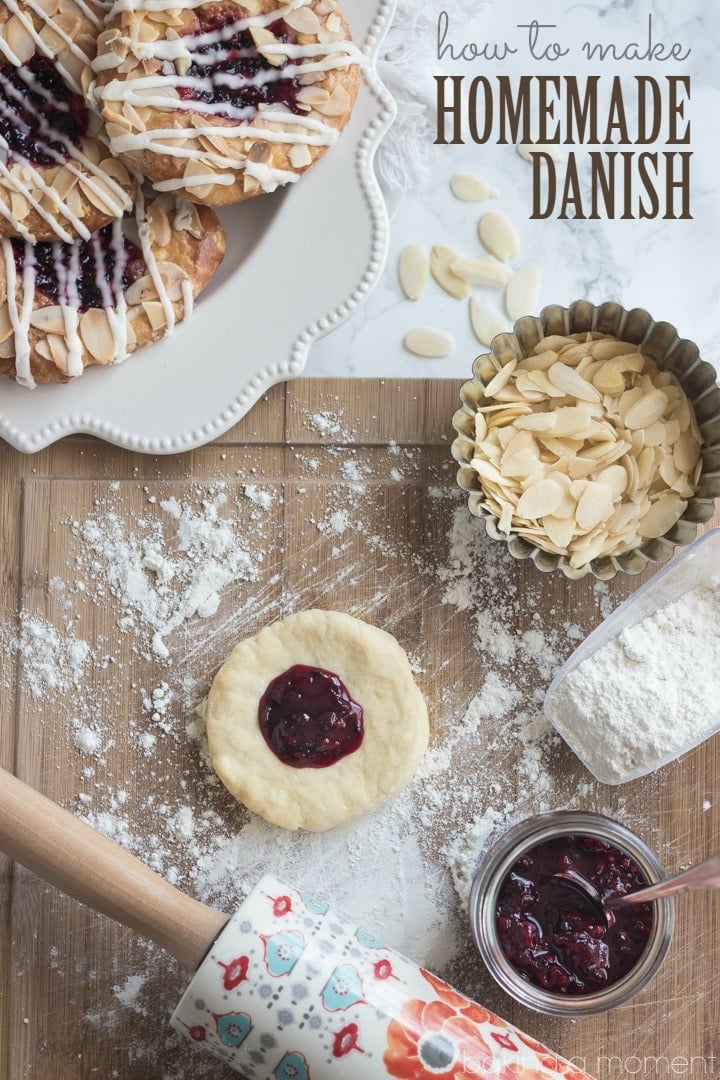
Every time I’ve ever had a Danish at a coffee shop or bakery, I’ve always been a little let down. They always seem to be a bit heavy, and kinda soggy. There’s only one solution, and that’s to make it homemade, from all the best ingredients, and fresh from the oven.
But ugh. I had heard about that butter square. How you have to create a square of butter, encase it within a yeast dough, and roll and fold it over on itself a hundred times to get all those flaky layers. Are you kidding me??? The though of it was exhausting.
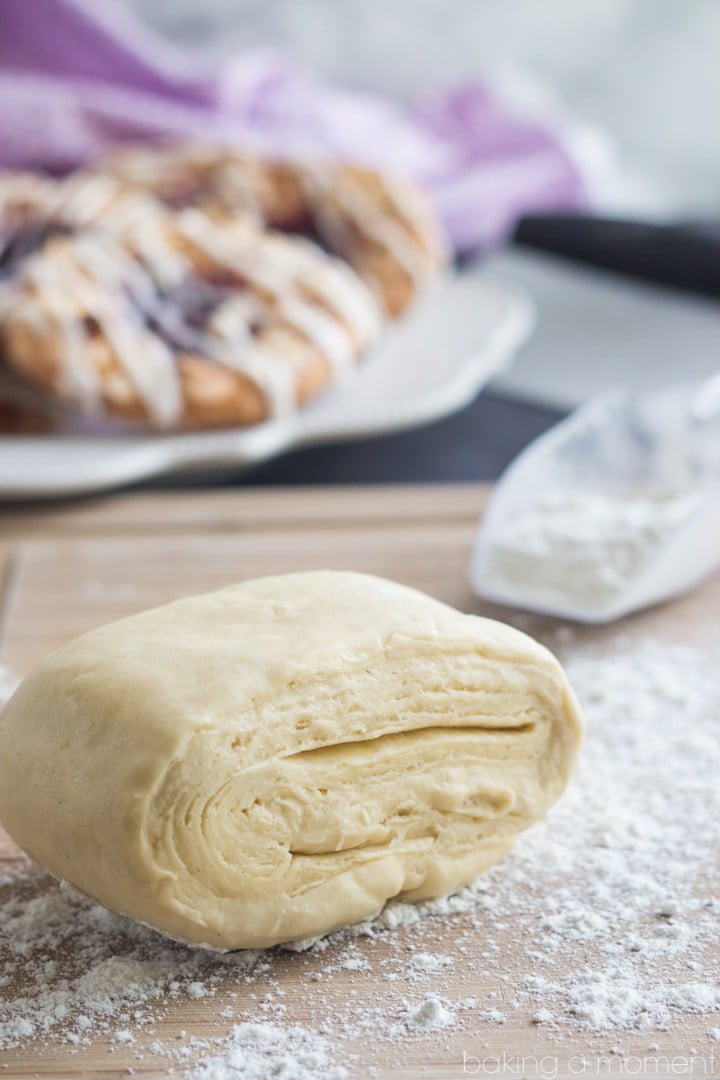
Well, I finally just got up and did it. And guess what? It wasn’t hard at all. The dough itself is as simple as mixing dry with wet, and the butter square took me all of about five minutes. Nothin’ to it!
The final product is light as air and super butter-y. I used the best ingredients I could get my hands on, including Irish butter from Kerrygold. What an incredible result! The flaky layers are to-die-for. On Friday I’ll tell you all about the filling and garnishes, so stay tuned!
I do a lot of talking in this video tutorial. I’m not really sure how I feel about that, but rather than typing out the step-by-step, I’m just going to let it speak for itself. I hope you enjoy, and let me know if you give this a try!
This post contains affiliate sales links.

Easy Danish Pastry Dough
Ingredients
- 1 cup (227 g) cold unsalted butter, (2 sticks)
- 2 3/4 cups (343.75 g) all-purpose flour
- 3 tablespoons granulated sugar
- 1 1/4 teaspoons (1.25 teaspoons) kosher salt
- 2 teaspoons dry active yeast
- 1/2 cup (122 ml) milk
- 1/4 cup (62.5 ml) warm water, (like a baby's bath)
- 1 large egg
- 1 teaspoon vanilla bean paste
Instructions
- Cut a half a tablespoon of butter off the ends of each stick of butter, and set aside.
- Cut each stick of butter in half, then cut each half stick lengthwise.
- Line up 4 butter rectangles side by side on a sheet of lightly floured parchment.
- Dust with flour, and fold the parchment up and over the butter.
- Use a rolling pin to lightly pound/roll the butter to a thickness of about 1/4-inch.
- Repeat with the remaining 4 butter rectangles.
- Refrigerate the parchment-wrapped butter squares.
- Place the flour, sugar, salt, and yeast in a large mixing bowl and stir to combine.
- Cut in the reserved tablespoon of cold butter, rubbing between your fingertips to fully incorporate.
- In a large liquid measure, stir the milk, water, egg, and vanilla together.
- Add the liquid ingredients into the dry and stir together.
- Knead the dough for approximately 7 minutes in a stand mixer fitted with the dough hook attachment.
- Turn the dough out onto a lightly floured surface, and roll/pat into a rough rectangle shape. (Ideally, the short side of the rectangle should be about the same length as the long side of the butter square in step 2. The long side should be about 3x the length of the short side of the butter square.)
- Place one of the butter squares in the center of the dough rectangle.
- Fold one side of the dough over the butter, and top with the remaining butter square.
- Fold the other side of the dough over the second butter square.
- Pinch the sides of the dough together to encase the butter within the dough.
- Roll the dough out to a thickness of about 1/2-inch, then fold the dough into thirds, like a letter. Repeat, two more times.
- Wrap loosely with plastic wrap and refrigerate overnight (or for a minimum of 1 hour).


I love that rolling pin and your video tutorials are the best. The pastry dough looks delicious.
Thanks Chineka! It really was… 😉
What a great tutorial, makes me want to make my own danishes, forget every buying them again 🙂
Haha, right Jannette?? Thanks so much sweetie!
My mom would occasionally buy danishes for the morning (nothing as spectacular as these) and they were always one of my favorites! I would eat the cream center first and then eat the rest 😉 This is definitely on my summer bucket lis! Btw, super cute rolling pin!
That’s too funny Kathleen! I always do the opposite- eat around the edge first and then save the middle for last! Thanks so much and ps the rolling pin was a gift from my sister in law. She found it at Anthro!
I love the idea for a summer baking bucket list! I have a few recipes that I have been trying to tackle but not finding the time, but those aren’t really bucket list-worthy. The only thing on my bucket list for the summer is macarons! I am determined to get them right! PS: I absolutely adore all of your videos. Please keep them coming!
Aw thank you! The videos are fun to put together and really challenging. I have no doubt you’ll master macarons no sweat! Good luck Nora!
I’ve always wondered about homemade danish dough! And you’ve gone to the trouble of making a video tutorial. You are one amazing lady, Allie! xo
Haha and so are you Marissa! Thank you so much my friend 🙂
OOOOH I love danishes–this recipe is brilliant and the video is cute as all get out!!!
Thank you so much Kayle! Boy it’s hard hearing my own voice I’ll tell ya. Thanks for the encouragement though!
Allie, I LOVE the video!!!! and that rolling pin!!! so pretty! ok, so stupid question. . danish pastry dough is very similar to puff pastry, right??
Not stupid at all! I actually had to do some research on this as well because I wasn’t quite sure myself. This is very similar to puff and croissant dough. Puff has no yeast and croissant has no egg. Other than that they’re pretty much the same thing!
Thank you so much for the great question Alice and for the sweet compliments too!
Your video is so great, Allie! It took me back to cooking school where I made puff pastry, Danish, and croissant doughs. I was surprised how easy they were, but it’s been a while now, and your video was a great refresher for me! Pinned, of course. 🙂
Thanks so much for pinning Marcie! I was surprised too- the dough was easy enough and the only extra step was the butter square which really wasn’t that big of a deal.
Thank you for sharing this! I definitely would love to try this someday, I love how you provide a video tutorial too!
Yay! So happy you liked, Sam!
So elegant and pretty! I haven’t made homemade danishes yet and can’t wait to try! Love the photos and your video – you always know how to make it looks so easy and it’s so helpful! 🙂
Aw, thanks Kelly! That’s my goal, lol. I just hate when I look at a recipe and it looks so long and scary.
I love making homemade danishes! These look perfect, Allie. Love the video tutorials! 😀
Thanks so much Jess! Aren’t they good?? 😀
So gorgeous Allie! Love the simple how-to posts. They’re just awesome!
Aw, thank you Melanie! Hope your week is off to a great start dear.
I need to try this recipe. It looks simple and I bet it yields and amazing danish! Love the video, Allie!
Thanks Jen! I was pleasantly surprised by how do-able it all turned out to be.
I need to totally get on your bucket list baking program because I have always wanted to make danishes. You are seriously killing it with the videos and photos my dear. Love it all!
Aw, thanks Joc! They’re a lot of fun to make but boy they take up a lot of time. I may be chillin’ for a bit after this one, lol!
There is no tutorial, would love to view it. thanks
Hey Mamie! The video is just below the recipe card. Good luck and enjoy!
I rarely make homemade danishes, but will definitely try these! Love the video and pictures, pinned!
Thanks so much Mira! It was a first time for me but it definitely won’t be the last!
Your photos are sooo freaking beautiful! Pinning 🙂
Aw, wow! Thank you Medha!
Hi Allie: I just made the dough but it was hard to roll the dough because it kept springing back. It’s much thicker than yours. I had to knead it by hand because I don’t have a stand mixer. Any thoughts, please? Should I dump it?
I wouldn’t dump it Marie! Try just letting it rest for 10 or 15 minutes (covered). That should help it to be a little more cooperative.
I did the best I could and put it in the fridge to rest. It came out great. It’s very forgiving!!
Just made another batch. Thank you for the great recipe!!!
Oh I’m so glad it worked out for you! Thanks so much for looping back. Enjoy!
I did it!
Thank you for the clear instructions, I have always wanted to try making the dough but was sure it was to hard.
Thank you!
Hooray! I’m so glad you finally went for it. And were successful! Great job Barbara!
I have been a professional Pastry Chef for almost 40 years and have never heard the term lock-in for the layer of butter. When did this term originate and where, if you know?
I don’t think I’m familiar with that term either Frank. Can you tell me where you heard that?