Vanilla Cake Recipe: Perfectly Moist and Delicate
As an amazon associate I earn from qualifying purchases.
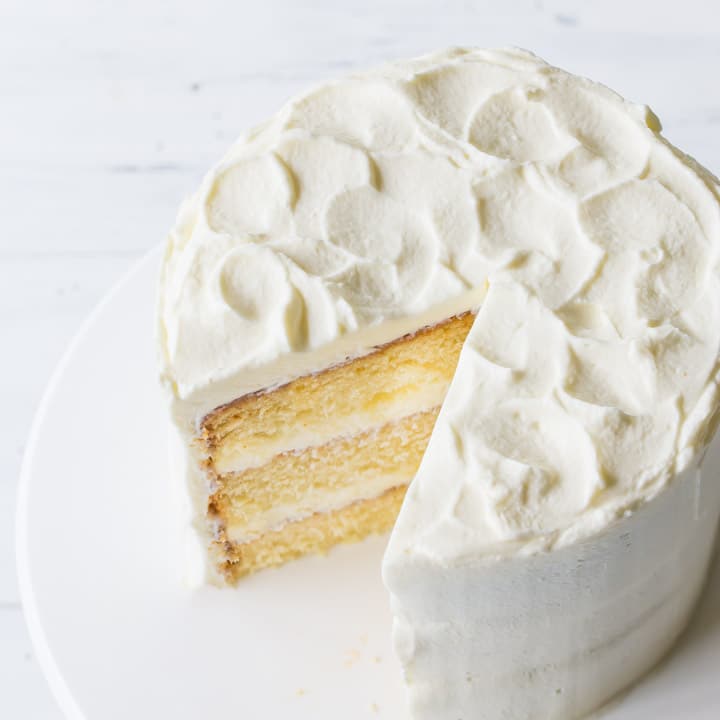
This is the only Vanilla Cake Recipe you'll ever need! It bakes up soft, buttery, and moist, with a fine, delicate crumb. So easy it's practically foolproof, and it all comes together in just one bowl. Simple, versatile, and so delicious!
There is no better way to celebrate a special occasion (I'm talking birthday or a holiday) than with a gorgeous layer cake. I love baking cakes, and my family loves them too. Our favorites include Chocolate Cake, Red Velvet Cake, and Carrot Cake. But lately we are really loving this simple, perfect vanilla cake.
I am a firm believer that nothing beats scratch-made. There is something so blow-your-mind fantastic about a homemade dessert freshly baked from simple, wholesome ingredients.
I grew up mostly on prepackaged desserts and treats made from a mix, but my grandmother used to bake for special occasions. My mom always made a big deal about her from-scratch cakes and would make sure I tasted them. She wanted me to note the difference, and I definitely did!
If you're good about keeping a well-stocked pantry, this recipe isn't any more complex than a box cake. Got basics like flour, sugar, butter, and eggs on hand? Know how to properly measure ingredients?
Then you can totally do this! This recipe comes together in just one bowl, so it's super easy, and you won't have a ton of dishes to wash. No sweat!
You will be amazed at the difference scratch makes. This is the best vanilla cake recipe because it is incredibly light, soft, moist, and delicate, and the flavor is off-the-charts. Buttery, rich, and sweetly perfumed with fragrant vanilla.
You'll never go back to the box!
Table of Contents
- Why You'll Love This Cake Recipe
- Ingredients
- Special Equipment
- In Photos: How To Make Homemade Vanilla Cake
- Recipe FAQ
- Recipe Tips
- How To Store This Cake
- Serving Size
- More Classic Cake Recipes
Why You'll Love This Cake Recipe
- Tastes amazing: Vanilla cake made from scratch offers a richer, more authentic flavor than the box mixes' artificial flavors.
- Great Texture: Scratch-made cakes tend to have a finer crumb and a moist, delicate texture.
- Wholesome: A homemade vanilla cake has no preservatives, weird additives, or artificial flavors or colors.
- Easy to Make: You will love how easy this recipe is to make! And, you only need one mixing bowl to make it. Less cleanup!
Ingredients
Here's a quick rundown of the ingredients you'll need to make this vanilla cake, and why.
- Flour: A combination of all-purpose flour and cake flour is used to achieve a balance between structure and tenderness.
- Sugar: Sugar adds sweetness (obvs!), but it also aids browning and keeps things moist, since it's hydrophilic (it loves water, so it draws moisture in). Regular white sugar is fine, or you can sub another sweetener if you like. As long as it swaps 1:1 for granulated sugar, it should work.
- Baking powder and baking soda: These leavening agents are essential for making the cake rise and bake up light and fluffy.
- Salt: Salt carries the flavors and intensifies them. The result won't taste salty, but it will make everything so much more flavorful! I like kosher salt best because it doesn't have any additives (table salt usually contains iodine, which can leave a bitter taste), so the flavor is pure. It's also inexpensive and easy to find in a regular grocery store.
- Butter: Butter adds richness and flavor to the cake. I like to use unsalted butter because it lets me control the amount of salt in the dish. Different brands of butter can contain different amounts of salt, so this way you get a more consistent result. For a vegan or dairy-free vanilla cake recipe, use a plant-based butter that can substitute for dairy butter 1:1.
- Eggs: Eggs act as a binding agent and provide structure to the cake. They also contribute to its moisture and tenderness. Use large chicken eggs here, or a plant-based egg replacement than subs 1:1 for chicken eggs. It's best if the eggs are at room temperature, but I don't find it critical.
- Sour cream: Sour cream adds moisture to the cake batter, resulting in a softer and more tender cake. It helps prevent the cake from drying out during baking. If you don't have sour cream, you could also use the same amount of Greek yogurt or buttermilk.
- Milk: Milk adds moisture and helps achieve a workable batter consistency. You can use whatever kind of milk you keep on hand: 2%, skim, whole, or even a plant-based milk will work!
- Vanilla: Vanilla extract adds a subtly sweet flavor without being at all sugary. For a more pronounced flavor, try using vanilla bean paste. You could also split a vanilla bean lengthwise down the center, scrape out the seeds, and add them. Or you could try this with an altogether different type of extract or flavoring, such as:
- Almond extract
- Lemon extract or citrus zest
- Orange blossom water
- Coconut extract
- Cinnamon
Special Equipment
Here are the tools you'll need to make this recipe:
- Measuring cups and spoons: To measure out the ingredients.
- Large mixing bowl: I use the one that comes with my stand mixer.
- Electric mixer: Either a stand mixer or a handheld electric mixer.
- Silicone spatula: For scraping down the bowl's bottom and sides.
- Non-stick spray: For greasing the pans.
- Parchment paper: To line the cake pans so the cake layers come out easily without breaking apart.
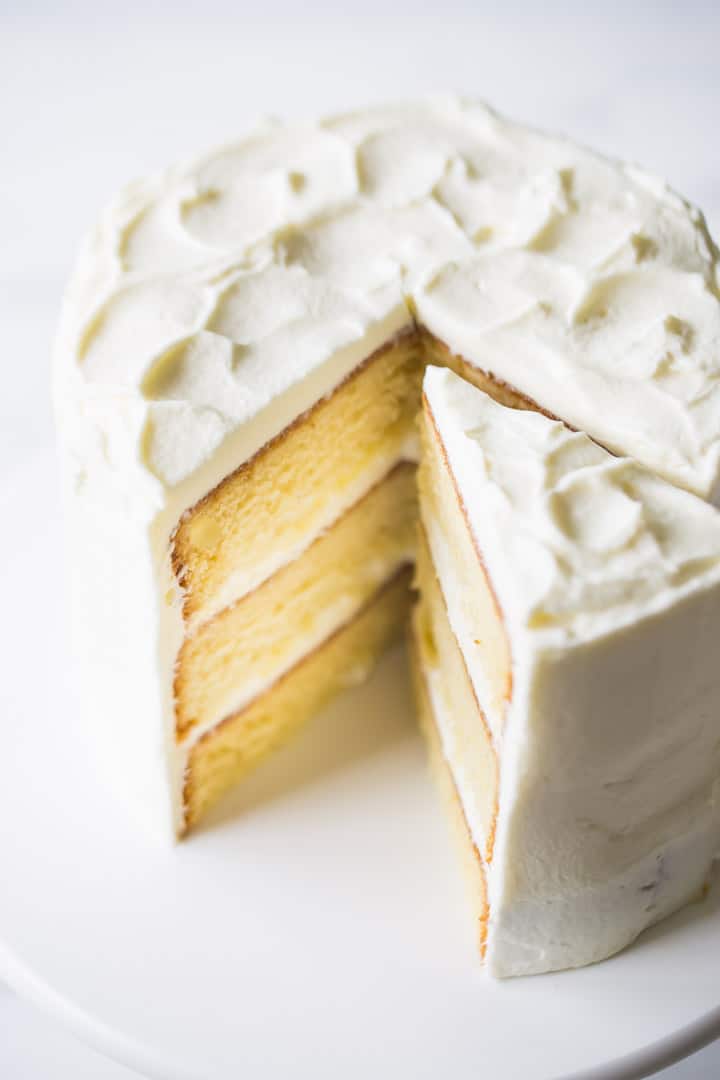
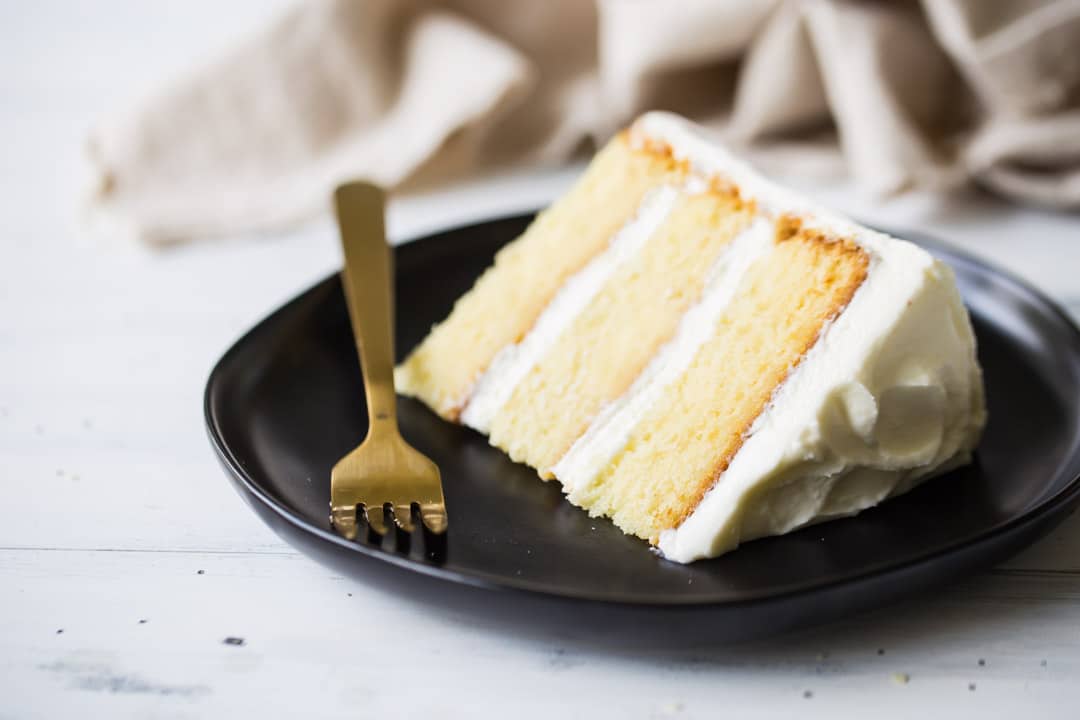
- Cake pan(s): For what you see here, I've used three 6-inch round cake pans, but you could also use two 8-inch round cake pans or two 9-inch round cake pans, a 9x13-inch sheet pan, or bake 24 cupcakes, or double the recipe and bake it in a 12-cup bundt pan.
In Photos: How To Make Homemade Vanilla Cake
Let's walk through the steps together!
Step 1: Prep
Preheat the oven to 325 degrees F, mist three 6-inch cake pans with nonstick spray, and line them with circles of parchment paper.
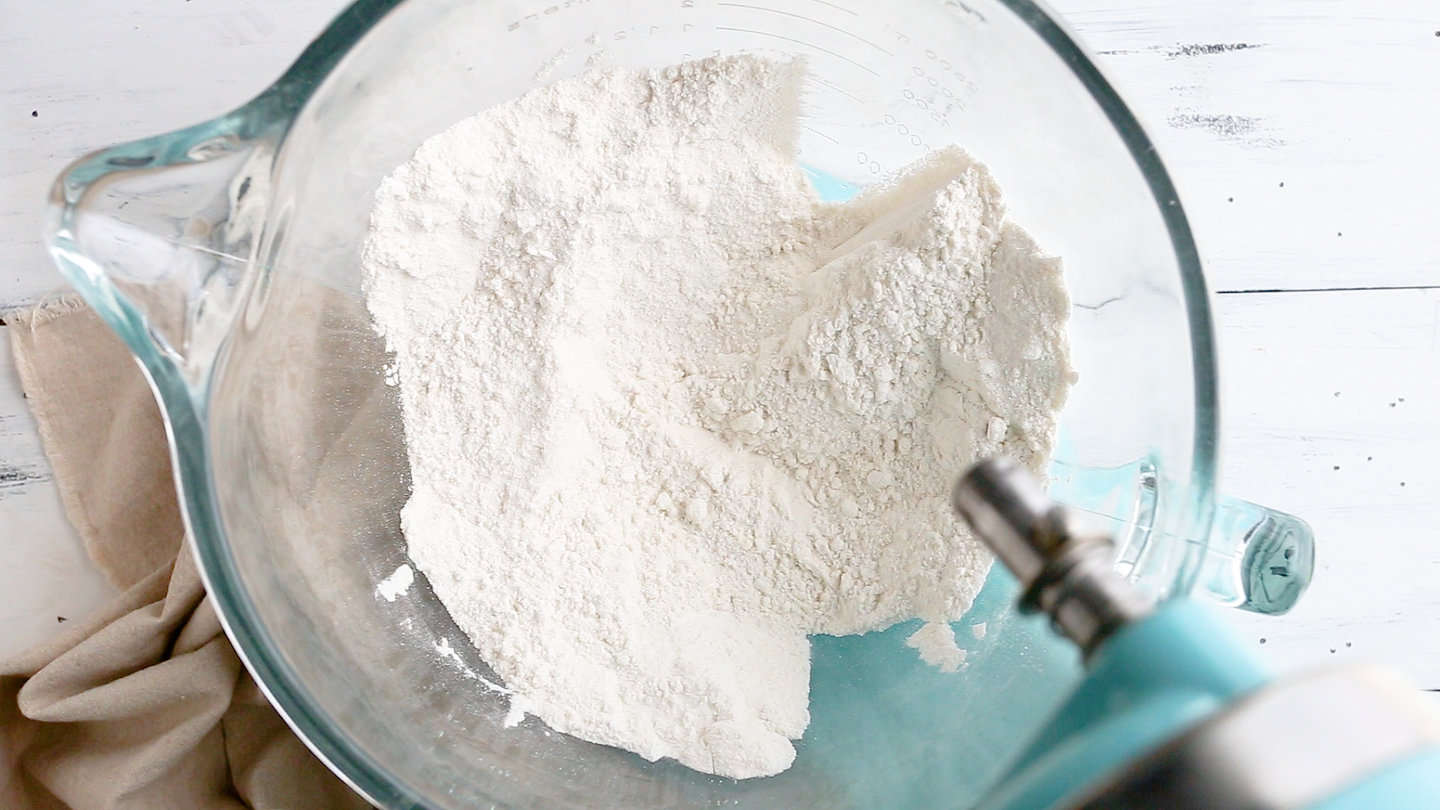
Step 2: Combine the dry ingredients
Place the cake flour, all-purpose flour, sugar, baking powder, baking soda, and salt in a large bowl, and stir to combine.
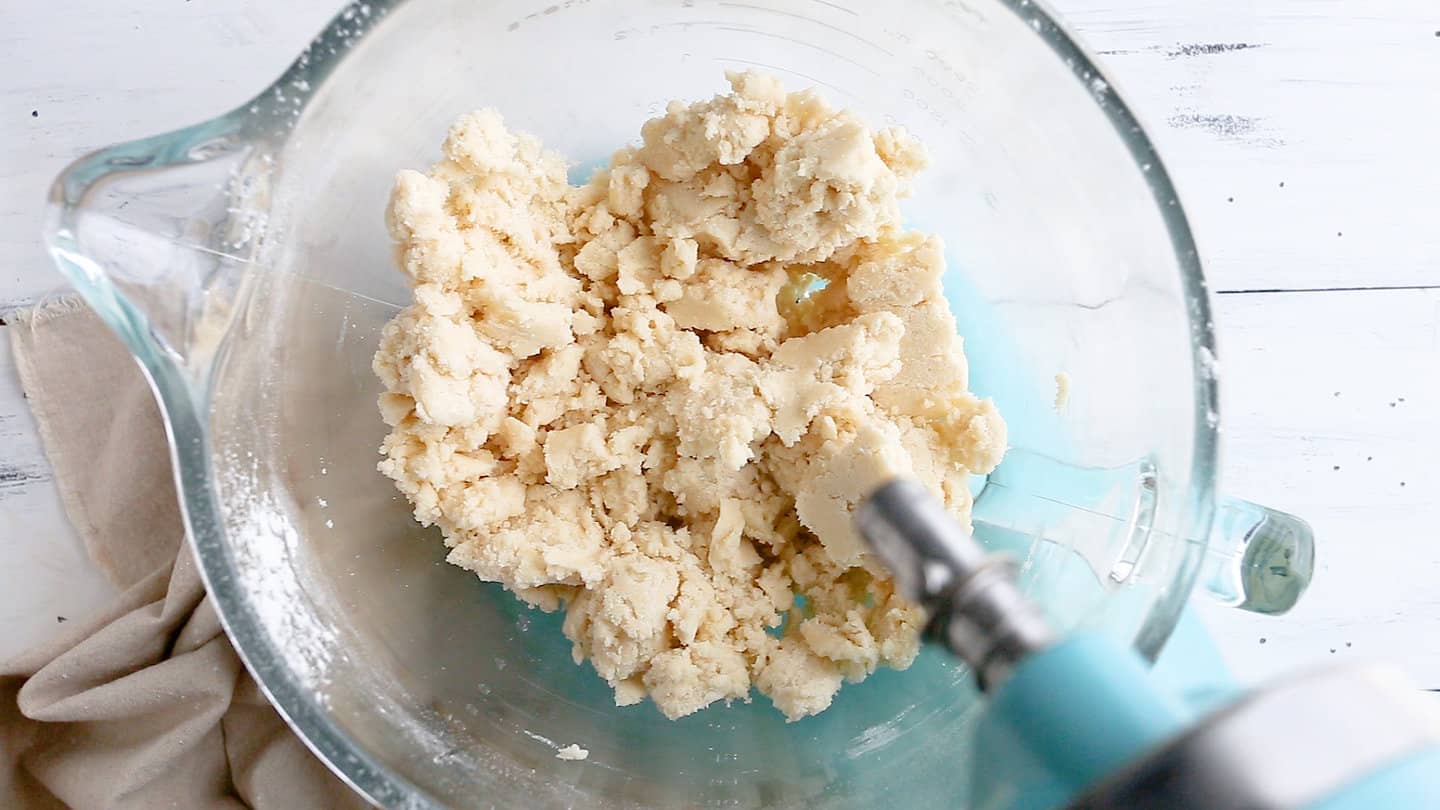
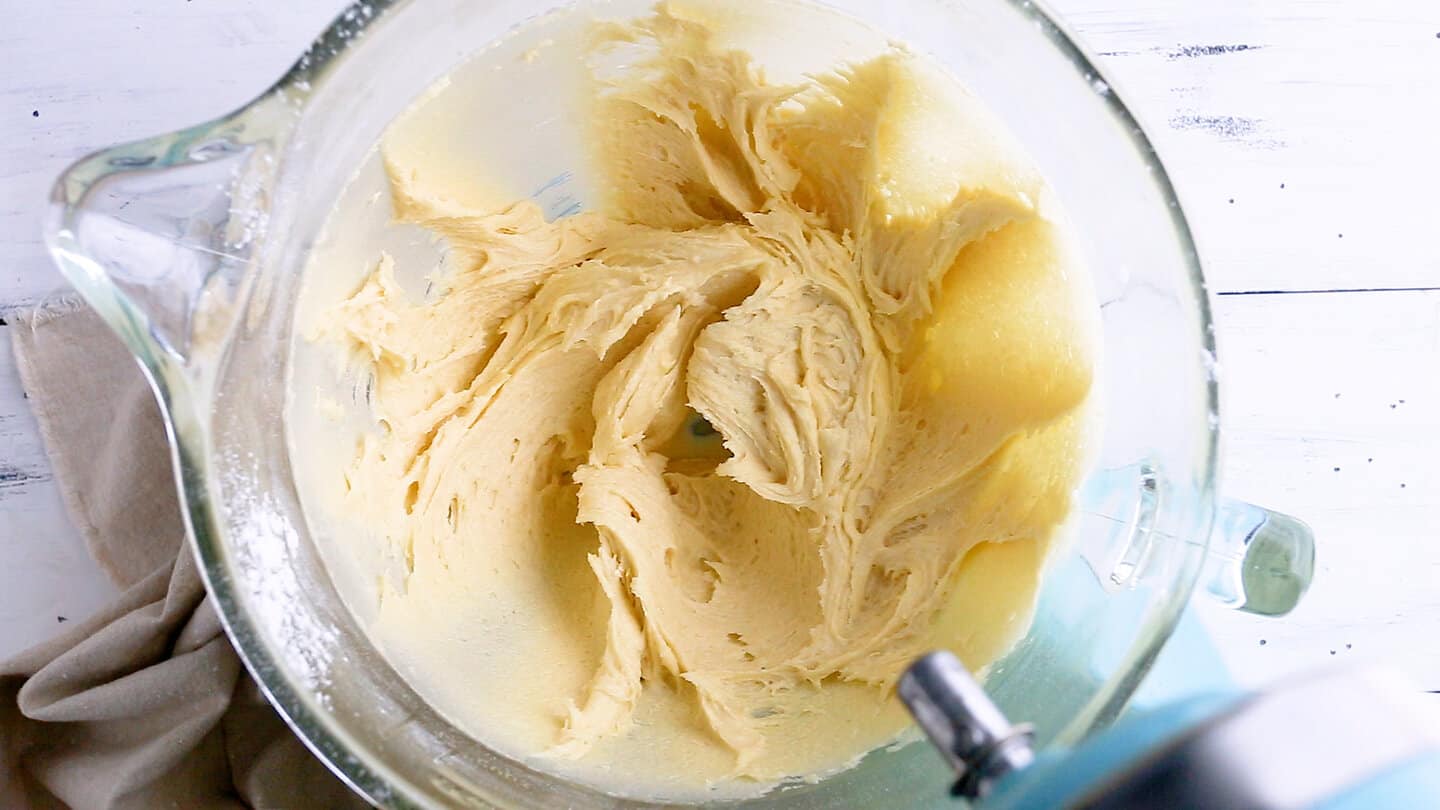
Step 3: Work in the butter
Add the soft butter to the bowl. Then mix it in on medium-low speed until the mixture resembles damp sand.
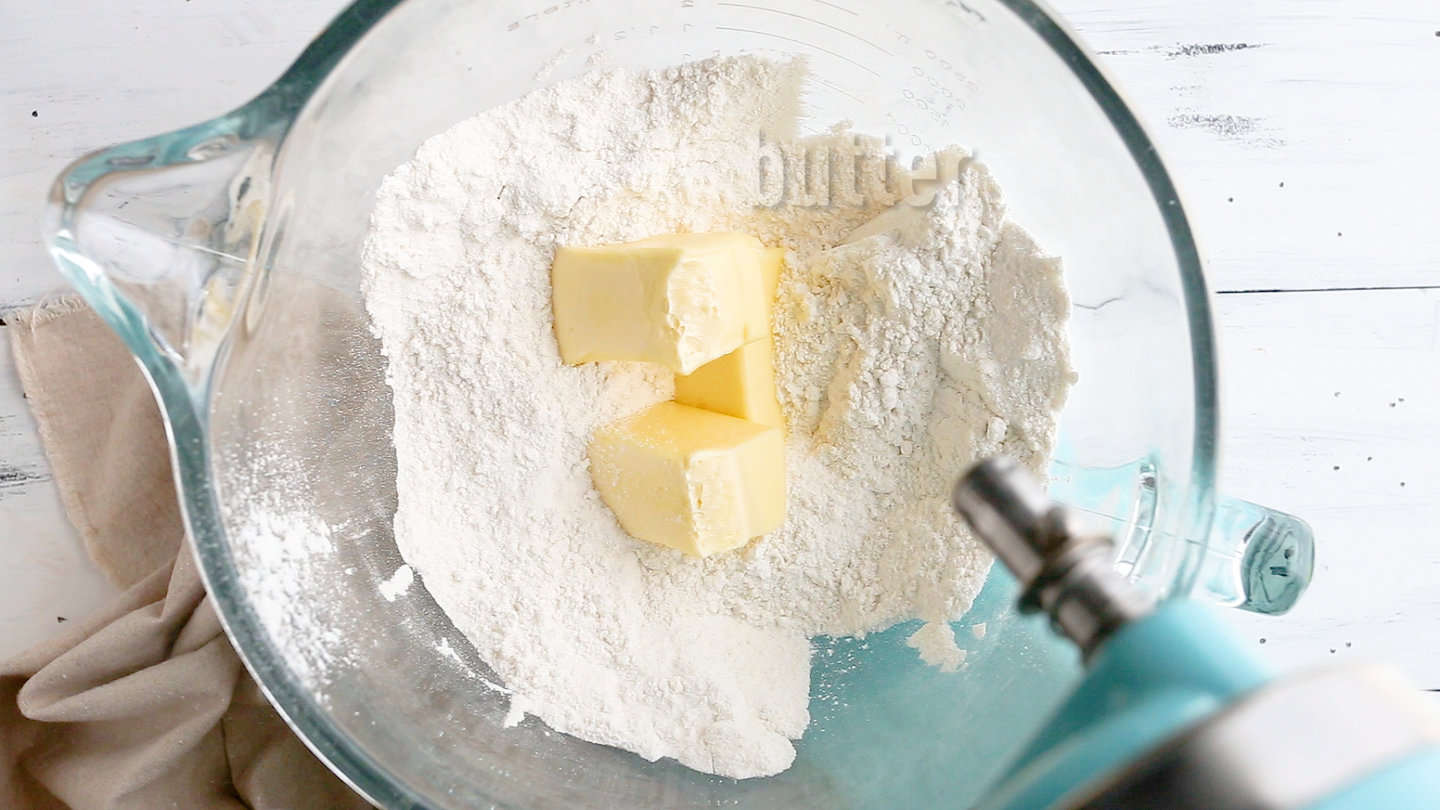
Then mix it in on medium-low speed until the mixture resembles damp sand.
Step 4: Add eggs
Stir in the eggs, one at a time, and allow each one to fully incorporate before adding the next.
Step 5: Liquid ingredients
Scrape the bottom and sides of the bowl to ensure all ingredients are fully incorporated, then add the yogurt, milk, and vanilla.
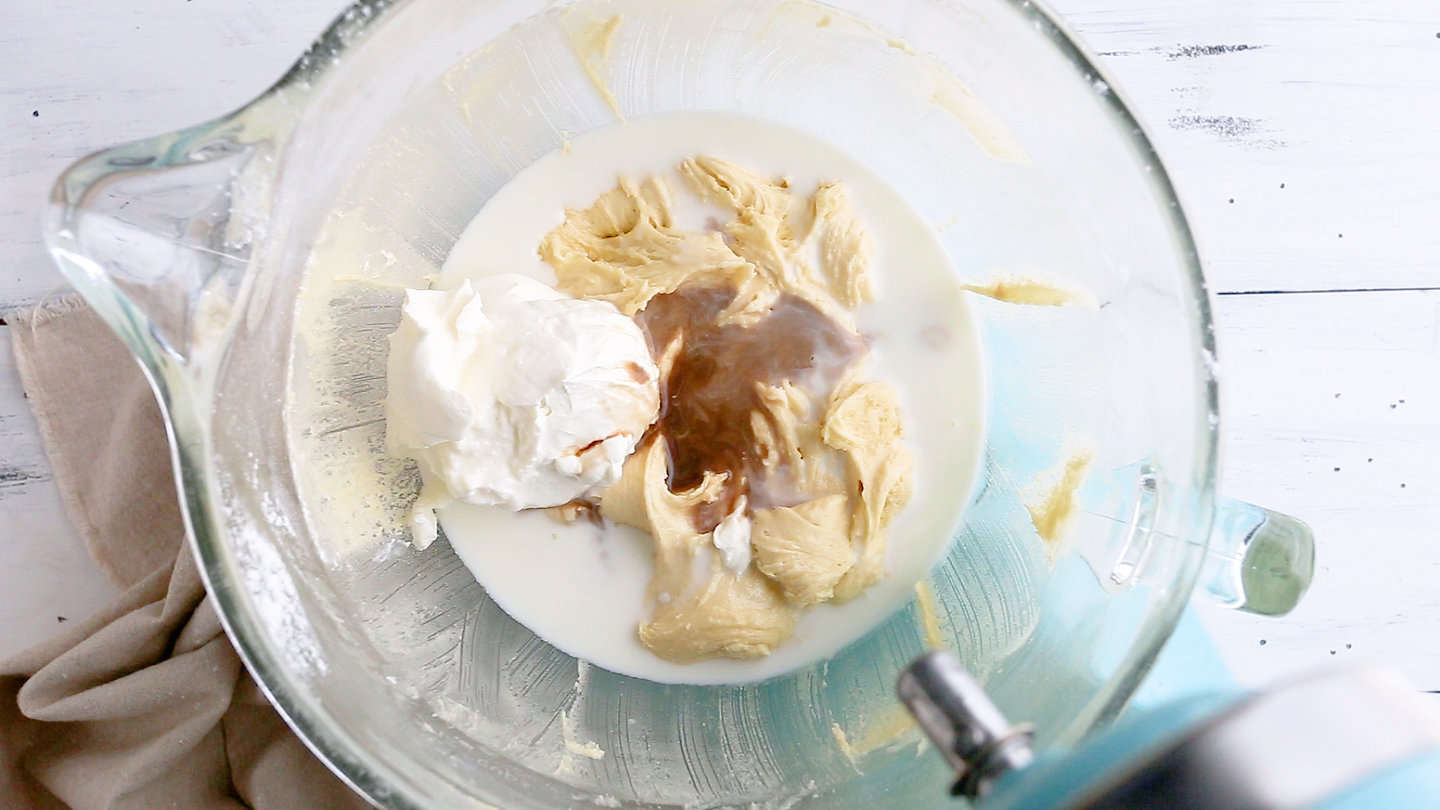
And stir them in until combined.
Step 6: Fluff
Mix on medium speed for 2 to 3 minutes, to aerate the batter and build the cake's structure.

Step 7: Bake
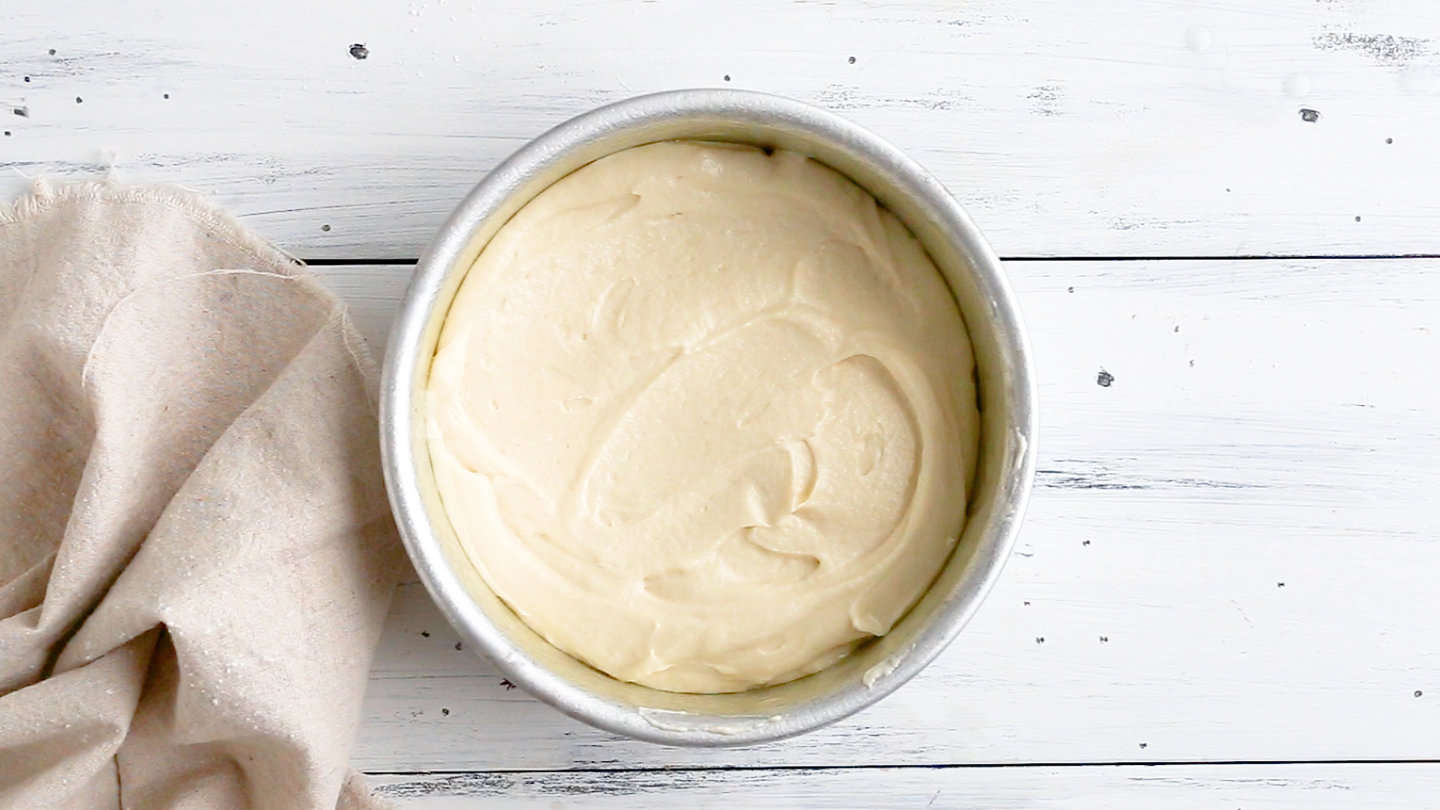
Divide the batter evenly between the prepared pans, then slide them into the oven on the middle rack.
You'll know your cake layers are done baking when they feel springy to the touch and a toothpick inserted in the center of the cake comes out clean or with a few moist crumbs.
Step 8: Cool
Allow the cakes to cool completely in the pans before filling and frosting.
Recipe FAQ
Most cake recipes start by creaming the butter and sugar, then alternately adding the dry and liquid ingredients in batches.
With this method, it's way too easy to under-cream the butter and sugar and over-mix the batter, which can make the cake tough.
Plus, it creates too many dirty dishes for my liking.
The reverse creaming method is much simpler.
Measure the flour, sugar, leavening, and salt into the mixing bowl, then work in the soft butter until the mixture resembles damp sand. Mix in the eggs, then add the dairy and vanilla extract, and you're done.
It's practically foolproof!
This cake is so versatile! It can be filled and topped in all sorts of ways. You can really let your imagination go wild!
Here are a few ideas to get your creative juices flowing: whipped cream frosting, chocolate Swiss meringue buttercream, vanilla Swiss meringue buttercream, pastry cream (filling), cream cheese frosting, vanilla frosting, or raspberry buttercream.
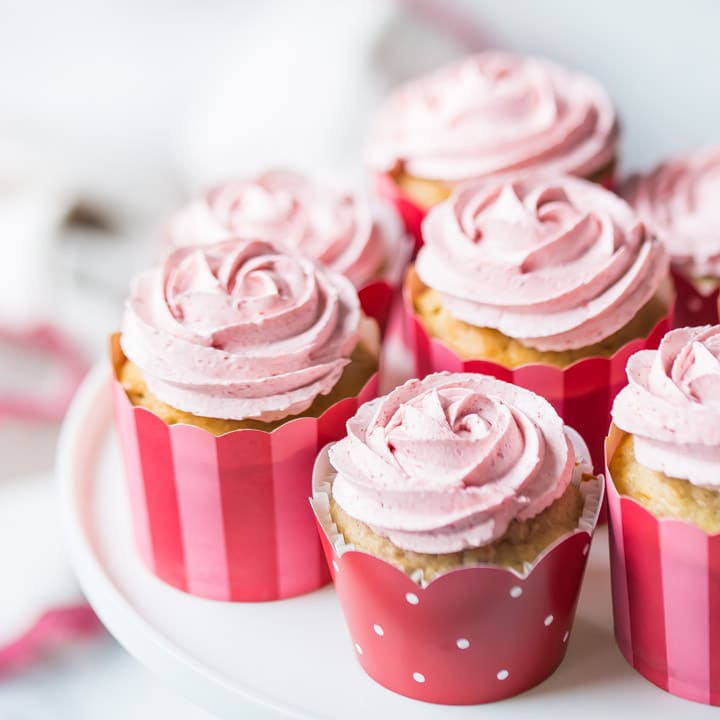
Yes, this cake can easily be made into cupcakes. This recipe will make 24 cupcakes.
Adjust the baking time to 16 to 20 minutes, and refer to my vanilla cupcake recipe for a full tutorial.
I baked my vanilla cake in three 6-inch pans. I just love the look of a tall cake!
But if you'd prefer to bake it as two 8 or 9-inch layers, you can totally do that.
Just keep an eye on the bake time, because a thinner, flatter cake will need less time than a smaller, thicker cake would.
This recipe can also be doubled and baked in a 12-cup bundt pan. Again, adjustments to the bake time will likely be necessary.
Recipe Tips
- Use Room-Temperature Ingredients: This recipe works best when the butter is at room temperature. You can set it out on the counter a few hours before making your recipe, or you can microwave it for 10 seconds, then turn it over and microwave it again for another 8 seconds. Allow ingredients like eggs and yogurt (if using) to come to room temperature before starting, too. Room temperature ingredients mix in more smoothly, so you don't end up with a lumpy batter.
- Measure All The Ingredients Precisely: Use liquid measuring cups for liquid ingredients and dry measuring cups for dry ingredients. Accurate measurements ensure the right balance of ingredients and prevent the cake from being too dry or too wet. Read more about this here: How to Measure Ingredients for Baking.
- Don't Overbake: Keep a close eye on the cake while baking and avoid overbaking it. Overbaking can lead to a dry cake. A few minutes before you think it will be done, flip on the oven light and view the cake through the window. If it doesn't look wet in the middle, crack open the door slightly and feel it. If it's springy, give it the toothpick test. If it comes out with a few moist crumbs, the cake is done. Insert a toothpick into the center of the cake; if it comes out with a few moist crumbs, the cake is done.
- Cool In The Pan: Allow the cake to cool in the pan. Cooling in the pan helps keep the cake moist.

How To Store This Cake
This vanilla cake should be fine at room temperature for a day or so. If you have a lot of leftovers, stash them in the fridge, tightly wrapped. They should be good there for a week or so.
Depending on the filling recipe and frosting recipe you've used, you might be able to freeze it as well. The cake itself should keep for a few months in the freezer.
Can This Be Made In Advance?
I love a good make-ahead dessert, and this white cake is a perfect example. The layers can be baked up to a few weeks in advance, which really helps take the pressure off when you're entertaining.
Once the cake is baked and completely cooled, wrap the layers tightly in plastic wrap and place them in the fridge. They can stay there overnight or up to a few days. Or slip the wrapped cakes into a zip-top bag and keep them in the freezer for several weeks.
When you're ready to fill, frost, and decorate, it's so much easier if the cake is cold.
You'll find it's much less crumbly that way. I like to frost my cakes straight from the fridge or freezer. No loose crumbs in the frosting, which really makes it much easier to decorate a beautiful birthday cake.
I know you are going to love this vanilla cake recipe! Bake it up for your next big occasion and get ready for tons of compliments!
Serving Size
Using three 6-inch cake pans to create a triple-layer cake, this recipe makes 8 servings.
The nutritional info in the recipe card below reflects a serving size of ⅛ the recipe.
More Classic Cake Recipes

Ingredients
- 1 ½ cups (187.5 g) cake flour, *
- ¾ cup (93.75 g) all-purpose flour
- 1 cup (200 g) granulated sugar
- 1 teaspoon (4 g) baking powder
- ¾ teaspoon (3 g) baking soda
- ¾ teaspoon (4.5 g) kosher salt
- ¾ cup (170.25 g) unsalted butter, softened
- 2 (100 g) large eggs
- ⅔ cup (153.33 g) sour cream, (Greek yogurt or buttermilk** can be substituted)
- ½ cup (122 g) milk
- 2 teaspoons (8 g) vanilla extract
Instructions
- Preheat the oven to 325 degrees F, mist three 6-inch cake pans*** with non-stick spray, and line them with circles cut from parchment paper.
- Place the cake flour, all-purpose flour, sugar, baking powder, baking soda, and salt in the bowl of an electric mixer, and stir on low speed to combine.
- Add the butter, mixing on medium-low speed until the mixture resembles damp sand (about 1 minute.
- Add the eggs, one at a time, scraping the bottom and sides of the bowl to be sure all of the ingredients are fully incorporated.
- Add the sour cream, milk, and vanilla.
- Mix on medium speed for 2 to 3 minutes, to aerate the batter and build the cake's structure.
- Divide the batter equally between the prepared pans, and bake for 30 to 40 minutes, or until a toothpick inserted in the thickest part of the cake comes out clean or with a few moist crumbs.
- Cool completely before filling and frosting.
Notes
** If you don't have buttermilk, you can substitute by stirring 2 teaspoons of white vinegar or lemon juice into ⅔ cup of regular milk. Allow the mixture to stand for 5 minutes, or until thickened and slightly curdled.
*** This layer cake can also be baked in two 8-inch or 9-inch diameter cake pans. The cake layers may bake up slightly thinner, and the bake times may need to be adjusted. Click here for the cupcake version of this recipe: Perfect Vanilla Cupcakes from Scratch.


Have not tried vanilla cake recipe yet, but I would like to know if there is a recipe for the frosting?!?
Hey Arlene! There are quite a few frosting recipes linked in the FAQ section under the heading "What is the Best Frosting to use for Vanilla Cake." For what you see here, I used the Whipped Cream Frosting which can be found here: https://bakingamoment.com/whipped-cream-frosting/. Hope that's helpful!
Why does it address how to make butter milk when the recipe calls for plain milk? Which does it require for the recipe?
Buttermilk is offered as a substitution for the sour cream. The recipe calls for both milk and sour cream, but if you don't have (or don't want to use) sour cream you can substitute buttermilk (or the homemade version of buttermilk) instead. Hope this makes sense!
Hi!
I need to bake a 3 layer 8inch cake since I don’t have a 6 inch pan. I was planning on doubling the recipe, do you think that is enough? I don’t mind having left overs but definitely want the three layers 1.5-2inches tall. Please let me know! Thanks!
Hey Kim! I think that should be more than enough and it will be a very generously sized cake. Good luck I hope you love it!