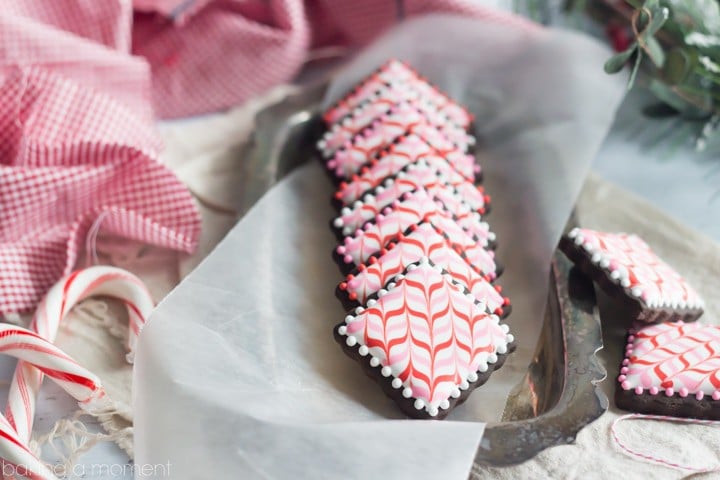
Iced Chocolate Peppermint Cookies
These dark chocolate peppermint sugar cookie cut-outs are decorated with pink and red candy cane stripes of royal icing! Follow my video tutorial and enjoy this fun and festive holiday recipe.

Today's post is coming to you a little later than I would have liked, for a couple of different reasons. One, I really wanted to make it extra, extra good. I don't want you to be intimidated by how pretty these cookies look. So, at the bottom of the post you will find my very first ever video tutorial. It ended up being a little bit harder to learn how to do video in the amount of time I allowed myself. I hope to get better at this with practice, but for now, I think it's decent enough to get the point across. Hopefully it illustrates just how "do-able" decorating cookies can be. And fun!
Also, I'm including a list of the products I used to make and decorate these cookies! I always get asked, inevitably, so I just decided to include a little shopping list for you here, right from the get-go. Please be advised that some of these are affiliate links, so I do earn a small commission from any purchases you might make. As always, they are products that I myself have purchased, use, and recommend.
And finally, I would like to share: the last couple of days have been really difficult, and I was completely derailed from my normal routine. Even today, I'm having trouble staying focused, after the tragedy that has ripped through my community. Things like this happen every day, around the world, and it's always terribly upsetting, but especially when it hits so close to home. My loved ones are safe, but my childrens' school was under lockdown for two days and our town was advised to "Shelter In Place," until local law enforcement could guarantee our safety from this sick and extremely dangerous person.
I never wanted this space to be political, or controversial in any way. I just want it to be a happy place. There's a lot of different opinions about why tragedies like this happen, and what should be done. But I only want to say that not a single day goes by that I don't remember what happened right around this time 2 years ago in Newtown, Connecticut. The terrifying events of this past Monday morning, in my small farm town, brought that sad day even more to the forefront of my mind. Let's all pause for a moment, send prayers to those who have lost, and count our many blessings.
And now on to happier subjects:
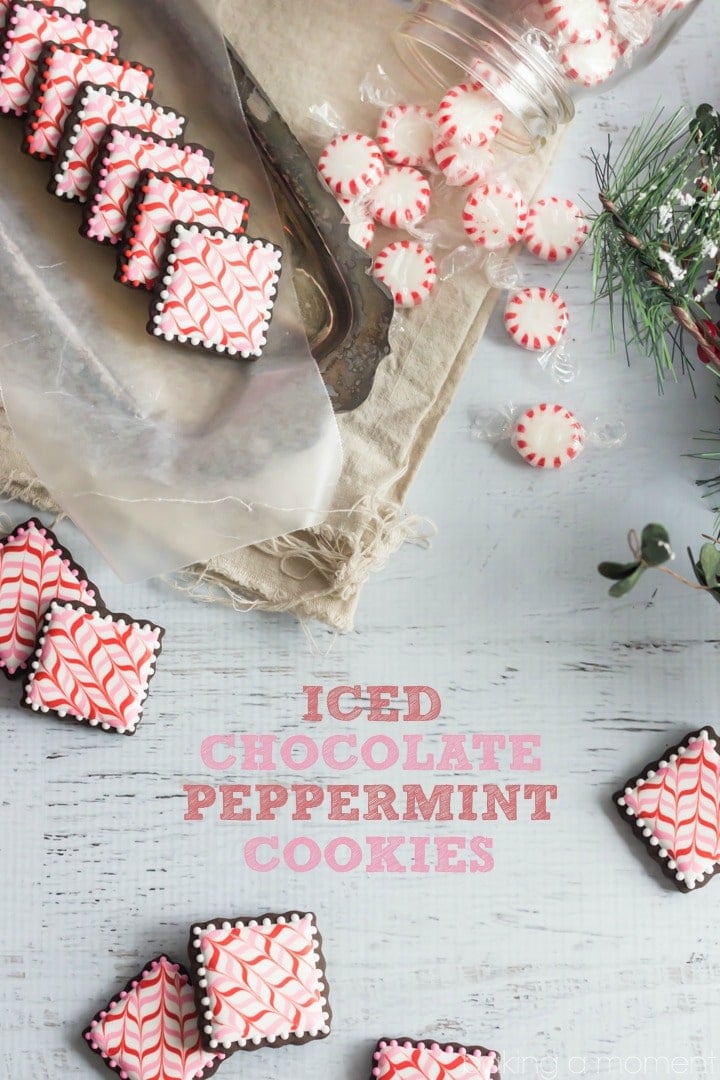
Christmas Cookies! Of the iced chocolate peppermint variety. I made these for the Food Blogger Cookie Swap, which is a really fun event that benefits a great cause. So three other food bloggers were the recipients of this yummy recipe. I hope they enjoyed them half as much as I loved making and decorating them.
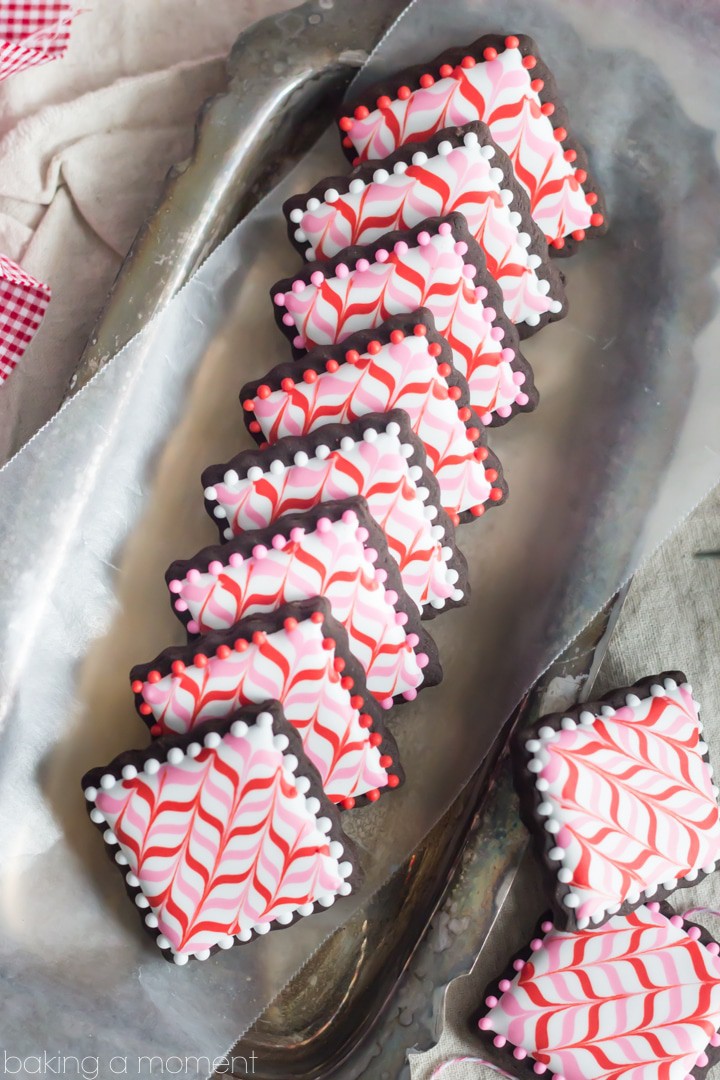
I can't decide what I like better, the pretty royal icing design or the chocolate-y cookie base. I love to play with my food, so I always enjoy the decorating part, but the cookie itself is so darn good. Which I think is no small feat. A lot of times, the prettier the cookie, the worse it tastes. But my Simply Perfect Chocolate Sugar Cookie recipe did not disappoint here. I used half regular cocoa powder, half black (dutched) cocoa, and the result was very much like a soft-in-the-center Oreo cookie, with a hint of cool, Christmas-y peppermint. I added 1 teaspoon of peppermint extract to this recipe.
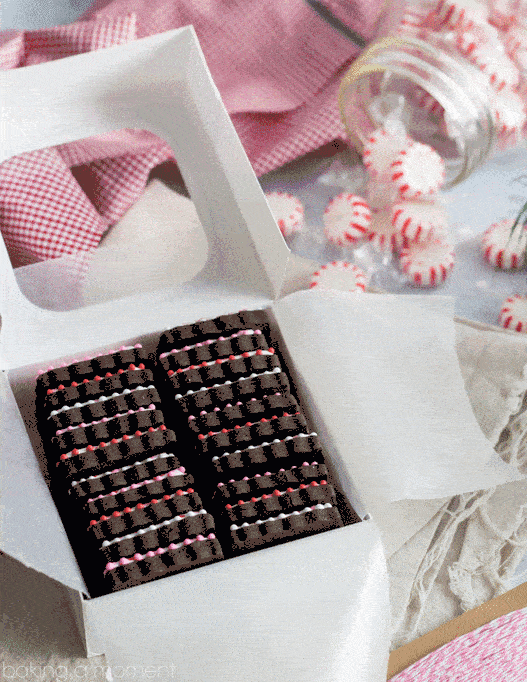
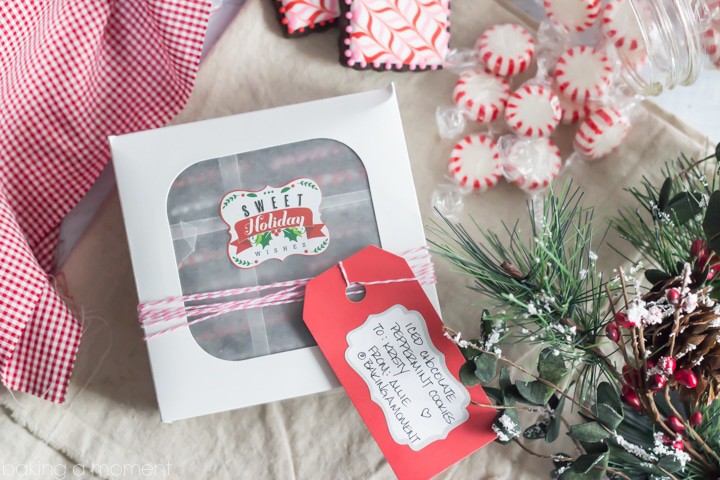
As you can see, this kind of cookie is great for shipping to loved ones, because not only are they sturdy, but they stack up so neatly with very little airspace in between. This is so key to having the contents arrive intact. I lined a treat box with wax paper so that the cookies wouldn't make oil stains all over the paper box. I saw one of the recipients Instagrammed me their package when it arrived, and it looked pretty good, so I guess it worked!
And now for the video! The decorating technique is really not that hard, as long as your royal icing is the proper consistency (think Elmer's glue for this technique) and you work relatively quickly, before the icing has a chance to crust over. Do take notice that the tip of my pastry bag is hovering slightly above the surface I'm decorating. Pulling up and away is what really helps the lines to be straight and not squiggly! You're letting gravity do the work for you here.
As an amazon associate I earn from qualifying purchases.
Here is that list of products I promised you:
- King Arthur Flour Black Cocoa
- Ghirardelli Unsweetened Cocoa Powder
- Peppermint Extract
- Parchment Paper Sheets
- Rolling Pin Rings
- Square Cookie Cutter Set (I used the smallest one in the set)
- Meringue Powder
- Red Gel-Paste Food Coloring
- Pink Gel Paste Food Coloring
- Disposable Piping Bags
- Piping Couplers
- Small Round Piping Tip
- Treat Boxes
I hope you enjoy!

Ingredients
- 1 batch Simply Perfect Chocolate Sugar Cookies, (with 1 teaspoon peppermint extract added to the dough), baked and cooled completely
Royal Icing
- 2 tablespoons (29.57 g) meringue powder
- 5 tablespoons (73.93 ml) water
- 2 ⅔ cup (320 g) powdered sugar
- Additionally- gel paste food coloring and a few teaspoons more water to thin the icing to the proper consistency.
Instructions
To Make the Royal Icing
- Place the meringue powder and water in a large bowl and whisk until all the powder has dissolved and the mixture is frothy.
- Add the powdered sugar and stir until combined.
- Whip on high speed until the icing is very fluffy and stiff, about 5-7 minutes. It should hold stiff peaks.
- Transfer to an air-tight container until ready to tint and pipe.
To tint and thin to proper consistency:
- Spoon about ½ cup of royal icing into a small bowl and add a few drops of gel-paste color. Stir in until desired color is reached. (Some colors, such as red and black, will deepen over time.)
- Add water, about an eighth of a teaspoon at a time, until the icing is the consistency of Elmer's glue. It should smooth over on its own after a few seconds.
- Place in piping bags fitted with decorating tips, and turn them tip side down into a drinking glass lined with wet paper towels.
- Use immediately. (Royal Icing will become thin and runny, and may separate, over the course of about 24 hours.)


Can someone please tell me if this yummy cookie is suppose to somewhat soft and chewy or slightly crunchy.
I made a batch and they turned out a little harder than my usual sugar cookie. They are not burnt just crisp.
Thank you so much!
They are meant to be like shortbread. A sturdy cookie with a little bit of bite, but they should crumble in your mouth. Hope this helps!
Thank you for replying- that explanation did help! One more question- are you using white or light pink to flood these yummy chocolate peppermint cookies
Of course! I used white but you can do it however you like!
Really late to this beautiful cookie page but I'm so excited to make these as a gluten free option for an upcoming ladies church event. My question for you is; should I use peppermint extract or mint extract. I've heard some people say to use mint instead of peppermint because peppermint tastes like toothpaste. I can't imagine your cookies taste like toothpaste with all the positive reviews. Is that a brand issue? Help! I don't want to mess up the few gluten free cookies this shin dig will have!
Hey Chelsea! I actually love the taste of peppermint. It reminds me more of a candy cane than it does toothpaste. And I think it depends, because I'd imagine that different brands of toothpaste would taste slightly different. If you do choose to use mint extract instead, that would be a blend of different kinds of mint. So it would have peppermint, along with probably spearmint and wintergreen, maybe even some other kinds of mint that I don't even know about lol. It's up to you!
Thank you for so many wonderful recipes and helpful hints to make everything turn out perfectly!!!
It's my pleasure Sheri! Hugs!
These are absolutely beautiful. I made the sugar cookies yesterday and they turned out perfectly. Today I’m going to tackle the icing. I have one question. How long did you let the white icing dry before piping the stripes? Or can I do that right away? Thanks so much.
So happy you like them! Pipe on the stripes right away, while the icing is still wet. That way everything will be level and smooth, rather than more 3d/textured. Hope that makes sense! Have fun decorating!
My kid is obsessed with peppermint! This is an excellent recipe!
Hi Allie! Question about your Royal Icing recipe...does it dry rock hard? I've been on the hunt for a RI recipe that won't break your teeth when you bite into it, but still dries firm enough to stack cookies. Thanks for your help an awesome recipes!
Hi Em! It's my pleasure! To answer your question, yes it does dry to a candy-like finish. I usually make it really stiff and fluffy, and then thin it down with water (just a drop or two at a time) until it gets to the right consistency where it can smooth over easily and not be too thick on the cookie. I agree, no one wants to break a tooth! Hope that's helpful; let me know if I can answer any other questions!
Thanks for the quick reply, it's awesome (and appreciated!) that you're so responsive to your readers!
🙂
I made these little beauts for a cookie swap that I held over the Christmas holiday. I asked my guests to bring 2-3 dozen of each type of cookie. I used a smaller than average cookie cutter and had to almost triple the recipe to get 2-3 dozen. But I did not mind because the cookie dough is fabulous! I made them a week prior and they froze nicely. They were not as sturdy as I was expecting them to be, so beware they may still be soft and break if you aren't careful. I will be using this recipe again. I am glad that Allie put the icing tutorial in the post for icing deficient people like me! My cookies did not look at all like hers, but they were still the most beautiful cookies on the table for sure. I may try the icing and decorating again when I have more time to devote to the process. If you are rushed, I would not recommend decorating them as pictured. You may end up becoming frustrated and vow to never use royal icing again (like I did). Anyway, those are my takeaways. I think this is a great recipe.
Thanks for the great feedback Holly!
Allie, thank you for these beautiful cookies and tutorial! I've looked through literally hundreds of recipes for a unique cookie to make for my mom's cookie exchange and yours is the winner for this year!
Question: did you use the same piping for the dots on the edges or does that have to be a little thicker to hold shape?
Thanks very much. Keeping your community in my thoughts. Happy Holidays!
I'm so glad you like these cookies Christina! Gosh it brought me back when you mentioned about my community. That was just about a year ago and it still makes me shudder when I think about it. I'm so glad it's all over. As for the piping, I did use the same icing for that, but that's a really great question. A thicker consistency might actually be a little easier. But I find that if I keep the dots quite small, they manage to hold their shape without running over the edge of the cookie. I hope that's helpful! Thank you for reading and for the great question; I hope your cookies are the hit of the cookie exchange! Happy Holidays to you as well!
The Chocolate Sugar Cookie recipe does not have peppermint extract, but you note to add 1 tsp. Is it in addition to the the 1 t vanilla extract or to replace vanilla extract.
Really you could do it either way, Debbie! It's totally up to your taste. I believe when I noted to add it, I meant in addition to, but you could certainly replace if you felt so inclined. Thanks so much for reading and for the great question!