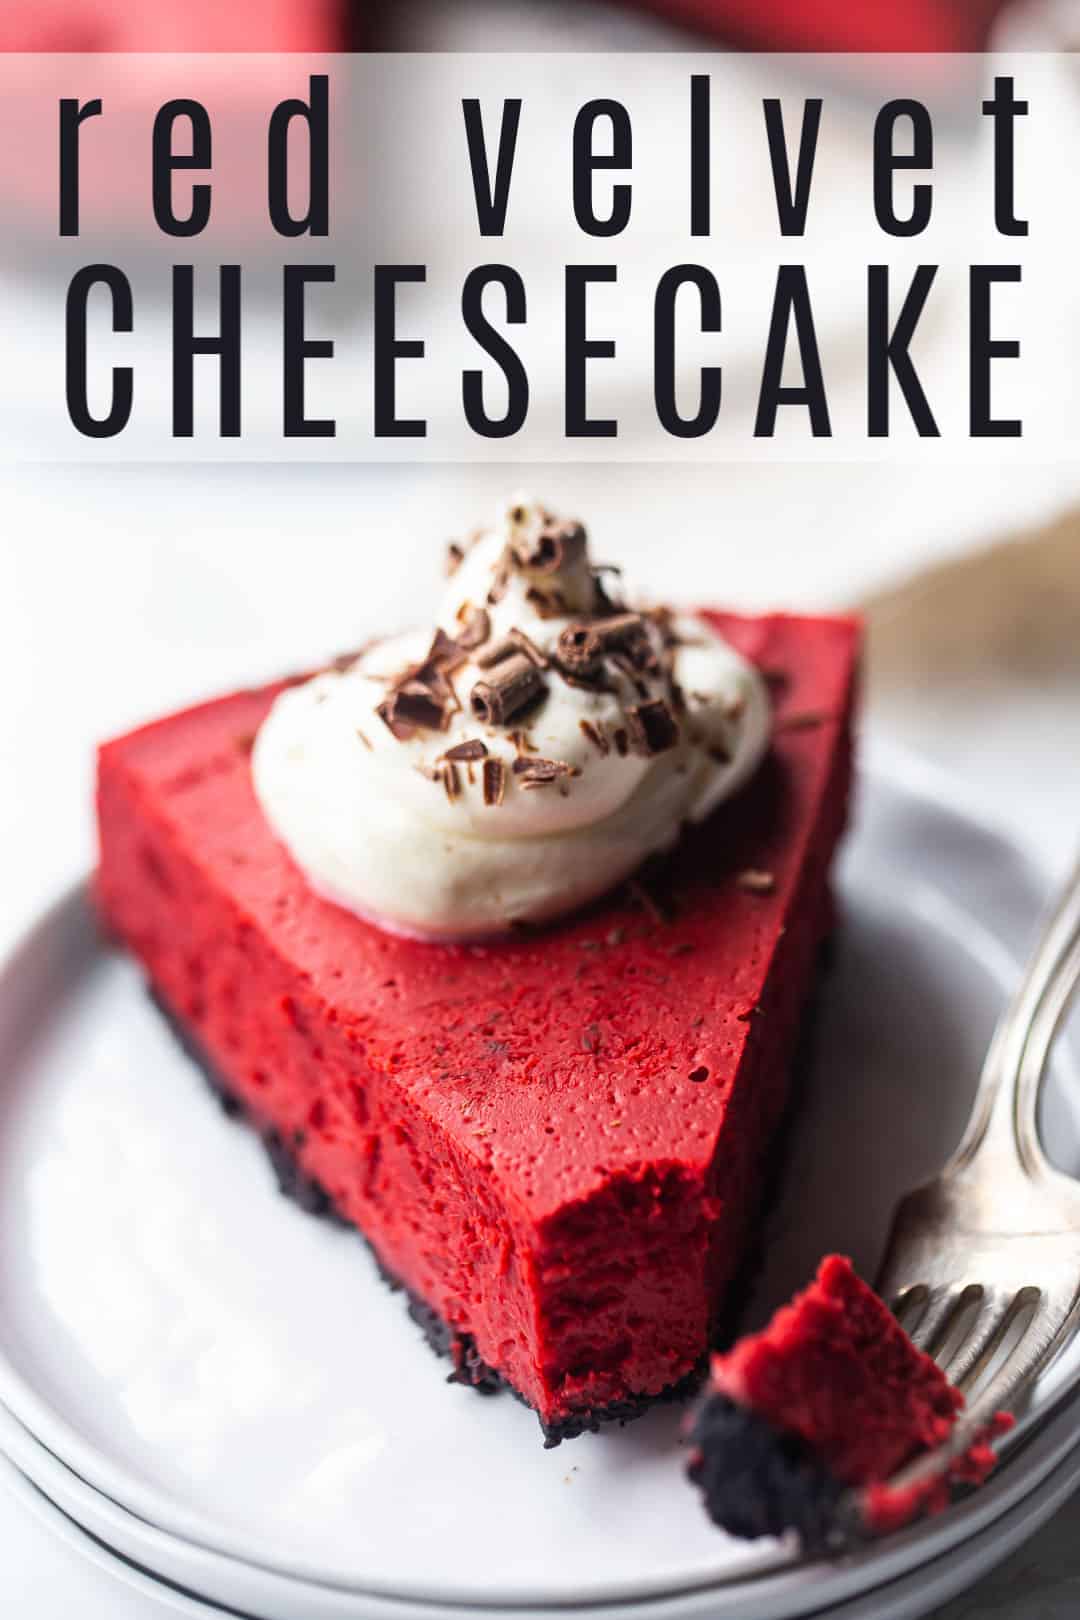
Red Velvet Cheesecake
Your loved ones will adore this gorgeous red velvet cheesecake! With a crunchy Oreo crust & a creamy filling infused with cocoa and buttermilk. YUM!

I’m baaaaack!
If you read my most recent Jam Thumbprint Cookies post, then you know I was in Ireland all last week on a whirlwind tour! I had an amazing time and the country and its people are so beautiful, in every way!
If you haven’t yet checked it out, be sure to have a look at my “Ireland” story highlight on Instagram– you can check out all the amazing places we stayed and all the delicious foods we sampled.
And there’s a sweepstakes where you can enter to win a trip of your very own! Click on over to see all the details, and to enter: Ireland Sweepstakes.
Being on this trip has inspired so many authentic Irish recipe ideas, but sadly they will have to wait a few weeks. Stay tuned!
For now we are smack in the middle of Valentine’s Day season, and that means I’m all about romantic treats like these pretty pink meringue cookies, these chocolate covered strawberries, and these chocolate molten lava cakes.
And of course red velvet!
I’ve got lots of red velvet recipes on this site, from cake to cupcakes to brownies and cookies, but for today’s post I thought it would be fun to share a red velvet cheesecake.
Cheesecake is just so special, from its rich, creamy filling right down to its crunchy cookie crust. It’s perfect for a party and everybody always goes crazy for it. Meanwhile it’s super-simple to make and stores beautifully, so it’s a great make-ahead dessert.
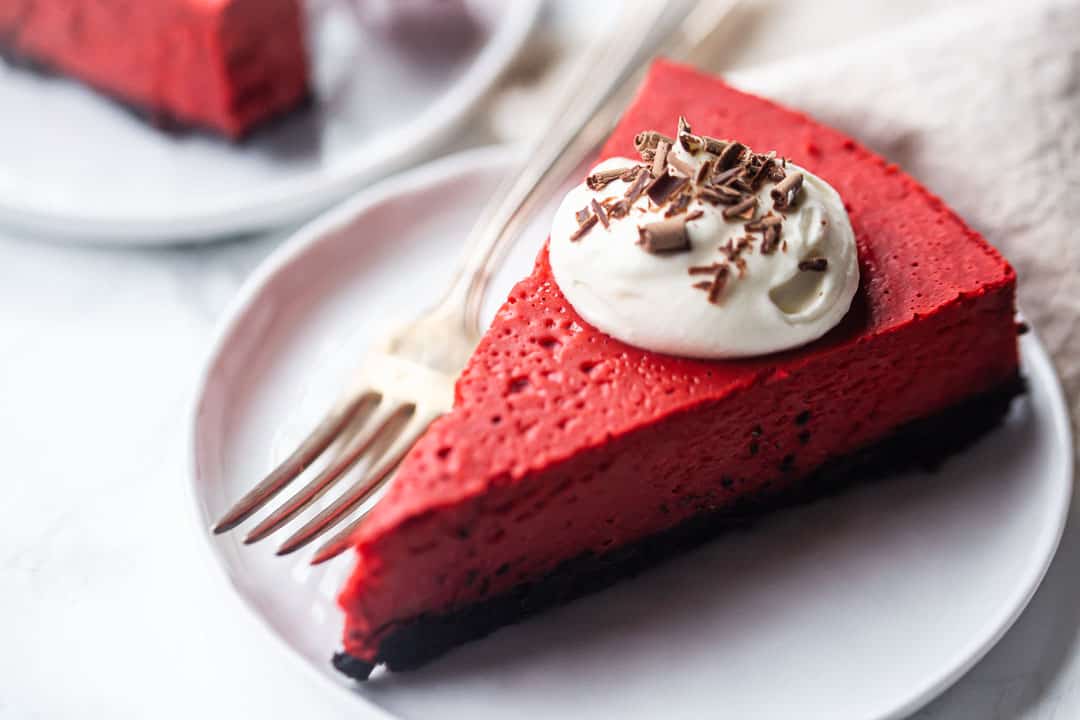
This version is just stunning to look at, and it’s brimming with all the luxurious red velvet flavors everyone craves, making it perfect for this (or any) time of year!
WHAT IS RED VELVET CHEESECAKE?
Red velvet cheesecake is basically just a cheesecake version of the southern classic: red velvet cake.
It’s got a crunchy chocolate cookie crust, paired with a rich and creamy New York-style cheesecake filling that’s got all the wonderful flavors of red velvet.
WHAT DOES RED VELVET TASTE LIKE?
The predominant flavors of red velvet are cocoa and buttermilk.
The cocoa taste is a little subtle. It’s not overly chocolate-y, but you do get a hint of that earthy flavor.
Buttermilk provides a rich, creamy taste with a slight tanginess. There’s also a small amount of vinegar, which enhances that flavor, and is traditional in red velvet.
You will also get a lot of vanilla flavor in this cheesecake. It’s a little sweet and very fragrant.
This combination of flavors is just amazing! You’ll love it and so will your friends and family.
HOW TO MAKE RED VELVET CHEESECAKE
This recipe breaks down into 3 main components:
- Crust
- Filling
- Garnishes
Let’s start with the crust!
THE CRUST
This is just your basic Oreo cookie crust, made by grinding chocolate sandwich cookies to fine crumbs, tossing them with melted butter, and then pressing the mixture into an even layer in the bottom of the pan.
For lots more info on how to do this, check out this page: Oreo Crust.
If you don’t want chocolate, you could replace this with a graham cracker crust or even swap out vanilla wafers for the Oreos.
THE FILLING
This is where all the magic happens!
This filling is so creamy-dreamy, with a swoon-worthy red velvet flavor, and it’s pretty simple to make!
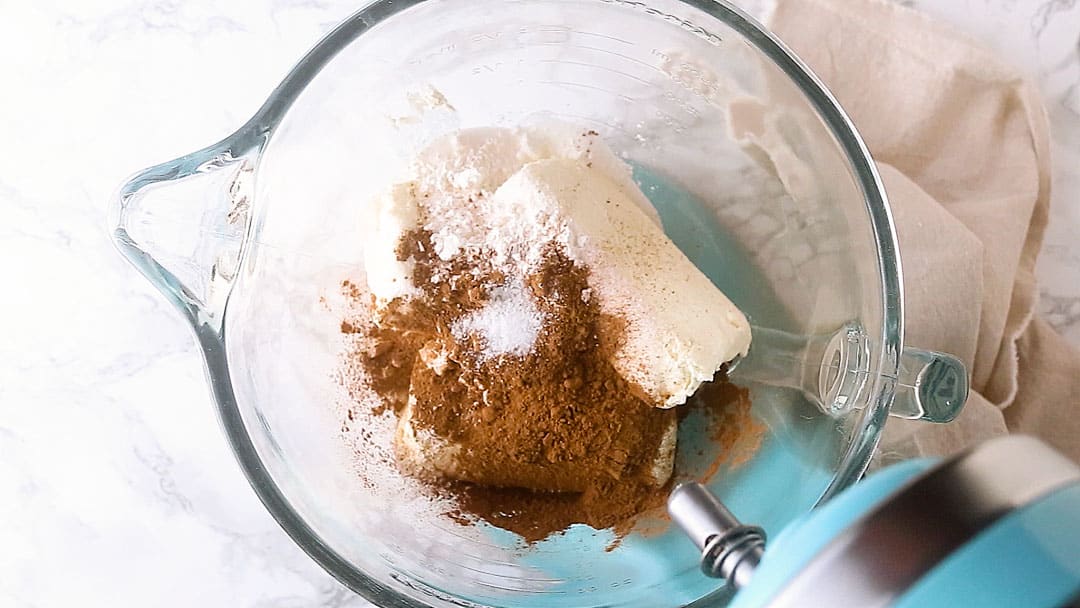
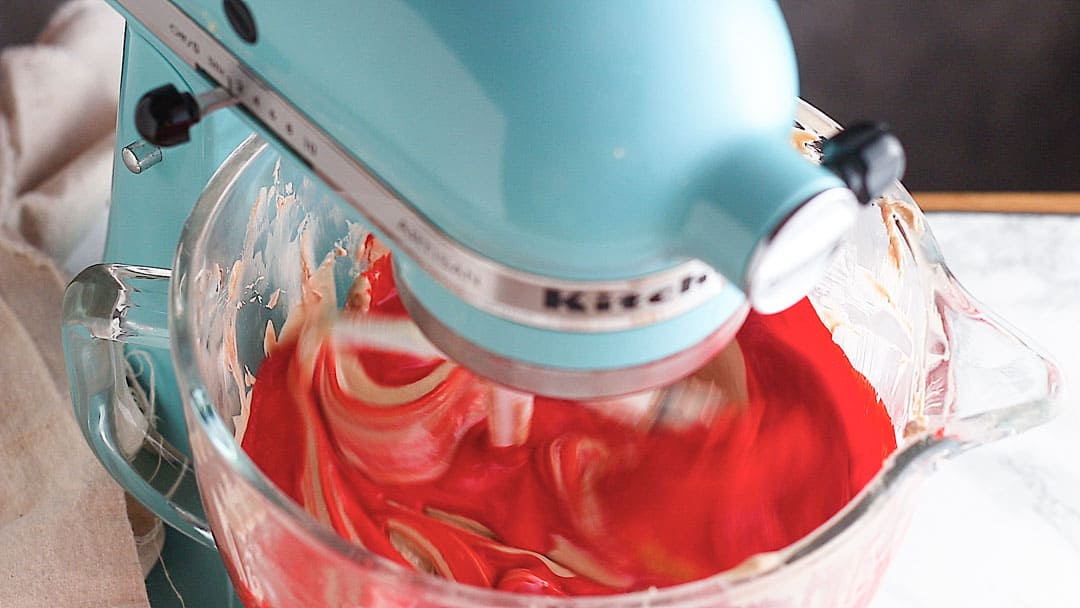
Start by combining cream cheese, sugar, cornstarch, cocoa powder, and salt in a large mixing bowl.
Beat these ingredients together on medium-low speed, just until they’re creamy and combined. You don’t need to whip in a lot of air, that will only cause air bubbles and maybe even cracks!
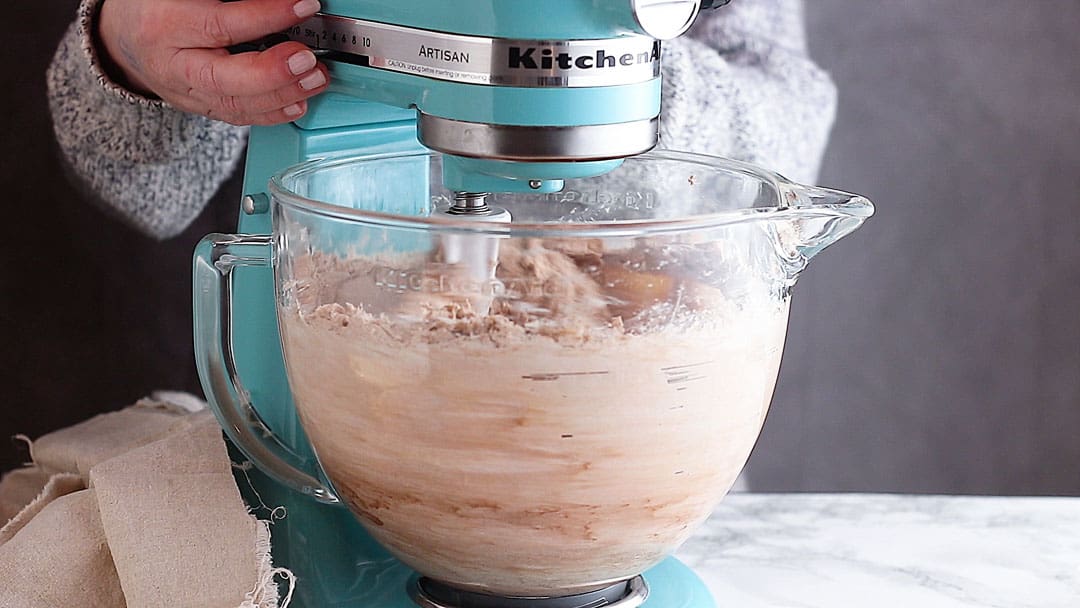
Next, add in the eggs. Beat them in one at a time, stopping to scrape the bottom and sides of the bowl after each addition. Don’t add the next one until the last one is completely incorporated. This is really important- so you don’t get lumps!
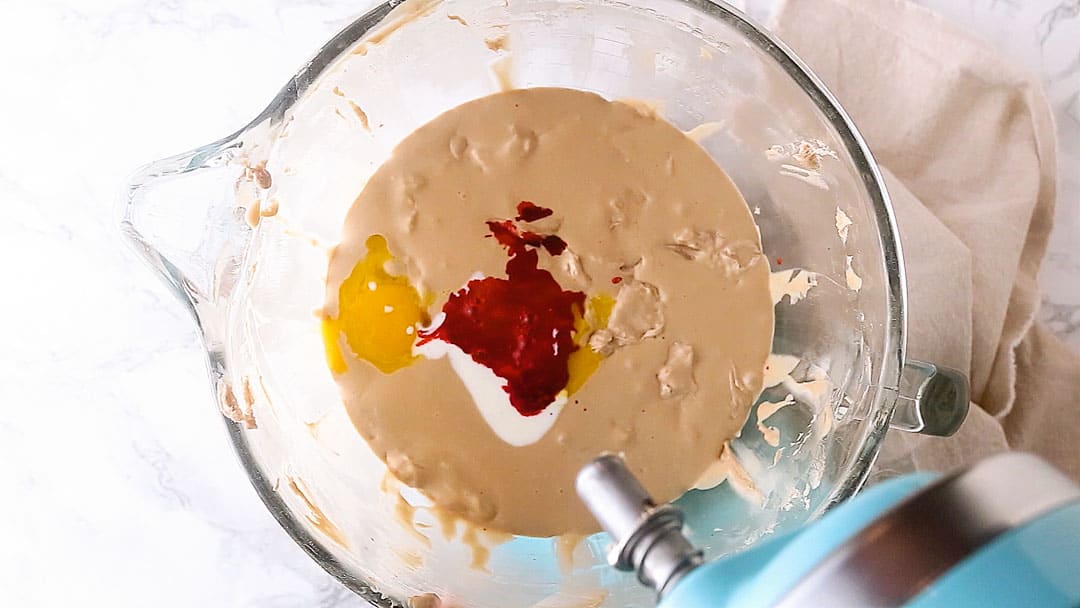
Now you’re going to add an extra egg yolk, a bit of buttermilk, red food coloring, vanilla, and a touch of white vinegar.
If you don’t have buttermilk, I’ve got instructions in the recipe card for how to make a reasonable facsimile. You could also substitute an equal amount of sour cream or Greek yogurt.
This recipe calls for the smallest amount of red food coloring needed to create a true red color. I think some recipes way overdo it on this ingredient. You may think at first that the color doesn’t look deep enough, but know that as the cheesecake cooks and cools, the color will intensify. Use liquid food coloring for this step.
The vinegar should be plain white vinegar. White wine or champagne vinegar would probably work in a pinch.
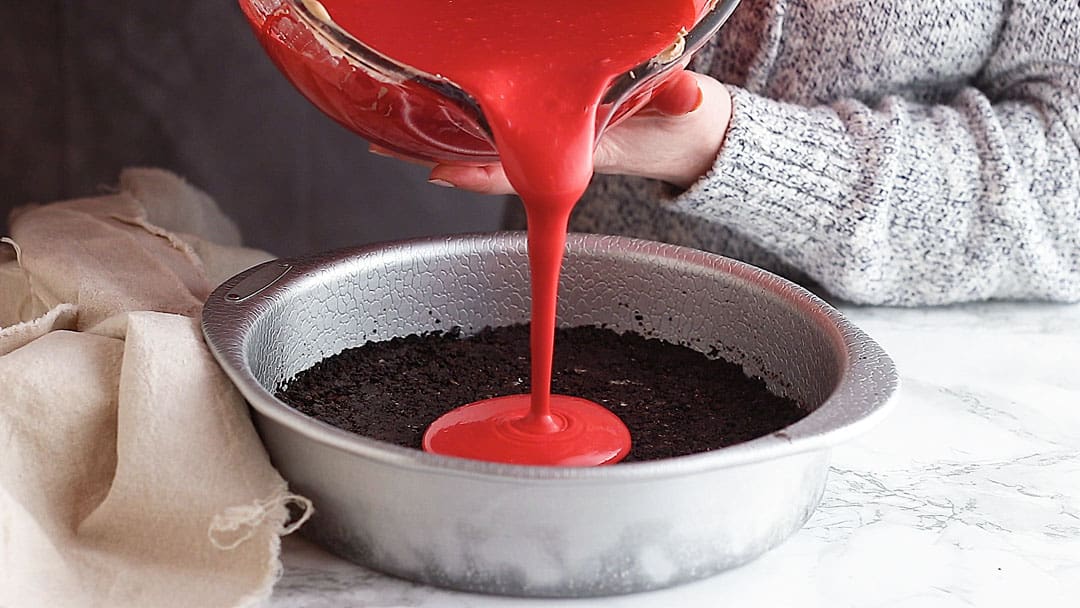
Pour this batter over the chocolate crust, then place the unbaked cheesecake inside a larger pan and pour water all around it. This is what’s known as a “water bath” or “bain marie,” and it will provide a more gentle heat for the cheesecake, so it doesn’t crack as it bakes and cools.
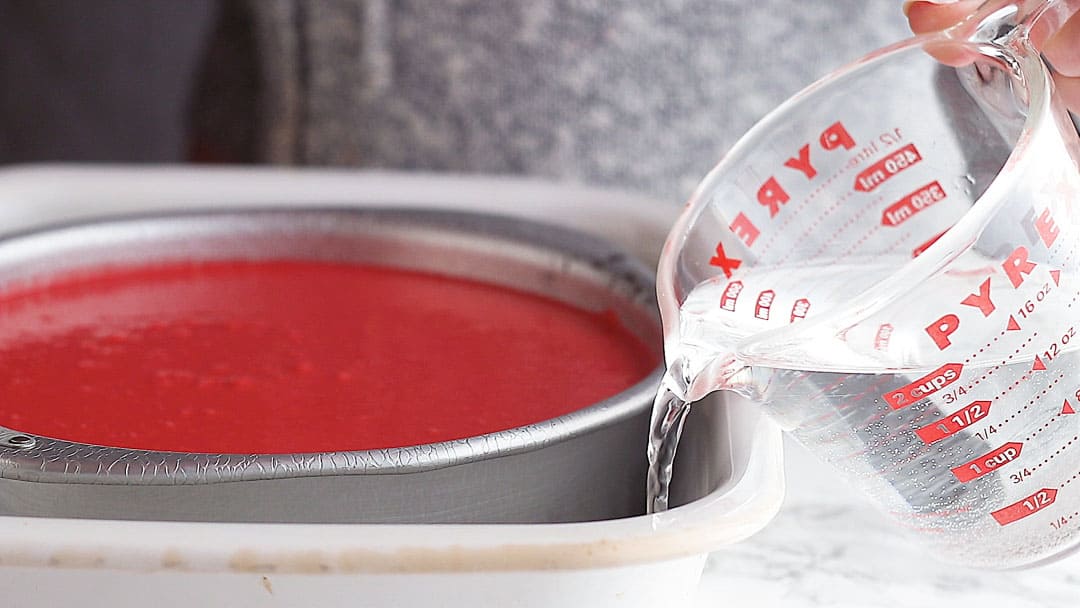
Bake this until the sides are set but it’s still a bit wobbly towards the center. Remember it will continue to cook and set up as it cools!
It’s best to allow this cheesecake to cool down slowly. I’ve got specific instructions on that in the recipe card below, but know that this recipe works best if you allow plenty of time for it to bake and chill. It’s probably best to make it the day before you plan to serve it.
HOW TO REMOVE IT FROM THE PAN
You may have noticed I call for a regular cake pan for this recipe, rather than a springform pan. I just really don’t like springform pans! They always, always leak for me, even if I wrap them tightly in foil.
Sometimes they’re necessary, but I really don’t think you need to use a springform pan for this cheesecake recipe.
Once the cheesecake has been chilled, it becomes quite firm.
And if the pan has been well-greased and lined with parchment, it’s easy enough to just flip the cheesecake right out, and then invert it onto your serving platter.
If you have any trouble at all, run a thin knife around the edge and warm the bottom of the pan slightly, to loosen any butter or grease that may have congealed in the fridge. This can be done with a hot towel, or you could even run the bottom of the pan over a burner on your stove. Just keep the heat low, you wouldn’t want to burn anything!
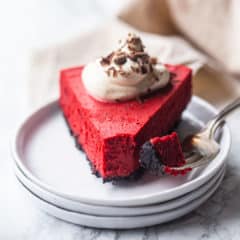
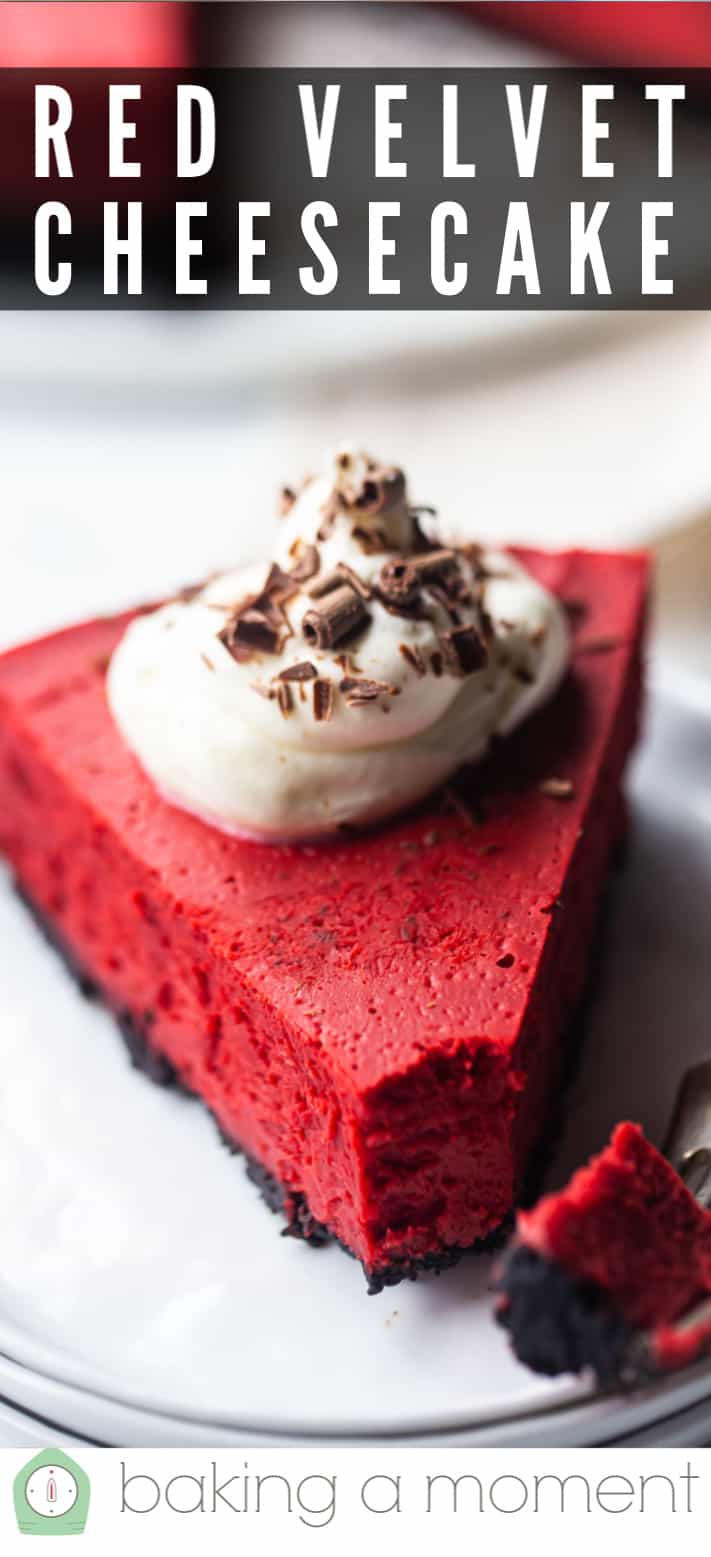
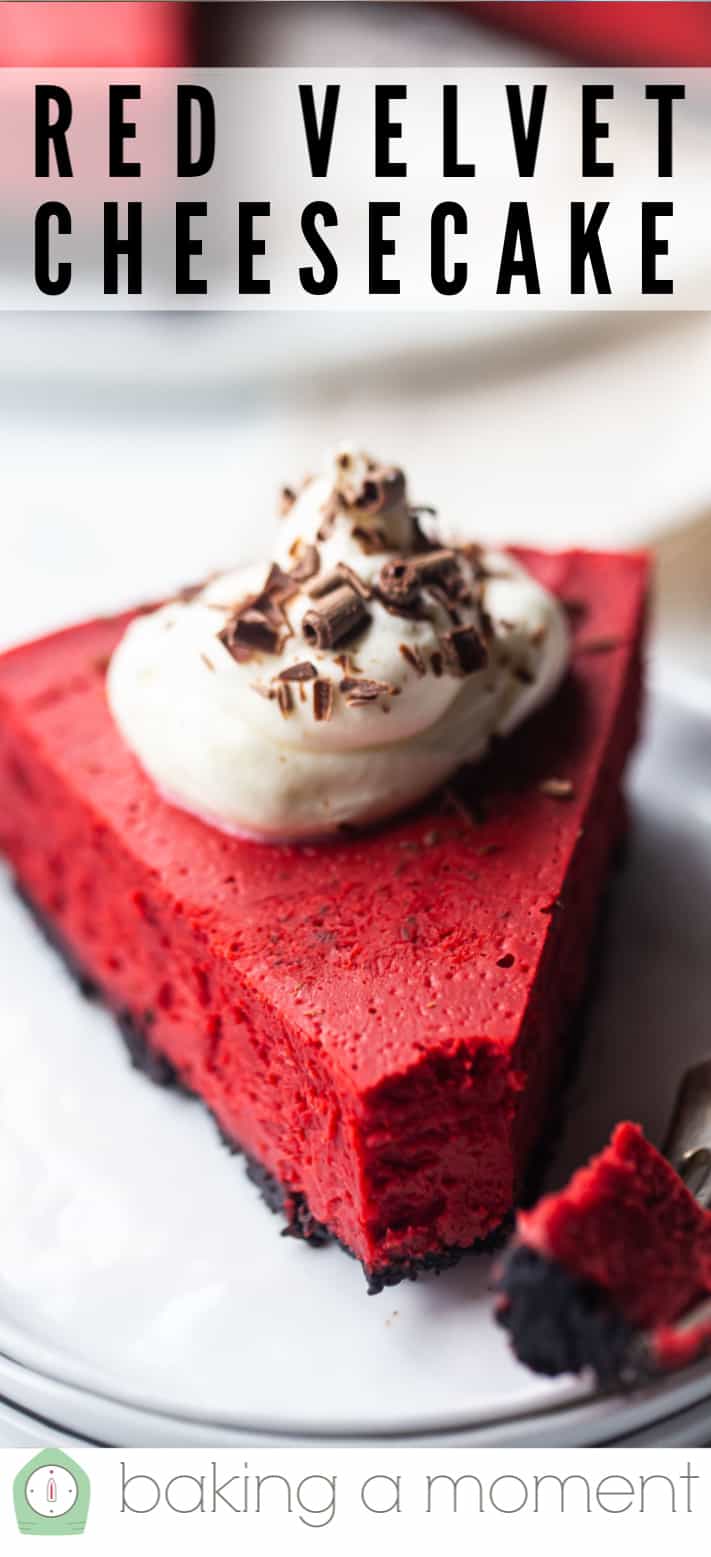
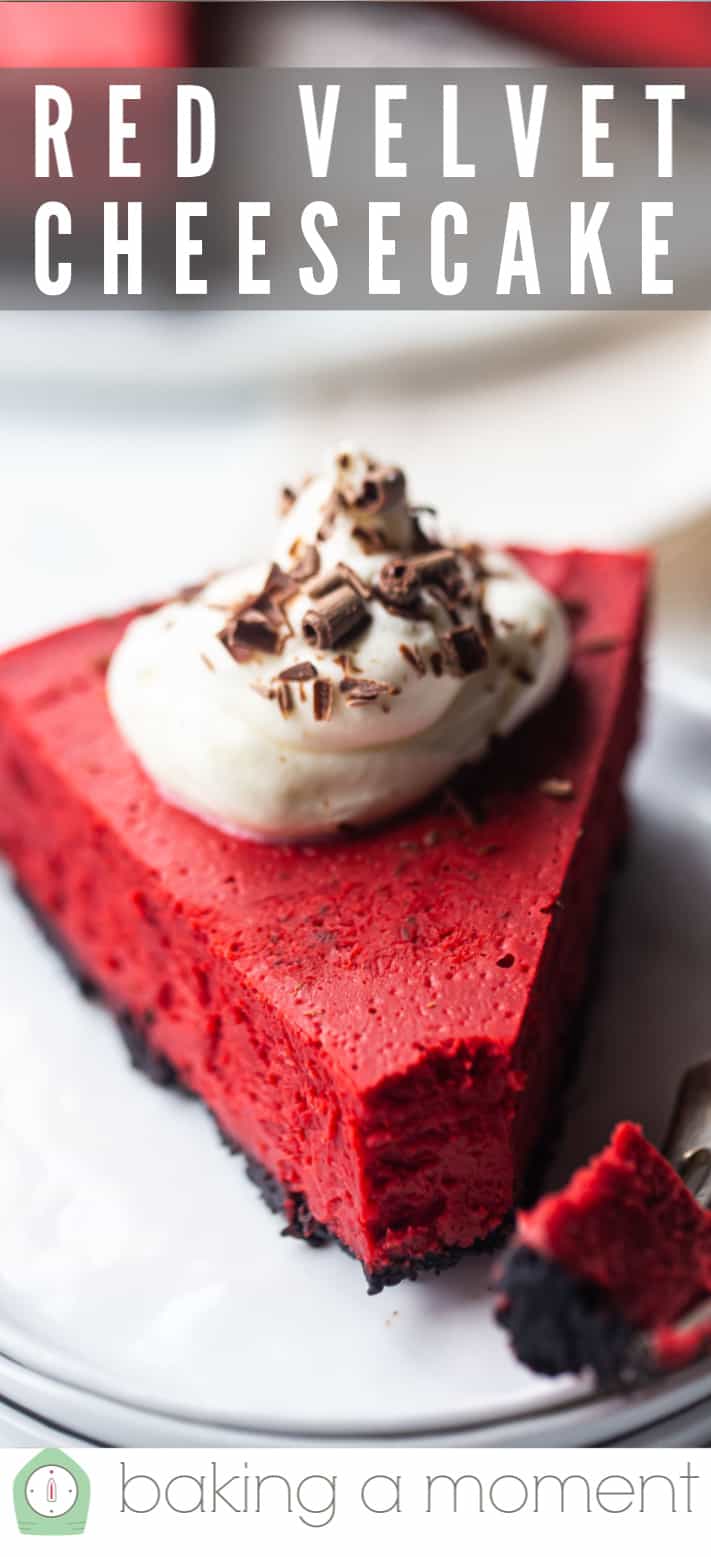
THE GARNISHES
These garnishes are totally optional, but I really love how pretty this cheesecake looks with a dollop of whipped cream and a few chocolate shavings!
You’ll need about 1/2 cup of heavy cream, whipped to soft peaks with 1 tablespoon of powdered sugar (or to taste).
For the chocolate shavings, just run a veggie peeler down the side of a bar of chocolate. You can see what this looks like by viewing the video in the recipe card below.

WHEN TO SERVE RED VELVET CHEESECAKE
With its vibrant red color, this dessert couldn’t be more perfect for Valentine’s Day or Christmas!
You could also swap out the chocolate shavings for fresh blueberries, and it would make a perfectly patriotic dish for the Fourth of July or Memorial Day. Red, white, and blue baby!
HOW LONG DOES RED VELVET CHEESECAKE KEEP?
It’s fine to leave this cheesecake out at room temperature for a few hours. But if you have any leftovers, it’s best to refrigerate them.
They will last for at least a week or two in the fridge.
CAN YOU FREEZE IT?
Cheesecakes freeze beautifully!
Wrap it tightly and this should last in your freezer for several months. Thaw in the fridge before serving.
As an amazon associate I earn from qualifying purchases.
Red Velvet Cheesecake
Ingredients
For the Oreo Crust:
- 24 Oreo cookies
- 5 tablespoons (73.93 g) unsalted butter,, melted
For the Red Velvet Cheesecake Filling:
- 24 ounces (680.39 g) cream cheese, (3 blocks), softened
- 1 cup (200 g) granulated sugar
- 3 tablespoons cornstarch
- 2 tablespoons unsweetened cocoa powder
- 1/2 teaspoon kosher salt
- 4 eggs, , large
- 1 egg yolk, , large
- 1/4 cup (59.15 ml) buttermilk*
- 1 1/2 tablespoons red food coloring
- 2 teaspoons vanilla extract
- 1 teaspoon white vinegar
For the Garnishes:
- sweetened whipped cream
- chocolate shavings**
Instructions
To Make the Oreo Crust:
- Mist a 9-inch diameter round cake pan with non-stick spray and line with a circle cut from parchment.
- Place the Oreo cookies in the bowl of a food processor and pulse until finely ground.
- Drizzle in the melted butter and toss together until combined.
- Press the mixture into the bottom of the prepared pan.
To Make the Red Velvet Cheesecake:
- Preheat the oven to 400 degrees F.
- Place the cream cheese, sugar,cornstarch, cocoa, and salt in a large mixing bowl, and beat together on medium-low speed until smooth.
- Scrape the bottom and sides of the bowl with a silicone spatula, then beat in the first egg.
- Continue adding eggs, one at a time, stopping to scrape the bottom and sides of the bowl after each addition.
- Stir in the egg yolk, buttermilk, red food coloring, vanilla, and vinegar, and pour the batter over the crust.
- Place the unbaked cheesecake in a larger dish, and pour water into the larger dish until it comes about halfway up the sides of the pan.
- Bake for 15 minutes at 400 degrees F, then lower the oven temperature to 300 degrees and bake for an additional 70 minutes, or until the cheesecake is set around the edges but still a little wobbly towards the center.
- Turn the oven off and leave the cheesecake in to cool down slowly, with the oven door slightly ajar.
- When the cheesecake has reached room temperature, transfer it to the refrigerator to chill for at least 2 hours (or overnight).
- Just before serving, flip the cheesecake out of the pan and invert onto a serving plate.
- Garnish with sweetened whipped cream and chocolate shavings.


This looks fabulous! Any tips for working with cream cheese? I often get a grainy texture. Not sure if it’s too cold, if my mixer is too slow (it’s kind of an old one) or what is causing that.
I can’t rate, have not tried. I would just like to see you flip the cake out
of the pan and invert it on a plate.
Will definitely include that in the next cheesecake recipe I make, in the video! Thanks for the suggestion!