Easy French Baguette Recipe
Craving a crusty French loaf? Look no further than this easy baguette recipe. Only 4 ingredients, and it’s mostly downtime! You can do this!

Here at my house, I’ve been knee-deep in bread baking. I’m on a real kick!
In the last few weeks, I’ve shared cornbread and soft whole-wheat bread, and I’ve also got a fantastic soft pretzel recipe that you’ve got to try. It would be perfect for Superbowl Sunday!
But today’s recipe has always haunted me.
My family loves a good crusty French baguette. We eat this kind of bread with so many things!
It’s so chewy and yeasty and good. But I’ve always been afraid to try making it myself.
Everything you hear says it’s complicated and fussy, and no one but a French boulanger could ever get it right.
WRONG! Here’s living proof that anyone can make a killer loaf with this easy baguette recipe.

You see that? Is that gorgeous homemade bread or what. I made that! It was pretty easy! And I’m not even an expert bread baker (talk to me about cakes, though!).
I am over the moon about that crunchy, splintery outer crust. See how it shatters? And the interior- soft, pillowy, and so airy. It’s perfection.
If I can do this, so can you. Don’t let anybody tell you otherwise!
What is a baguette?
When you picture a scene in France, do you envision a girl in a striped top, wearing a beret, and riding a bicycle with a basket full of long loaves of French bread?
Those long loaves are called “baguettes.” (The term comes from the Latin word for “stick.”)
They are iconic, and France’s reputation for incredibly crusty and delicious baguettes is known far and wide.
They say that nothing can come close to the bread you can get in France. I’ve never been, so I can’t say for sure, but I think you’d stand the best chance if you make it yourself.
How could anything be better than a freshly baked loaf of bread? That crackly crust, the tender, airy crumb inside, steamy and yeasty and just begging to be torn into!
Give it a try. It’ll only take 4 simple ingredients and a few easy steps to make this easy baguette recipe. It’s mostly downtime!
French Baguette Ingredients
This French baguette recipe is made with just 4 simple ingredients.
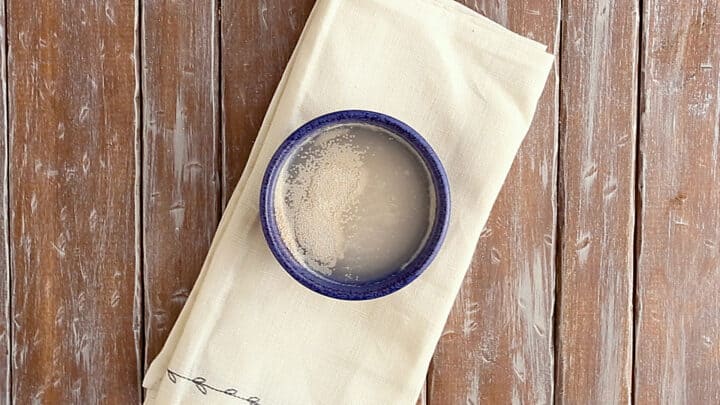
Water: Water brings the yeast to life and hydrates the bread. You’ll need both warm water and cool water for this easy French baguette recipe.
Warm water first, to dissolve the yeast. You want it to be warm but not hot, like a baby’s bath. Aim for around 105 degrees F. If the water is too hot, it can kill the yeast.
The cool water comes later, and the exact temperature is not as critical. The exact quantity can vary based on different factors. Use the minimum amount needed to achieve a stiff, shaggy dough.
Yeast: I prefer dry active yeast for bread baking. It allows a slow enough rise for the flavor to really develop, and it’s easy and convenient to buy and store.
Instant yeast is another option. If you go this route, you’ll only need 0.75x the amount, and you can cut the rise times down by 15 to 20 minutes.
Either way, be sure to check the expiration date on the packet and make sure it hasn’t past. If it has, the yeast could be dead and your bread won’t rise properly.
Flour: Bread flour is my favorite for this baguette recipe, because it has a higher protein content and therefore yields a strong crumb and a chewy texture.
However, a lot of readers have tried experimenting with alternative types of flour, and you can read about their results in the comments section below.
Salt: Salt carries all the flavors and intensifies them. Feel free to adjust the amount used to your own taste.
I like kosher salt best because it doesn’t have any additives (table salt usually contains iodine and that can leave a bitter taste) so the flavor is pure, and it’s very inexpensive and easy to find.
How to make this Easy baguette recipe
Despite only having 4 ingredients, the results of this easy baguette recipe are magical. And it’s all because of the technique!
Start by dissolving the yeast in warm water.
While that is doing its magic, combine the flour and salt in a large bowl. Create a little well in the center, and add in the yeast mixture. Stir it around, taking flour from the outside edge and bringing it into the well, a little at a time.
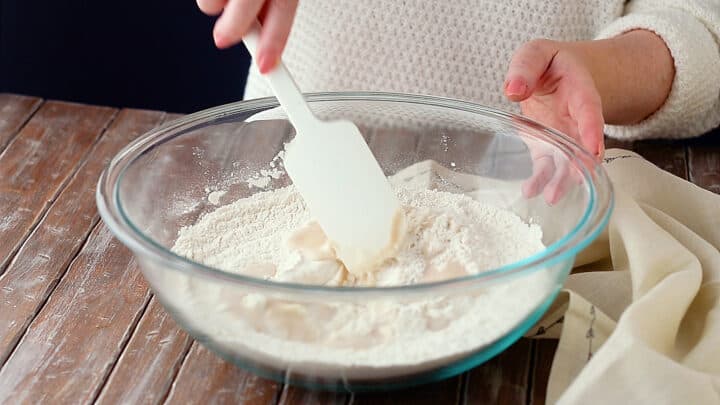
Next, add a bit of cool water. Keep stirring and adding water as needed until a shaggy bread dough forms.
Now cover it loosely, and let it rest.
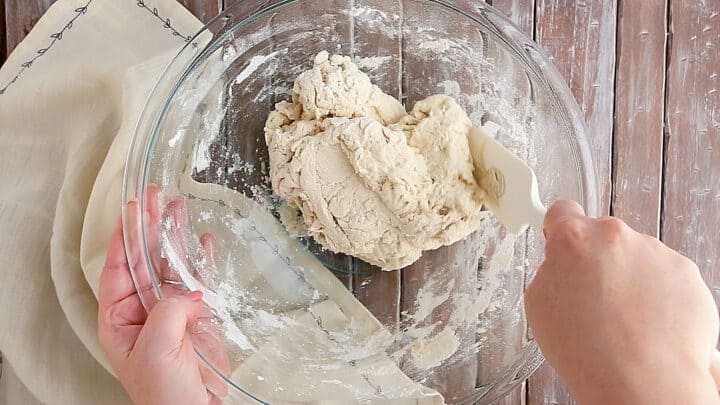
Once the dough has had its rest, transfer it to a lightly floured surface and begin folding.
For this type of bread, there’s not a lot of kneading involved. It only needs a few quick folds to become smooth and build strength without overworking the gluten and causing toughness.
Gently shape it into a rectangle, then bring both short sides of the rectangle into the center. Flatten, and repeat.
Place the dough into a greased bowl and cover it tightly. Allow it to proof (or rise) in a warm place until doubled in bulk.
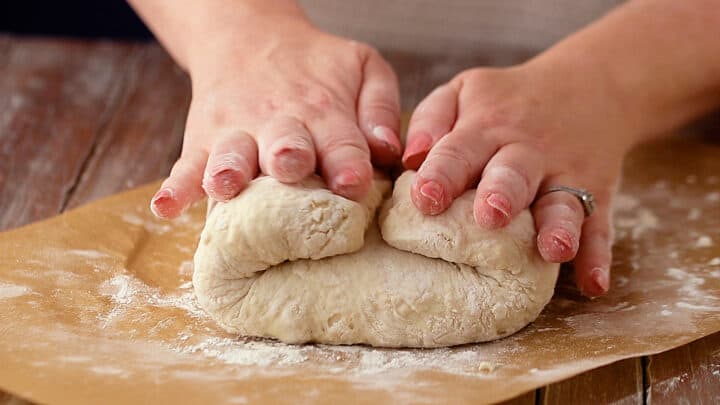
Divide the dough into 4 equal portions.
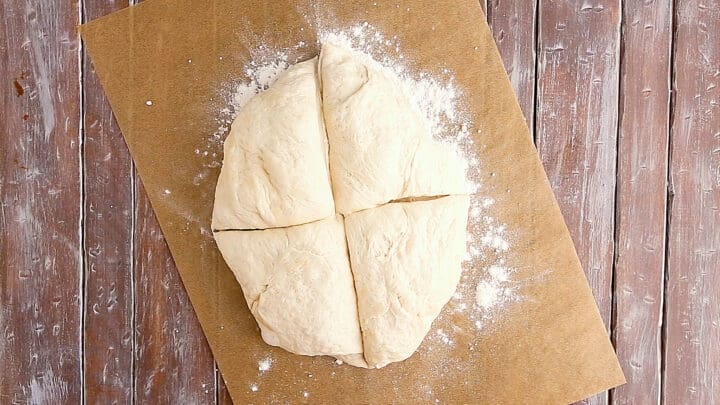
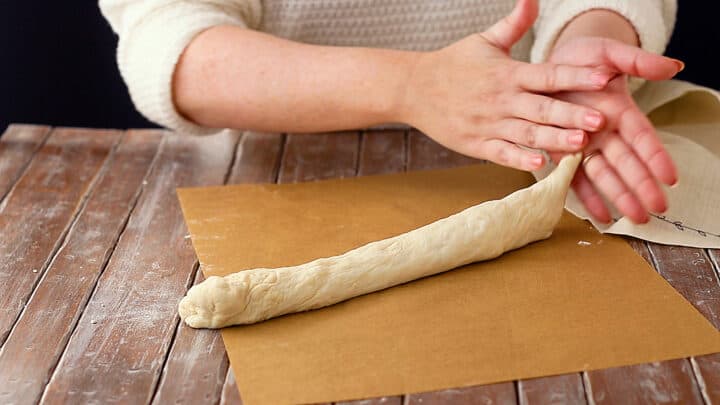
Add a little flour to your workspace and shape the dough into a slender loaf (about 15 inches long) with pointed ends.
Place the loaves on a parchment-lined baking sheet, cover them with oiled plastic wrap and allow them to rise a second time.
While the baguettes are rising, fill a baking pan with water and place it in the bottom of your oven. Preheat the oven and allow it to fill with steam from the water. This is the KEY to a crusty baguette.
Once the loaves have finished their second rise, remove the plastic wrap and sprinkle them with a bit of flour.
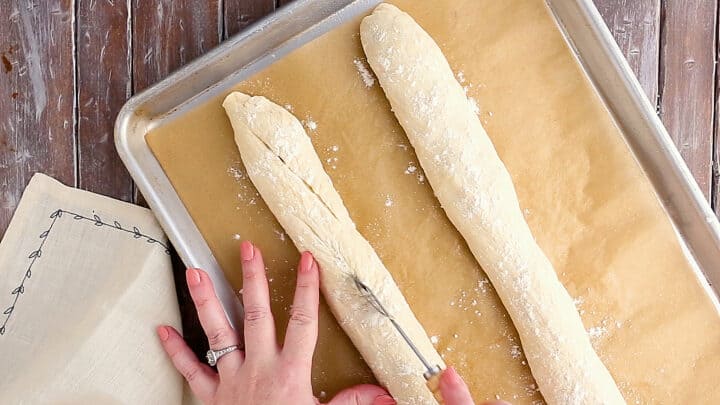
Then quickly slash them with a lame razor blade or sharp knife. This is decorative, but it also allows the crust to crack and the bread to expand in a more controlled way.
Place them in the hot oven, and allow them to bake until deeply golden brown. They should feel light and dry on the outside, and when you tap them, they should give a hollow sound.
TIPS FOR MAKING FRESH BAGUETTES
- Make sure your yeast isn’t past its expiration date. Over time, yeast can actually die. Old yeast probably won’t activate and help the bread to rise.
- Watch the water temperature. If the water is too hot it can kill the yeast.
- Be sure to use bread flour, not all-purpose flour. Bread flour has a higher protein content, which helps to get a better texture and that nice crunchy outer crust. King Aruthur and Bob’s Red Mill both make excellent bread flour.
- Don’t forget to score the top of the loaf before baking. Due to the shape of the bread, scoring is necessary to release the gas that forms inside the loaf caused by the oven’s heat. Without scoring, the shape of the baguette can be destroyed.
- Keep the oven door closed during the baking process. Use the oven light to check on the progress of your bread.
- Place the baguettes in the center of the oven, do not place them at the bottom of the oven.
- Use a baguette pan to help keep the bread shape while baking.

Frequently Asked Questions
How do you use a baguette?
This type of loaf is infinitely versatile with its crispy crust!
Slice it into 1/2-inch rounds, perfect as a base for bruschetta or crostini.
Or it can be used as a dipper for your favorite party dip recipe.
And the best way we like to enjoy it is toasted with garlic butter for garlic bread. So good with a pasta dinner!
Or tear into it and eat it with your favorite soup recipe. So satisfying!
How do you keep a French bread baguette fresh?
Baguettes are best when freshly baked, but they’re still pretty fantastic the next day or even a few days later!
To store a French baguette, wrap it loosely and keep it at room temperature for 2 to 3 days.
If you notice it’s not as crusty after a while, pop it in a warm oven (around 170 degrees-ish) for 5 or 10 minutes, and it should come out good as new.
Can you freeze a baguette?
A fancy French boulanger might disagree with me, but I say go for it!
I do this a lot at my house. When the baguette is still fresh, slice it down into thin rounds. I’ll often cut on the diagonal, so there is more surface area to spread yummy things on.
Then slip the baguette slices into a zip-top freezer bag, and into the freezer they go.
We pull out what we need whenever we want a slice of crusty French bread.
The baguette slices thaw in just a few minutes at room temp. Or they can be warmed in the oven or toasted up. It’s super convenient!
Why is my baguette flat?
If the dough is too sticky, the bread can sometimes bake up flat.
Another reason your baguette may turn out flat is if the yeast dies. This can happen if the water is too hot when you add the yeast. The water should be warm but not hot, like a baby’s bath. Aim for a temperature of around 105 degrees F.
Lastly, if you allow the unbaked loaves too much time to rise, they could over-proof. This basically means the yeast “tires out.” As soon as those loaves look doubled in bulk, whisk them right into a preheated oven.
Why is my dough sticky?
This can happen if too much water is added. Be careful to use only as much water as is needed to make a stiff, shaggy dough. Keep in mind that the dough will hydrate as it rests.
How many French baguettes does this recipe make?
This recipe makes four slender baguettes.
If you prefer a thicker loaf, divide the dough into just 2 or 3 loaves.

Hopefully, this takes the mystery out of the crusty French baguette!
You can do it yourself, so don’t let anyone intimidate you! You’ll love the result, and everyone will be so impressed!
This post contains affiliate sales links.

Crusty French Baguette Recipe
Ingredients
- 3 1/2 tablespoons (52.5 g) warm water
- 1 1/2 teaspoons (4.67 g) active dry yeast*
- 3 3/4 cups (468.75 g) bread flour
- 2 teaspoons (12 g) kosher salt
- 1 1/4 cup (295.74 g) cool water, (you may not need all of the water)
- additional flour,, for dusting
Instructions
- Place the warm water in a small bowl and sprinkle the yeast on top. Set aside and allow the yeast to dissolve and become foamy.
- Place the bread flour into a large bowl and stir in the salt.
- Make a well in the center of the flour mixture, and stir in the dissolved yeast.
- Add the cool water, a little at a time, while stirring, just until a stiff, shaggy dough (watch the video below to see what this should look like) has formed (you may not need to use all of the water).
- Cover the bowl with plastic wrap and allow it to rest for 30 minutes.
- Transfer the dough to a lightly floured work surface, gently press it into a rectangle, and fold the short sides into the center. Flatten, turn 90 degrees, and repeat.
- Place the dough in a large oiled bowl, and cover with plastic wrap. Allow it to rise in a warm place until doubled in bulk (about 1 to 2 hours).
- Divide the dough into 4 equal portions, and shape each one into a long loaf (about 15-inches long and 1 1/2-inches in diameter), with pointed ends.
- Place the loaves on a parchment-lined baking sheet, cover with oiled plastic wrap, and allow to rise until doubled in bulk (about 30 to 45 minutes).
- Preheat the oven to 450 degrees F, and place a pan of water on the bottom rack.
- Uncover the baguettes, sprinkle them lightly with flour, and make 4 elongated slashes down each one with a lame, razor, or sharp knife.
- Bake the breads until crusty and brown (approx. 30 to 40 minutes). The baguettes should give a hollow sound when tapped.


Thank you so much for this baguette recipe. I’ve tried others but they have never been as successful as this one. I will definitely be making them again!
Fantastic recipe. So simple to follow for a novice bread maker like myself. It takes a while elapsed time, but there’s not that much effort involved. I have had great results both times I have tried this recipe.
Worst recipe I ever cooked.
I don’t know why. I’m using a baking stone, putting the water on bottom rack, cooking confection bake but it taste great and crispy but it’s very light color help and small loaf. In ur video it shows a lot of loafs. Are you doubling the recipe??
No. I’m baking the recipe exactly as written, dividing the dough into 4 equal portions before shaping into loaves.
Love these French baguettes! I’ve made these twice now – the first time I made them with bread flour, and the second time I made them with all purpose flour (since bread flour is tough to find right now!). Both turned out very tasty, but we preferred the ones made with bread flour as they were a bit chewier and rose more. Either way, these baguettes are wonderful! A few notes on the recipe: if you’re using regular table salt (like Morton salt) instead of kosher, make sure to decrease the amount used. Table salt is finer than kosher, so there more “saltiness” in a teaspoon of table salt than there is in a teaspoon of kosher. I used table salt and cut the amount in half. Also, for the second rise, I form the loaves and then place them right onto a baking sheet rather than onto a floured towel. That allowed me to avoid the challenge of moving the loaves, and they still turned out great! Thanks again for this awesome recipe!
This was soooo easy! I would never have attempted it but the way you described it in the beginning of your post made me try! Never gonna buy one again!
This is consistently good results and almost no work/clean up.
I follow the recipe except unable to find bread flour & substitute All Purpose. Great results.
Question. I have a stone in the bottom of my oven. Should I cook on that? I can move it up to center rack to account for the water pan. Or should I put water pan on higher shelf.
Sounds like it should work!
We liked thses. The basic recipe is great. Very good description. They were difficult to transfer. And the cook time is too long. I baked two for 35 minutes and they were over done. I baked the second two for 22 minutes and that was right for my oven.
I think it’s a matter of tweaking until you get it right for your oven and ingredients.
A very promising recipe. Thought that it would work well. But,
1. Only needed 10 of the 16 ounces of water. That was odd.
2. The next to very last instructions (No. 12) calls for one to transfer the soft, risen baguettes to a pan for baking. Of course, what happens is that they collapse. I did not take the time to let them rise again, and, of course, ended up with very tasty, and very crunchy bricks.
Gosh, and I was so hopeful.
Just wanted to point out that this recipe calls for 10 ounces of water, not 16. As stated in the notes, this should be measured by weight (not volume). Step 4 of the directions also states that you might not need all of the water.
I’ve been making bread for decades but I’m always interested in new recipes. I don’t think transferring risen loaves is a great idea. Better to simply let them rise on the surface you intend to bake them on.
Turned out great! The recipe was easy to follow and produced excellent baguettes.
After decades of holidays in France and repeated attempts at baking baguettes, you provide this, the perfect recreation. I cannot tell you just how grateful I am,my mind is in France right now, whilst I sit at home during the Covid pandemic!
I used easy bake yeast, in warm water, with a quarter teaspoon of sugar.
Thank you so much
Hi I just made your French sticks, everything went well and the tops were brown and crunchy. The underneath was whit and quite raw. What might have caused this please?
I left the pan of water in oven for the duration as the re I’ve dudnt say to remove it, could this have caused it?
Thank you
Reg
How strange! Can you tell me a bit about what kind of pan you used?
Hey! Tried this out (albeit with half the recipe) and it worked amazing! The timings were perfect, and so was the recipe itself. At the start, before you really start to roll it out or make it a rectangle, it’ll likely be quite sticky, but this got fixed when I floured the surface and my hands and let that incorporate into the dough. As for baking, it baked almost perfectly in my oven, with one little end slightly darker/blacker, but I believe it might be fixable by just turning the tray midway through the process.
Though, I do have a question for anyone who may have tried. Can I leave it for an overnight rise in the fridge and/or am I able to put it in the freezer and still have it usable the next day? Wanting to do this because I have to start quite early if it’s for dinner, and my family gobbles them up pretty quickly.
Thank you for the excellent tips! Yes, you can keep the unbaked loaves in the fridge overnight (or up to 48 hours), let them come to room temp then proof a second time, and then bake. The dough will last for up to 2 months in the freezer as well. Hope this is helpful to you!
So crunchy!! Only thing I would change is to divide the dough in half to make 2 larger baguettes.
Hi,
I can only make 2 baguettes out of the dough, and they are skinny ones. Any suggestions why i don’t get more?
Thank you,
Louis
Divide the dough into 4 equal portions. The loaves will be smaller but that is the traditional size for a baguette.
Hi Allie,
I’ve done it the first time i made them and they were line ficelles vs. baguettes.
Thank you,
Louie