Crusty French Baguette Recipe
As an amazon associate I earn from qualifying purchases.
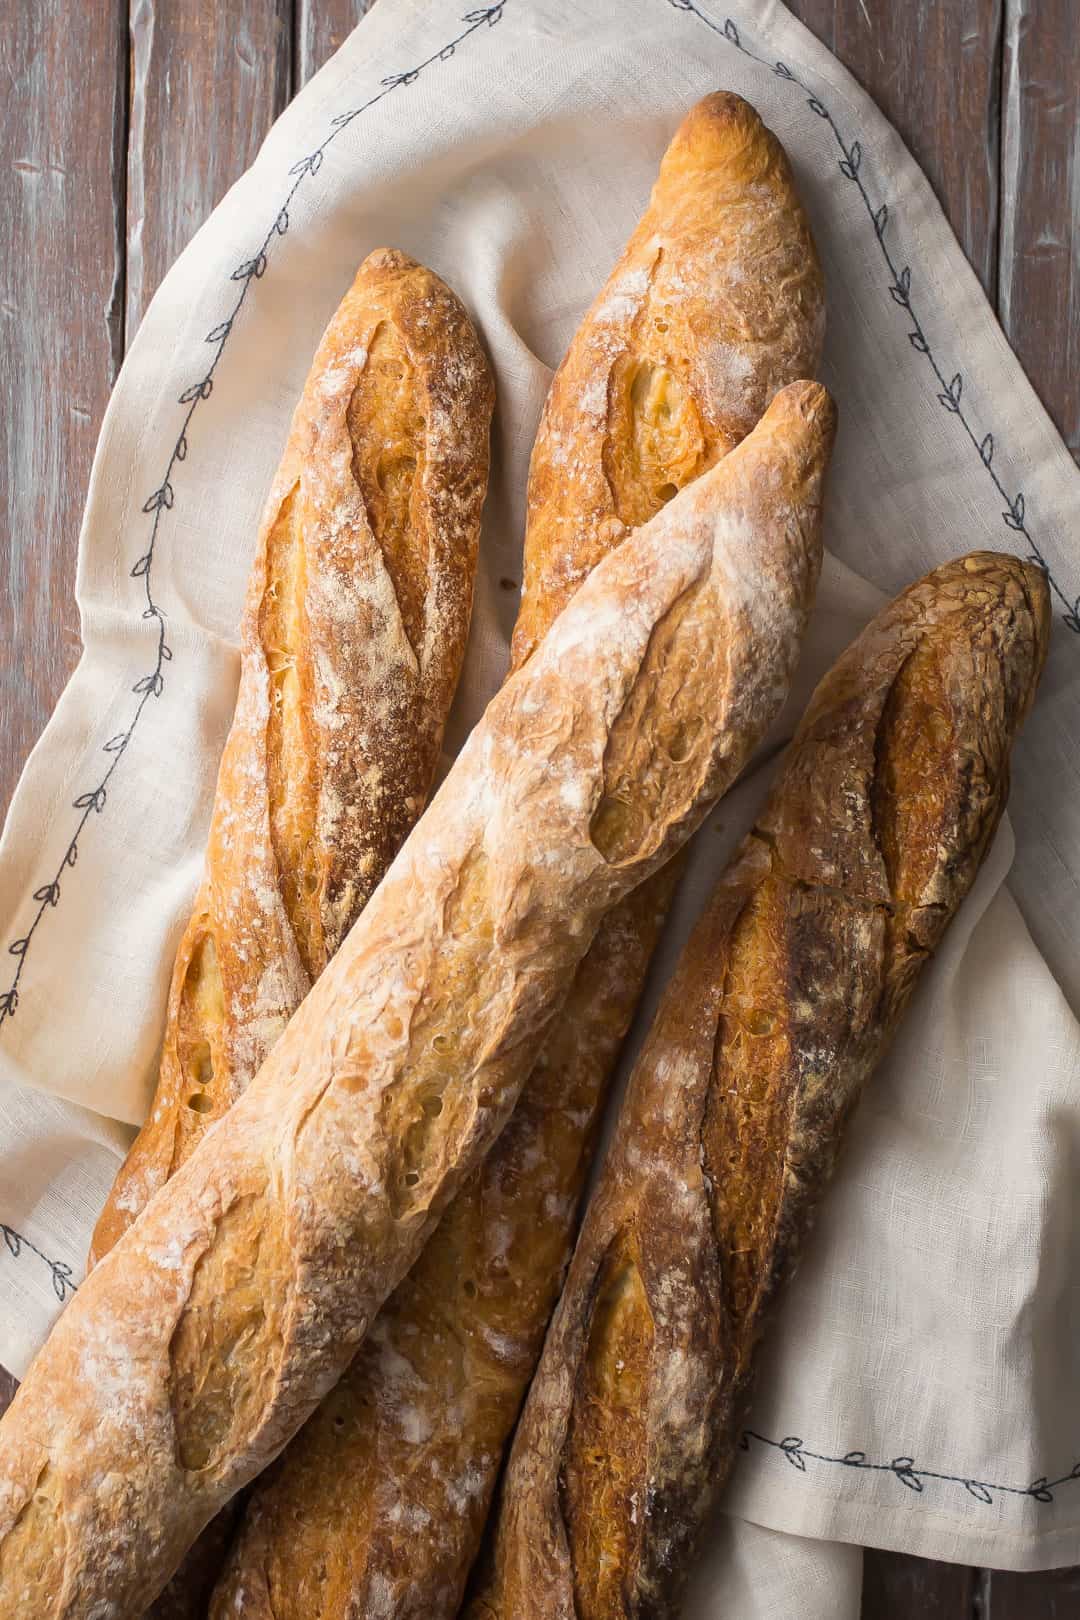
Few things compare to the magic of a crusty French Baguette fresh from the oven. With its golden, crackly crust and tender, airy interior, this bread is irresistible served alongside a bowl of hot soup, piled high with sandwich fillings, or torn off piece by piece to enjoy with butter.
The best part? This recipe is made with just four simple ingredients, and most of the work is hands-off. A little patience goes a long way here, and the results are so worth it.
I am over the moon about that crunchy, splintery outer crust. See how it shatters? And the interior- soft, pillowy, and so airy. It's perfection.
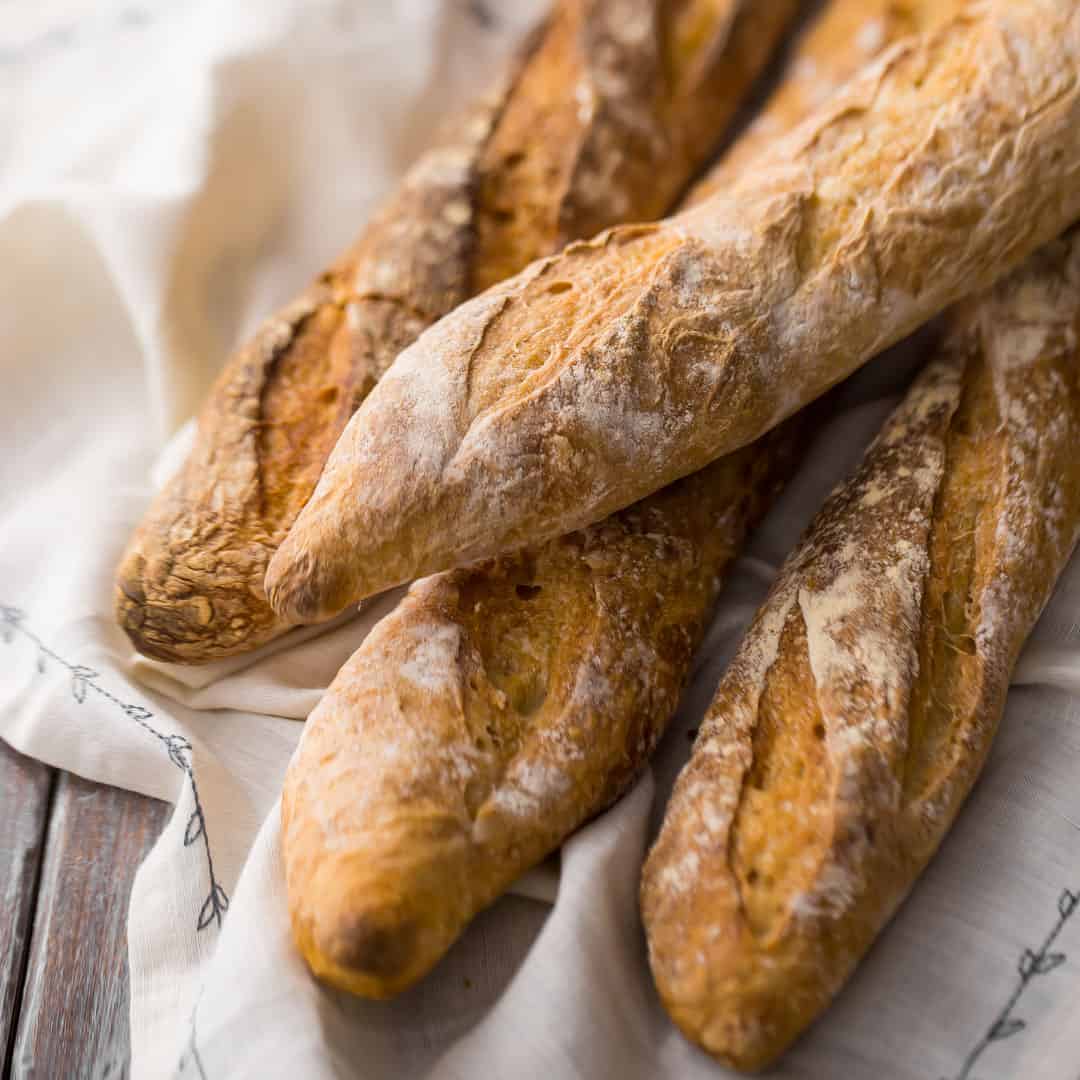
Table of Contents
- Why You'll Love This Baguette
- Ingredients You'll Need
- How To Make A Homemade French Baguette
- Classic French Baguette FAQ
- More Homemade Bread Recipes
My family loves a good crusty French baguette. We eat this kind of bread with so many things! It's so chewy, yeasty, and good. I've always been a little afraid to try making it myself. Everything you hear suggests it's complicated and fussy, and only a French boulanger could ever get it right.
WRONG! Here's living proof that anyone can make a killer baguette.
Why You'll Love This Baguette
- Bakery-style at home: You don't need fancy equipment to get an artisan-quality loaf.
- Simple ingredients: Just flour, water, yeast, and salt.
- Crispy crust, tender crumb: For the perfect balance of crunch and softness.
- Versatile: Enjoy it as a snack, side dish, or as a base for sandwiches.
Ingredients You'll Need
The recipe card at the bottom of the post contains the full list with all of the amounts. Refer to that when you're cooking.
- Bread flour - Provides the higher protein content needed for that perfect chewy texture and airy interior.
- Kosher salt - Balances flavor and strengthens the gluten structure.
- Active dry yeast - The key to a good rise and light texture. Instant yeast can also be used.
- Water - Warm water helps activate the yeast, while cool water keeps the dough manageable.
- Additional flour - For dusting your work surface and shaping the loaves.
How To Make A Homemade French Baguette
Step 1: Start the Dough
Sprinkle the yeast over the warm water and let it sit until it becomes foamy. This ensures the yeast is active and ready to work.
In a large bowl, combine flour and salt. Make a well in the center and pour in the dissolved yeast. Slowly stir in cool water until you have a shaggy, stiff dough. You may not need all of the water. Cover and let the dough rest for 30 minutes.
Step 2: Fold and Rise
Turn the dough onto a lightly floured surface. Gently press it into a rectangle, then fold the sides into the center and flatten and rotate it. Repeat the process. Place the dough in an oiled bowl, cover it, and let it rise until it has doubled in size (about 1-2 hours).
Step 3: Shape the Loaves
Divide the dough into four equal portions. Shape each into a long, thin loaf, approximately 15 inches long, with tapered ends. Transfer to a parchment-lined baking sheet, cover loosely, and let it rise again until doubled in size (30-45 minutes).
Step 4: Bake with Steam
Preheat your oven to 450°F (230°C). Place a pan of water on the bottom rack to create steam, which helps form that signature crust.
Slash each loaf with a sharp blade, dust lightly with flour, and bake until golden brown and crusty, about 30-40 minutes. The baguettes should sound hollow when tapped.
Helpful Tips and Tricks
- Don't rush the rise: A slower rise develops more flavor and better texture.
- Use steam: That pan of water in the oven is the secret to a crisp, golden crust.
- Slash with confidence: Clean cuts help the bread expand properly in the oven.
- Cool before slicing: As tempting as it may be, let the loaves rest for at least 10 minutes to allow the crumb to set.

Classic French Baguette FAQ
This type of loaf is infinitely versatile! Slice it into ½-inch rounds and it's perfect as a base for bruschetta or crostini. Or it can be used as a dipper for your favorite party dip. And we love it toasted with garlic butter, for garlic bread. So good with a pasta dinner! Or just tear into it and eat it with a hot bowl of soup. So satisfying!
Baguettes are best when they're freshly baked, but they're still pretty darn great after a few days!
To store a French baguette, wrap it loosely and keep it at room temperature for 2 to 3 days. If you notice it's not as crusty after a while, just pop it in a warm oven (around 170 degrees-ish) for 5-10 minutes, and it should come out good as new.
A fancy French boulanger might not agree with me on this one, but I say go for it!
I do this a lot at my house. When the baguette is still fresh, slice it into thin rounds. I'll often cut on the diagonal so there is more surface area to spread yummy things on. Then, just slip the baguette slices into a zip-top freezer bag, and into the freezer they all go.
Whenever we want a slice of crusty French bread, we just pull out what we need.
The baguette slices thaw in just a few minutes at room temp. Alternatively, they can be warmed in the oven or toasted. It's super convenient!
Yes, but the texture won't be quite as chewy or airy. Bread flour is best.
No. A parchment-lined baking sheet works beautifully for this recipe.
This could be due to inactive yeast, cool rising conditions, or using too little water. Ensure your yeast is fresh and allow the dough plenty of time to rise.
Spritz the loaves with water right before baking, in addition to using a steam pan.
More Homemade Bread Recipes

Ingredients
- 3 ½ tablespoons (52.5 g) warm water
- 1 ½ teaspoons (4.67 g) active dry yeast*
- 3 ¾ cups (468.75 g) bread flour
- 2 teaspoons (12 g) kosher salt
- 1 ¼ cup (295.74 g) cool water, (you may not need all of the water)
- additional flour,, for dusting
Instructions
- Place the warm water in a small bowl and sprinkle the yeast on top. Set aside and allow the yeast to dissolve and become foamy.
- Place the bread flour into a large bowl and stir in the salt.
- Make a well in the center of the flour mixture, and stir in the dissolved yeast.
- Add the cool water, a little at a time, while stirring, just until a stiff, shaggy dough (watch the video below to see what this should look like) has formed (you may not need to use all of the water).
- Cover the bowl with plastic wrap and allow it to rest for 30 minutes.
- Transfer the dough to a lightly floured work surface, gently press it into a rectangle, and fold the short sides into the center. Flatten, turn 90 degrees, and repeat.
- Place the dough in a large oiled bowl, and cover with plastic wrap. Allow it to rise in a warm place until doubled in bulk (about 1 to 2 hours).
- Divide the dough into 4 equal portions, and shape each one into a long loaf (about 15-inches long and 1 ½-inches in diameter), with pointed ends.
- Place the loaves on a parchment-lined baking sheet, cover with oiled plastic wrap, and allow to rise until doubled in bulk (about 30 to 45 minutes).
- Preheat the oven to 450 degrees F, and place a pan of water on the bottom rack.
- Bake the breads until crusty and brown (approx. 30 to 40 minutes). The baguettes should give a hollow sound when tapped.


can i use your baguette on me
Followed your recipe exactly, and ended up with four gorgeous loaves. I am not a baker, but felt like I ended up with a very professional product. Next time, I would increase the salt a little and be more generous with the flour on the towel as I had a big challenge lifting the loaves off it.
So glad you had such success Erin! And thanks for the great tips as well!
Hi Allie,
Can I use organic wheat flour instead of bread flour? I'm sorry.. I don't know if bread flour is very different from wheat flour. I would love to make this recipe tomorrow. Your baguettes look absolutely gorgeous. 🙂
Thanks
Hi Anuradha! Are you asking about a whole wheat flour or just regular organic all-purpose flour that is milled from wheat? If it's regular organic flour I think it would work just fine. If you're looking to make whole wheat baguettes I believe there was another reader who tried this and left her recommendations in a previous comment. Hopefully that is helpful to you!
The bread seems like it would be great if it weren’t completely burned. You say 480°F (or about 250°C) for 30 to 45 minutes. I set a timer for 25 minutes and it was burned before it even got that far.
Followed the recipe exactly and the rolls seemed the right size so I’m not sure what happened. Dinner is pretty much ruined though. What am I doing wrong?
Hey Ross! Sorry to hear you had trouble. Did you make rolls or loaves? You say rolls and that was a bit of a red flag for me because rolls would definitely not need as long of a bake time as loaves would. If you did indeed make loaves and they still baked that quickly, I don't necessarily think you did anything wrong, it's probably just that your oven runs a little hot and you'll need to compensate for that by baking at a lower temperature. This is not uncommon, many ovens will wander out of calibration over time.
any other options besides resting the dough on a floured towel? i feel like i put so much flour and they still stuck so when i was transferring to a baking sheet, they totally deflated 🙁
I was worried about that happening, too, so after the second rise I formed the loaves and placed them immediately on parchment to rise for the final time rather than having to transfer them later. I followed the rest of the steps exactly as written, including covering with lightly covered plastic wrap. This worked just fine.
What is the benefit of using the floured towel? Could you just place the loaves on parchment paper? My bread keeps coming out flat and to dense ....any suggestions?
It was going well until the final transfer of the loaves from the towel to the greased baking sheets; They lost all their "puff". I left them for another 10 minutes while the oven was warming/steaming up. They never fluffed back up and remained flat in the oven. Baked, but not airy light and big like yours. Any thoughts? They proofed for almost 2 hours the first time around, and 30 minutes the second. I am ready to try again asap.
Maybe next time just proof them on the baking sheet, and skip the floured towel altogether? Sorry to hear you had trouble.
So.... I just left a comment about sticky dough, but as soon as I submitted it I realized how dumb I am. I now realize that I don't have to use all of the cool water in the recipe, and just use enough to make a shaggy dough. I just can't believe that went right over my head! Thank you for all your hard work and sharing this delicious recipe with us! I can't wait to make it again, the correct way this time!
No worries at all Anna! It happens to the best of us.
I don't know if you'll ever see this, but I'm having a problem with this recipe. 16 ounces of flour just isn't enough. I've made it twice now, and the dough just stays a horrible sticky mess throughout the process. Is it supposed to be incredibly sticky? It makes it hard to shape into loaves. But I do my best and bake it and it tastes fine. It's just a difficult process!
Hi! I used to have this issue too but what I've learned is (assuming everything is measured correctly of course), you can get your hands a bit wet to unstick it from any given surface (like a bowl or a floured surface) or if you're working with the dough to fold it or shape it, don't be afraid to use plenty of flour on your hands and on the surface you're working on.
If the dough is so wet it's falling apart, then you probably have too much liquid and you can add more flour, but the goal should still be "shaggy" dough.
Thanks so much for weighing in Mia!
I am glad that you mentioned that just wrap a french baguette loosely and keep it at room temperature to store it. A lot of people probably don't know to do this and it could save them a lot of money from buying a new baguette because the old one went stale quickly. Thanks for the helpful advice on how to store a french baguette.
My pleasure David! I'm so happy you found that useful.
Amazing! My first time making bread, let alone baguettes and they came out amazing. Crunchy on the top and very soft and fluffy in the middle. Was lovely to have such fresh warm bread with butter straight from the oven, and then again for cheese and pickle baguettes the next day.
Followed the exact recipe and video - recommended (by both myself and my partner!)
This recipe made perfect baguettes, as well as ficelle (the thinner, shorter version of a baguette--think individually sized)! I lived below a bakery in Paris and have eaten my fair share of french bread. Being cooped up, along with the rest of the world, is a great time to bake with the kids, and today was French Bread day! Alas, both loaves are almost gone (they barely cooled!)....we would live to make it again, however did anyone mark down the amounts in Americn measurements? I was lucky enough to get it right, along with some tweaking, as I knew what I was going for as far as how the dough should feel (I know a shaggy dough when I see it, lol). But recreating it is another story. And may be why people are having trouble. All that notwithstanding, I always use a cast iron pan in the bottom of my oven, filled almost to the top with hot water, to create enough steam without the pan drying out (although any pan will do). And I check it at 20 mins as my oven runs hot. I used waxed parchment paper and didn't fuss with the tea towels. Just one bowl throughout, onto a floured surface (I used the leftover flour to sprinkle on top of my loaves before baking). And once it was done (always tap with a wooden spoon and listen for a hollow sound), I turn off the oven, crack the door a few inches (or stick a wooden spoon or other utensil in the door by the hinge if need be), and keep an eye that it doesn't get too brown. This will make it extra crispy. Not a Parisian style, more of a country style, rustic finish. But very yummy! Et voilà! C'est parfait!
Great tips; thank you for sharing. I'm very happy you enjoyed!
I made the Crusty French Baguette Bread and I put the water in the oven about about 1 and 1/2 hours early at 400F to make sure the oven was plenty moist. When baking turned oven up to 475 degrees and added some boiling water to the existing pan of water. Followed instructions to the "T" and now 1 and 1/2 of the Baguette's are resting peacefully in my stomach. Broke the bread and buttered it and couldn't stop eating . The Baguettes had the nice holes and and I'll be thawing out some of my easy to make wild rice soup and finishing off the rest. I am so proud of myself!
I'm proud of you too! Way to go Rick 😉
Excellent "BREAD"
I Am very satisfy. I always was looking for this recipe to make "THI GREAT BAGUETTE".
Thank's very much!
You're welcome! I'm so happy you enjoyed.
What exactly is a shaggy dough?
Hey Courtney! I entered your question into Google's search window. Here are the results that come up: https://www.google.com/search?q=shaggy+dough&rlz=1C1GCEA_enUS832US832&oq=shaggy+dough&aqs=chrome..69i57j0l5.2734j1j4&sourceid=chrome&ie=UTF-8. Hope that's helpful!
I’m not sure why you feel the need to be condescending when a reader asks an honest question. I am aware that Google exists. However, I was asking *you* what *you* meant by it. Maybe you were having a rough day. I hope today is better for you.
I was not being condescending at all. I just thought you'd get a clearer answer by looking at some of the images that are already online. If you watched the video I created and it still wasn't clear to you, then perhaps there are other resources online that can explain it better. I thought I was pretty polite and nice about it!
I just have to come back to this one more time, for anyone else that might be reading.
Please know that to develop, test, photograph, create a video for, and write up and publish a recipe post like this can easily take upwards of 20+ hours. And I have nearly 700 of them on this site! I don’t regret a second of it because I love being able to share this stuff with people who share my same passion.
At this time of year, I typically get anywhere from 50 to 150 comments a week on all those various recipes. Many of them are just positive feedback from people who have made the recipes or who want to make them soon. Some of them are easy questions to answer, and some are more difficult. A lot of times, I get asked questions that have already been answered, either in the recipe card or in the headnotes above, in the video, or within the comment section below. Sometimes I’m answering the same question over and over again, because people don’t bother to read before asking.
I’ve always made an effort to answer every comment, even when it’s hard to do so on top of continuing to create new content and all the other things that are involved with running a website. It’s important to me to make that kind of connection with readers. Most of the time they are very grateful that I take the time to do that, even if it is just directing them to another resource that can do a better job of answering their question than I feel I could.
After this though, I’m really beginning to second-guess that choice. As much as I want to help, if someone feels entitled to my time and effort, that I somehow owe them something much more, it puts me in a really bad position.
I don’t want to take a chance anymore that my effort to help someone out, if percieved as insufficient, would cause someone to come back on me with accusations like this one. So, moving forward, if any of those 50 to 150 comments per week have questions I can’t easily and confidently answer, I will go ahead and publish them, but I’m afraid they’re going to go unanswered by me personally.
Perhaps other readers will be willing to step in and help out, or maybe the commenter will just have to do a little digging on their own. I’m sorry it’s led to this but I’m afraid it’s what I have to do at this point, in order to keep things running along smoothly and without conflict. Hope you all can understand where I’m coming from.
You didn't ask *you,* you asked *what is.* I thought you were the condescending one in this exchange, courtney. Thanks for ruining it for the rest of us.
dude, you need to chill out. how entitled can you be? at least she replied to you. she owes you nothing so get off your high horse.
This were my first time making baguettes and honestly, they turned out great! I thought you needed the whole ten oz. of water, so I used all of it. I ended up having to add a ton more flour, which worked! This recipe is foolproof!
So glad you had such great success!
I have never ever made bread before and decided to make this recipe for a potluck with my friends. I rushed a few steps because of a time crunch and it still came out AMAZING! My friends gobbled it up so quickly and were super impressed. This recipe rules and it easy to follow, I love that theres also a video for us visual types. Thank you!
It's my pleasure Diana! So happy you and your friends enjoyed. Thanks so much for the awesome feedback!
What is 1.75 ounces? Google can't give an answer without decimals and ridiculous numbers. The US does have measurements but I can't tie them to 1.75 ounces and neither can Google. How am I sppose to make a recipe I can't measure? What is the US measurement for 1.75 ounces please?
The ingredients for this recipe are meant to be measured by weight. There's an explanation of this in the notes section of the recipe card, as well as a link to a kitchen scale.
I have a scale but I do think you need to give us the weights to be used. No? A teaspoon of kosher salt can have very different weights to it depending upon how many grains fill your spoon!
I changed ounces to tablespoons. I don’t know how you weigh water, I think it’s fluid ounces not the weight (?). I used Kosher salt and didn’t find it too salty, and I use very little salt in my diet. I only got 3 loaves instead of 4. I baked it at a lower temperature for 30 minutes.