Rye Bread
As an amazon associate I earn from qualifying purchases.
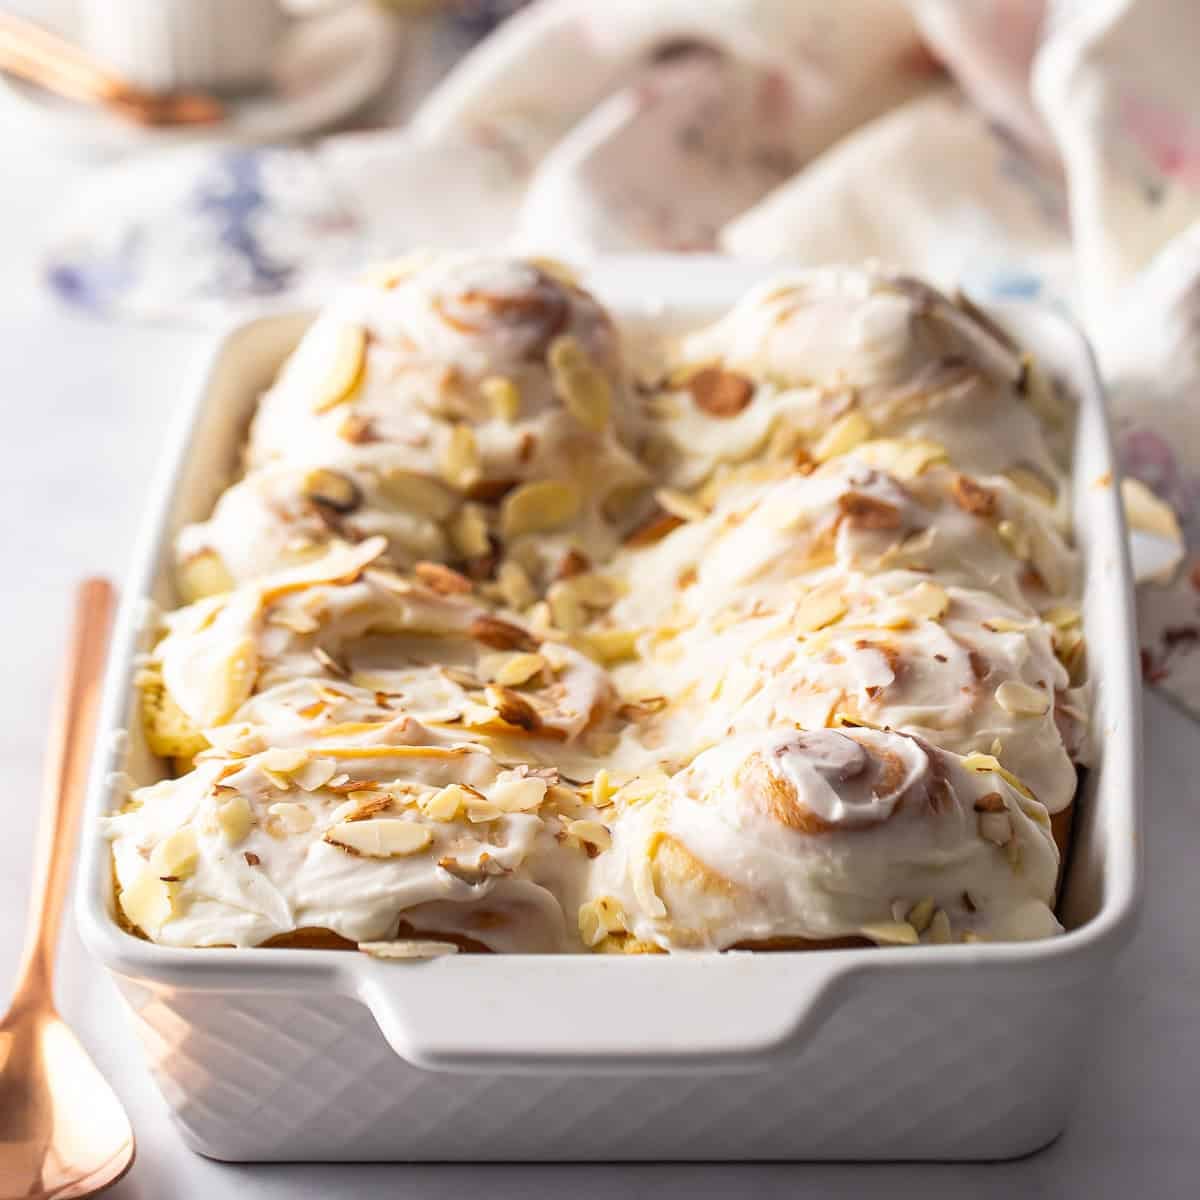
Easy rye bread recipe: Everything you've ever dreamed of! Hearty, crunchy crust & a soft, airy interior. Perfect for toast or sandwiches!
Today's recipe goes out to a reader who emailed me asking for a rye bread recipe. I wish I still had the email so I could give her a shout!
It was probably several months ago and I'm finally now getting around to it.
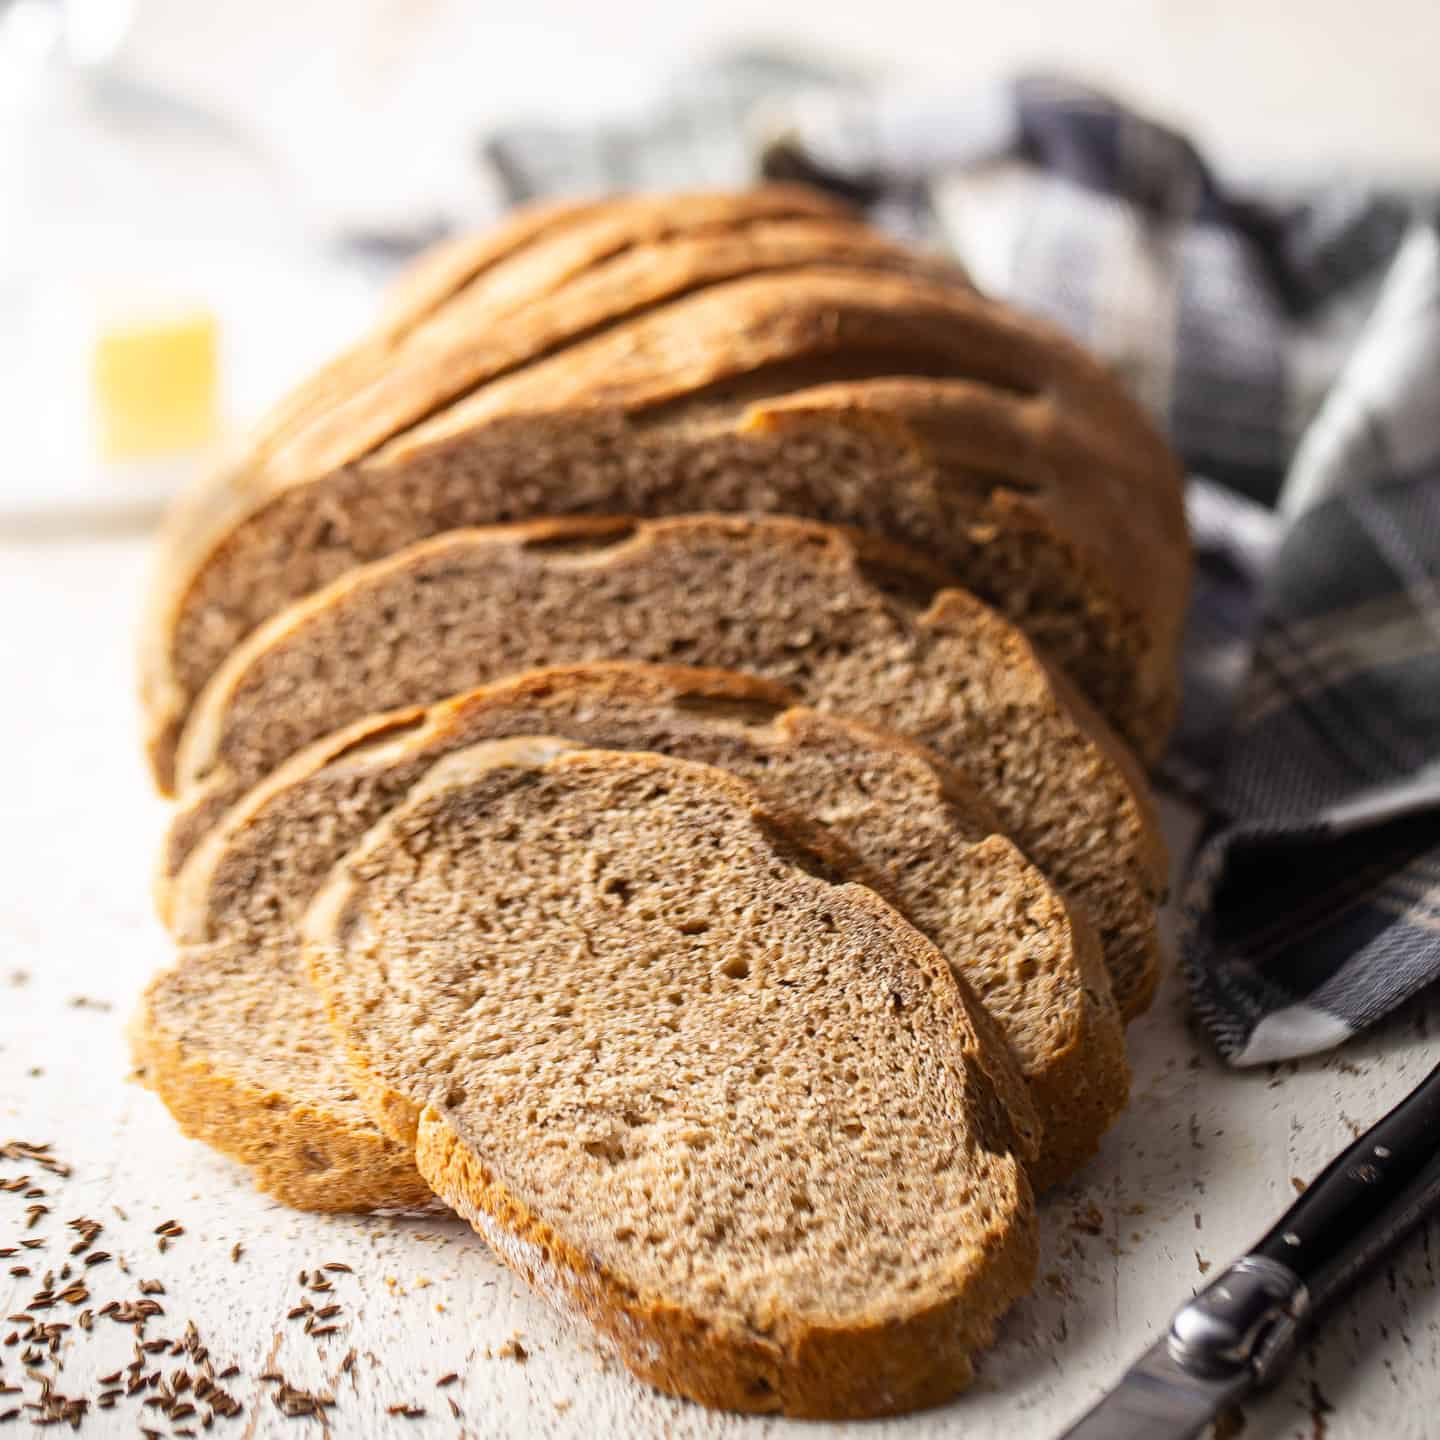
Thanks to her, I've worked out what I believe to be the best rye bread out there. It bakes up sky-high, with an airy, even crumb and a real traditional rye bread flavor. The flavors are beautifully balanced thanks to a combination of sweet, salt, nutty, and caraway. The crust is hearty and chewy, and the middle part of the bread is pillowy-soft and moist.
Please don't hesitate to reach out to me with ideas for recipes! I'm always in the market. And I will eventually get on it, if it makes sense for this site. I'm happy and grateful to hear your suggestions!
Breads are quickly becoming a real specialty for me. I never imagined I'd be that good of a bread-baker, but it seems every time I post a bread recipe it's really well received. My soft whole wheat bread, moist and sweet cornbread, and easy French baguette recipes have quickly become some of the most popular on this site!
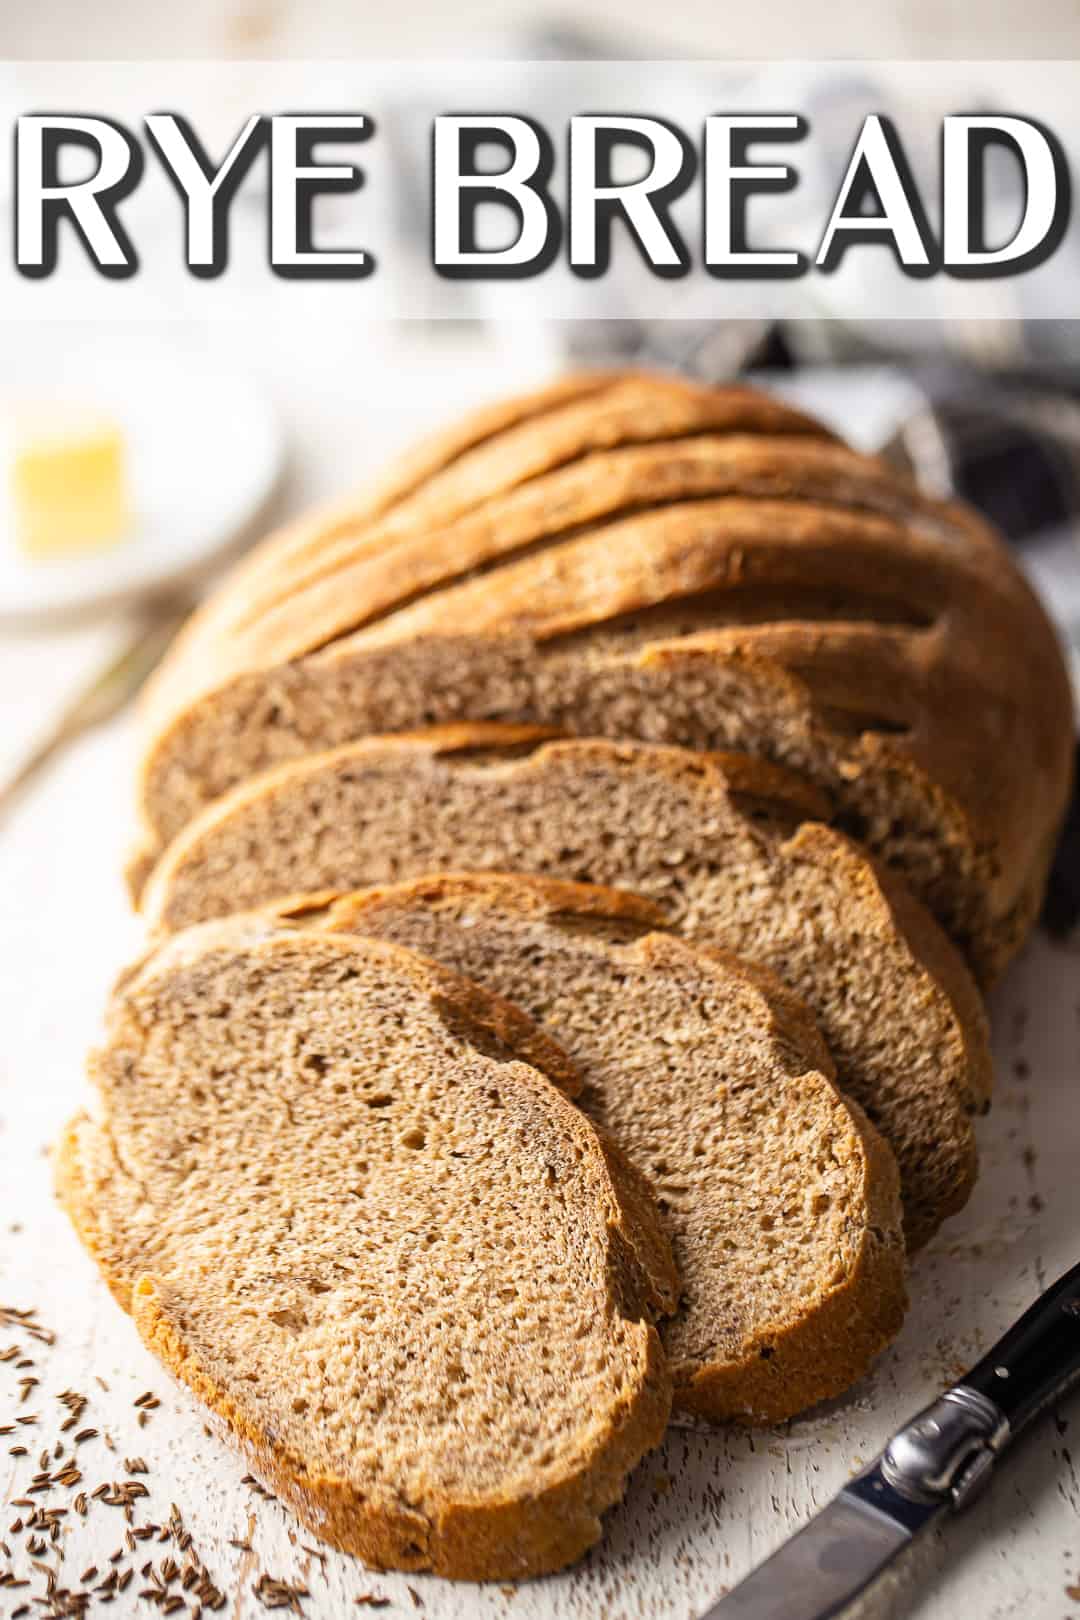
Table of Contents
- What is rye bread?
- Why this is the best rye bread recipe
- What does this rye bread taste like?
- Ingredients
- Special equipment
- How to make rye bread
- How to serve
- Expert tips
- Frequently asked questions
- A few more of my favorite yeast bread recipes
What is rye bread?
Rye is a type of grain, similar to wheat, barley, or oats.
Rye bread is bread that is made with rye flour, which is milled from rye grain. In other words, the grain is ground into a fine powder (aka: flour) and then baked into bread.
Why this is the best rye bread recipe
- Tastes amazing: The flavors are really balanced here, for a flavorful bread that has just the right amount of sweetness and seasoning.
- Few ingredients: You'll only need a few ingredients to make it.
- Easy to make: The steps are really simple, and while it takes a while, most of it is downtime.
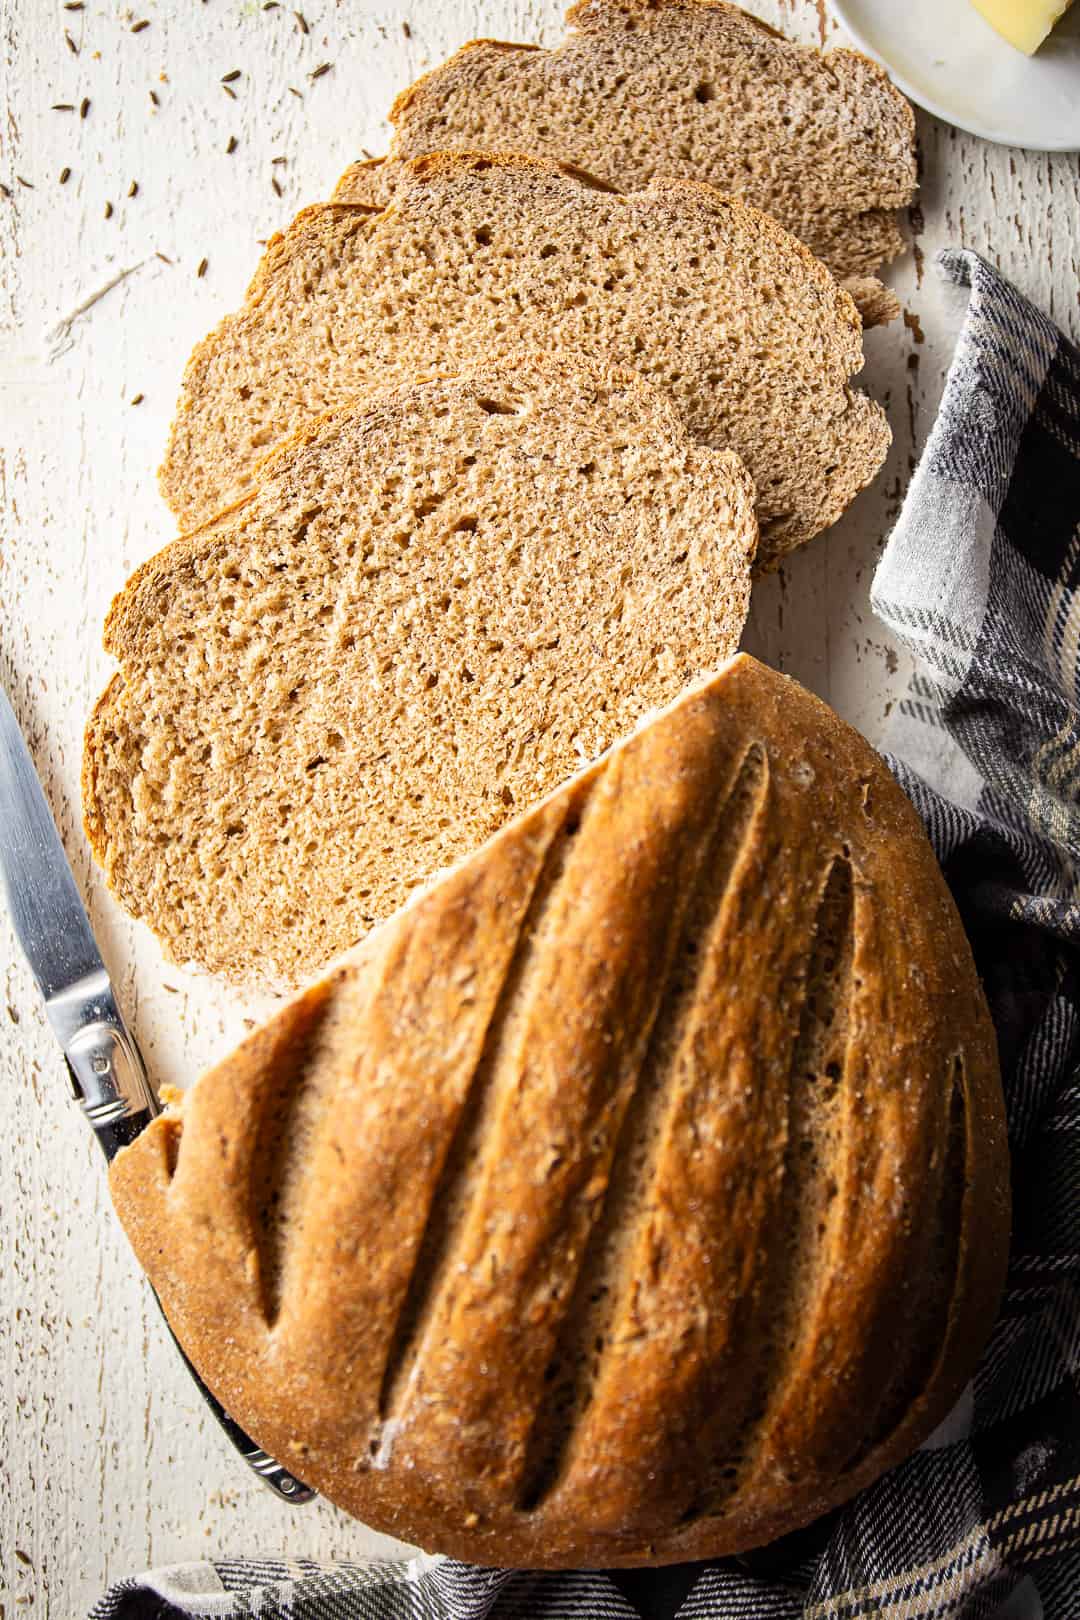
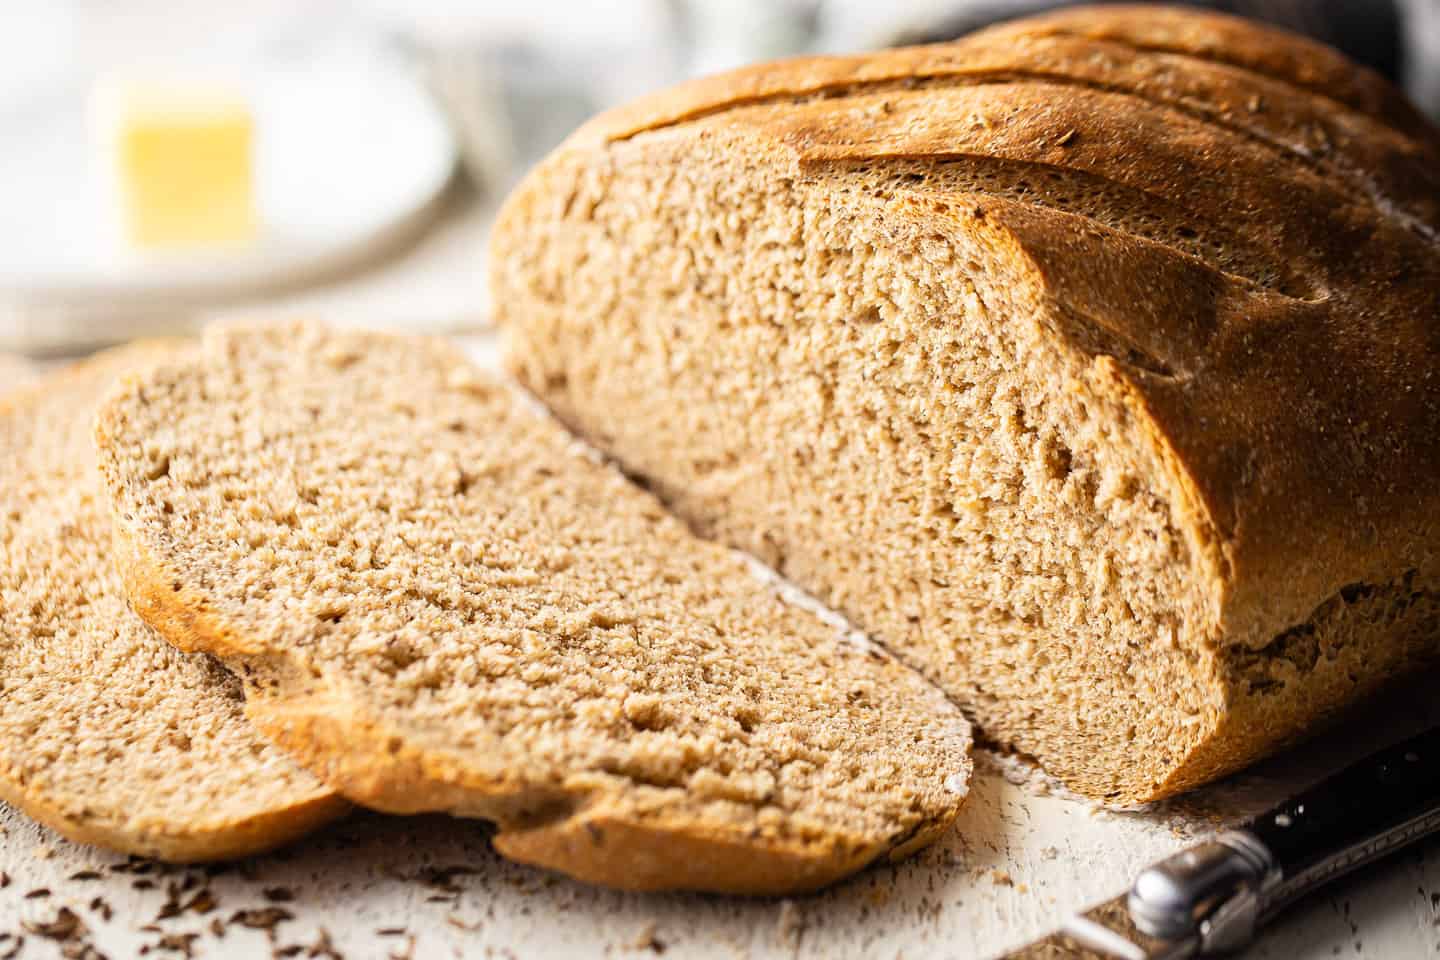
- Great texture: You get a nutty, hearty loaf with a crackly crust and soft, moist interior. Perfect for toast or sandwiches!
What does this rye bread taste like?
Rye is said to have a slightly spicy flavor, similar to black pepper or cloves. To be honest, I'm not sure if my palate picks up on that. But maybe that's just because I've been eating rye bread all my life, so to me, it just tastes like rye bread!
I will say that it tends to have more of a tangy, yeasty flavor, as well as a nutty, whole-grain taste.
Most of the time, rye bread also has caraway seeds, which have a really distinctive flavor. Again, to me, it's that rye bread flavor, lol! But it's often described as sharp, with hints of lemon and licorice.
Ingredients
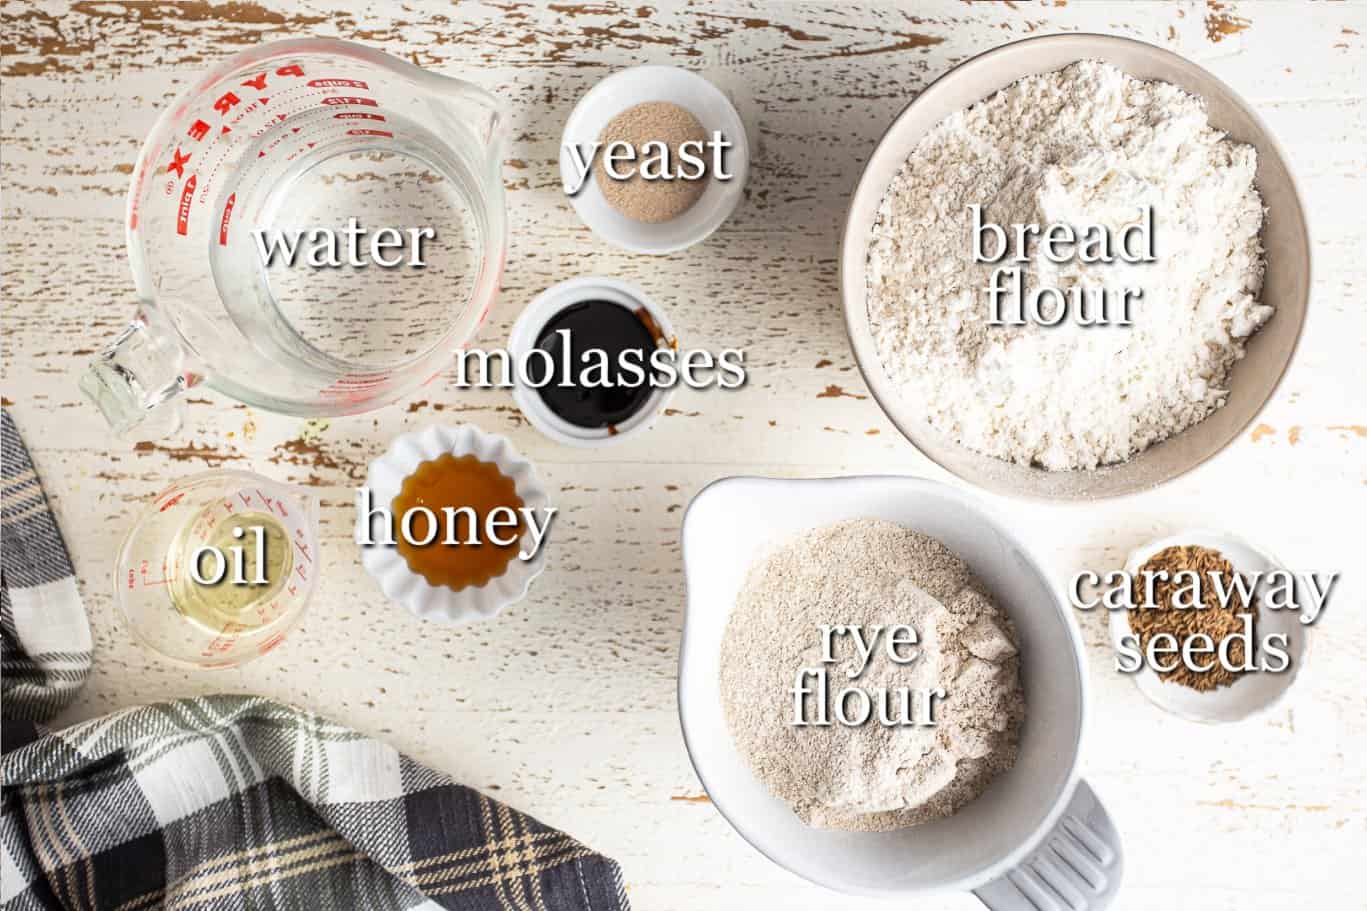
Water: Use lukewarm water to dissolve the yeast. Aim for the temperature of a baby's bath or around 105 degrees F.
Oil: I've used vegetable oil, but any neutral-tasting oil that's liquid at room temperature will work.
Honey: The sugar in honey and molasses helps to feed the yeast but also gives the bread a hint of sweetness. For vegan rye bread, use agave nectar instead.
Molasses: Molasses adds sweetness and a slightly bitter complexity that's really nice here. It also helps to give the bread a deeper color.
Yeast: Active dry yeast gets my recommendation here. It allows for a slower rise that yields a deeper flavor thanks to the fermentation that occurs during that time. Sourdough starter and instant yeast can also be used (see below), but I like active dry yeast best.
Flour: We are going to use a combination of rye flour and bread flour. You can't really make rye bread without rye flour, but if we used all rye we would end up with a really dense loaf. We need the high protein content that bread flour has to create that satisfying chewy texture, and to allow the loaf to rise properly.
Caraway seeds: These are optional, but they really add that unique signature flavor!
Salt: Salt balances the flavors and intensifies them. I like kosher salt best because it's cheap and easy to find, and it doesn't have any additives like table salt does. Table salt usually has iodine, which often adds a bitter taste.
Special equipment
- Measuring cups and spoons: Follow my guide on how to measure ingredients for baking.
- Mixer: I like to use my stand mixer to mix up the dough and knead it, but you could also make this bread by hand or in a bread machine.
- Baking sheet or loaf pan: I shaped my bread into what's called a "Vienna," it's like an ellipse. You could also make it into a boule (round) by baking it on a sheet pan or Dutch oven. Or you could pop it into a standard-sized loaf pan and make like a sandwich loaf.
- Lame: This is a tool used by bread bakers to score the loaf. It makes shallow cuts that allow the steam to escape in a controlled way, without cracking the bread. If you don't have a lame, you could just use a straight edge razor or a very sharp knife.
- Metal pan: A steamy oven creates a really nice crunchy crust. So we are going to fill a pan with water and bake the bread with that. I prefer metal just because I've had some of my earthenware baking dishes crack in the oven when adding more water to them.
- Thermometer: To check the bread for doneness.
- Wire rack: For cooling.
How to make rye bread
This easy rye bread recipe comes together in 6 simple steps.
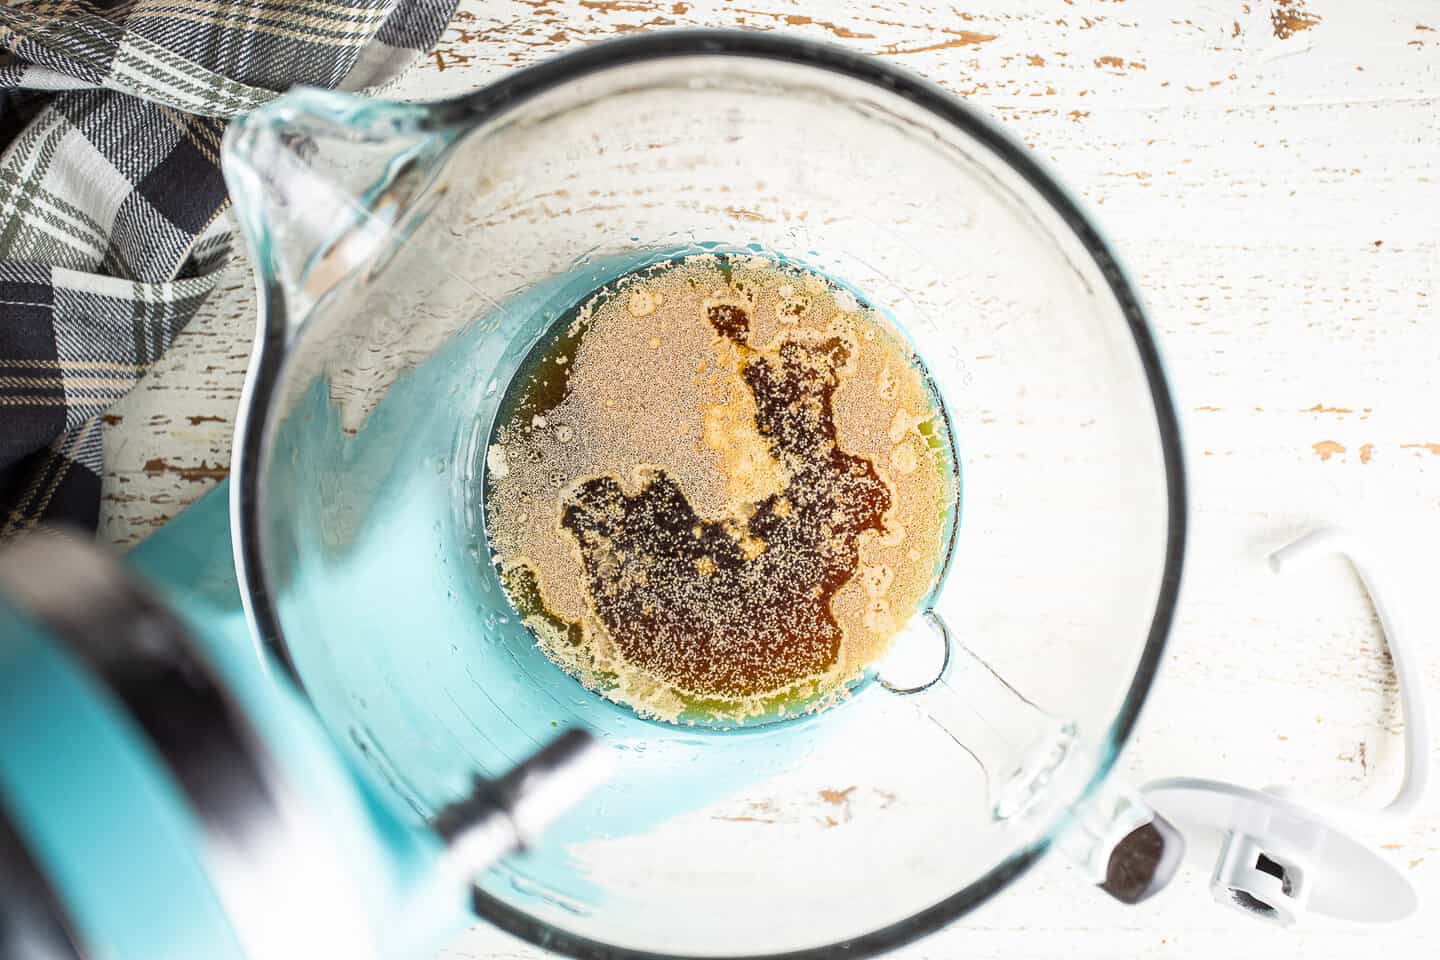
Step 1: Dissolve the yeast
Place your warm water in a big bowl, along with the oil, honey, and molasses.
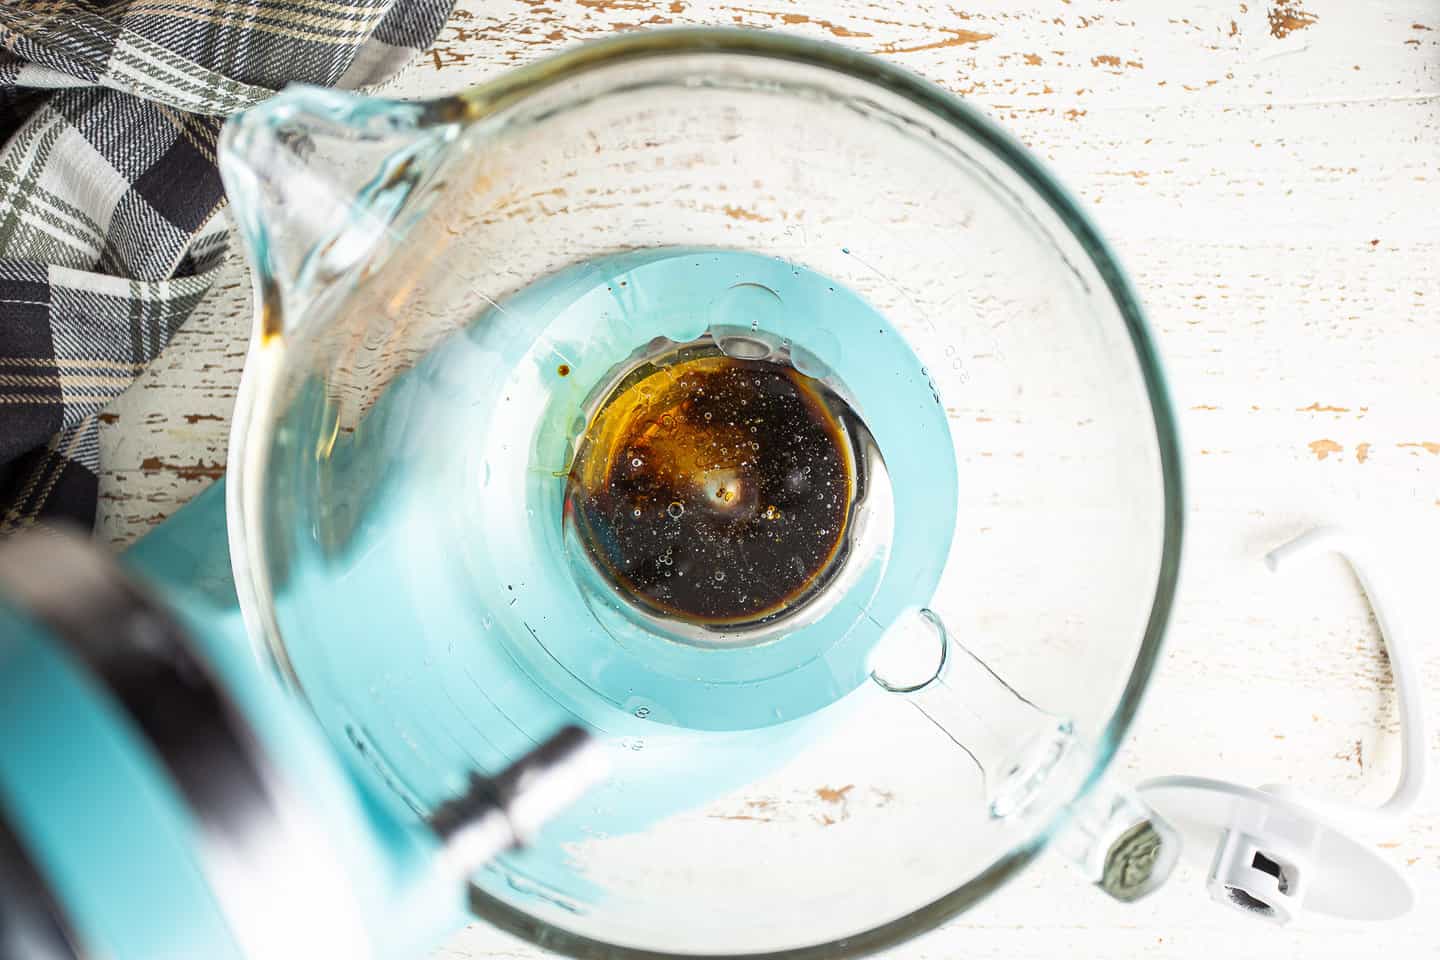
Then sprinkle the yeast on top.
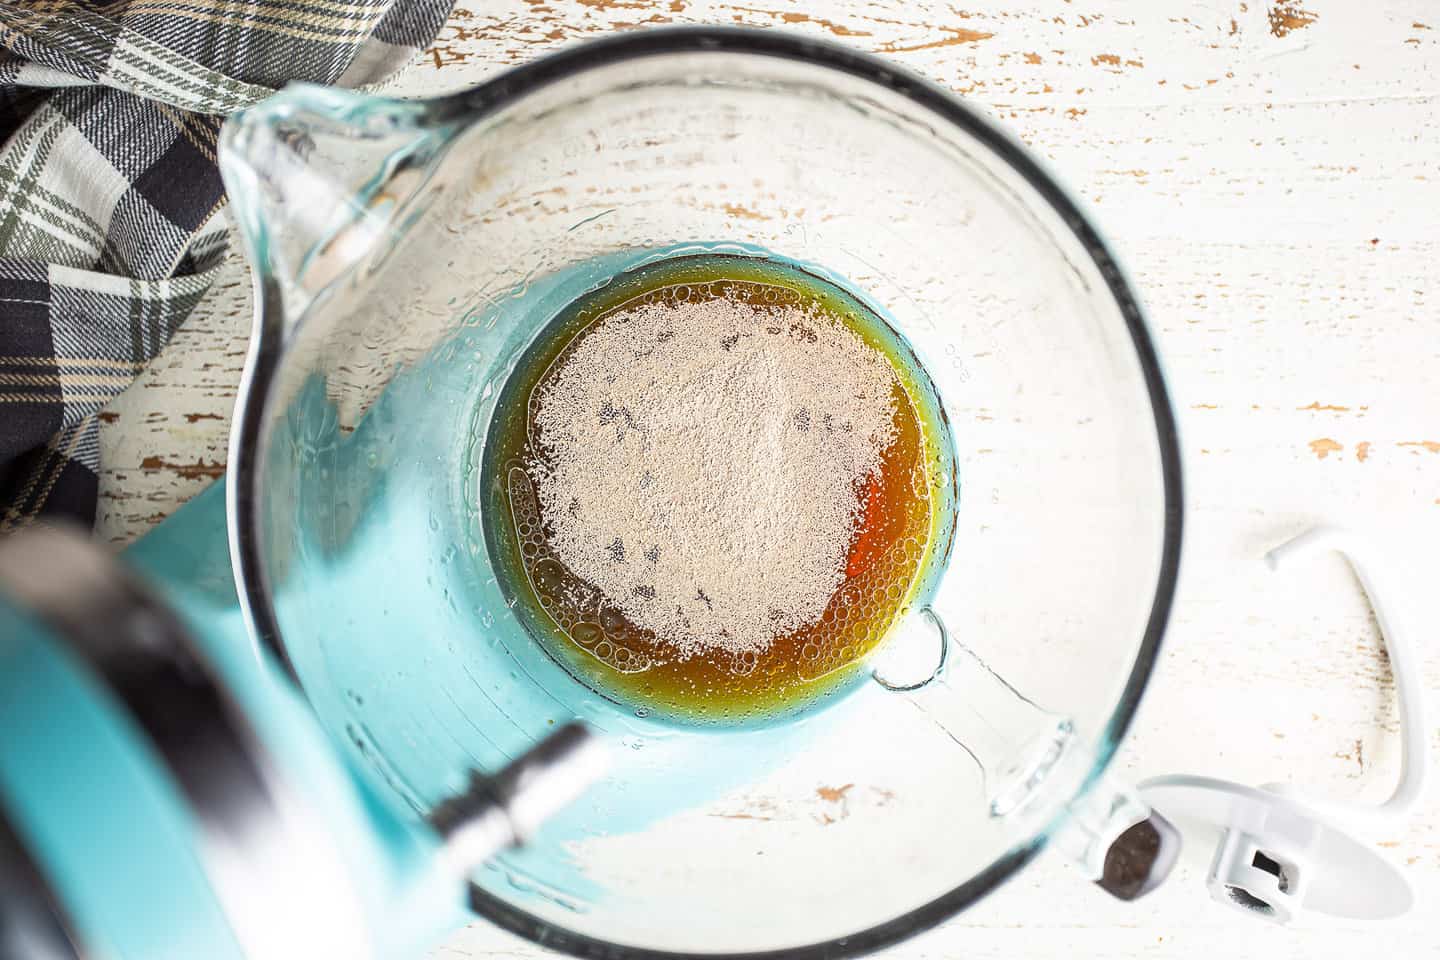
And allow it to dissolve.
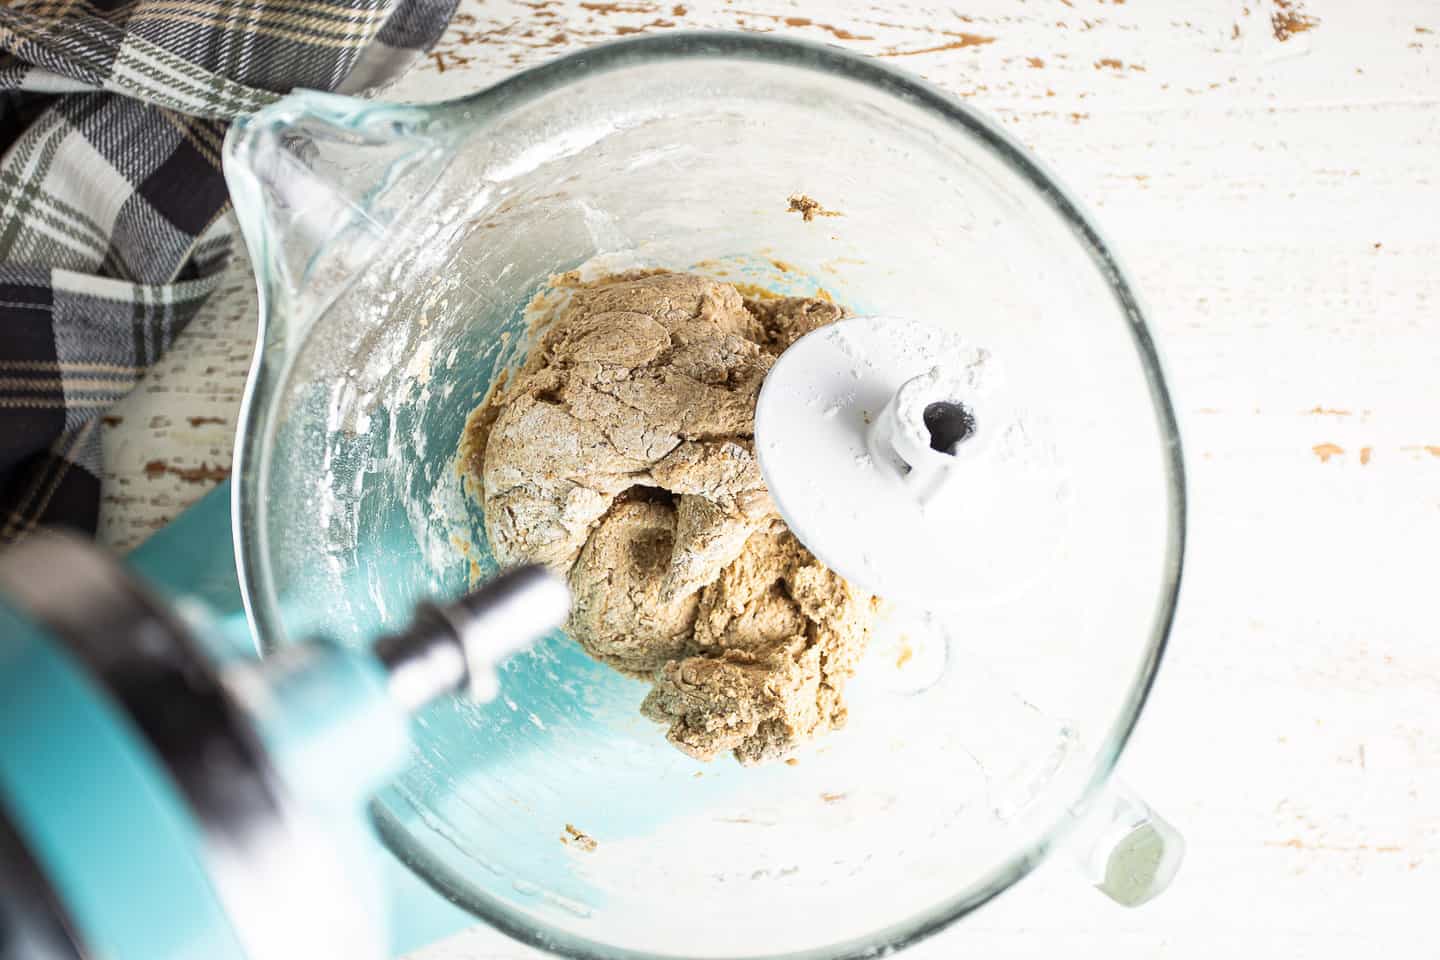
Step 2: Add the dry ingredients
Next, add the rye flour, caraway seeds, and salt.
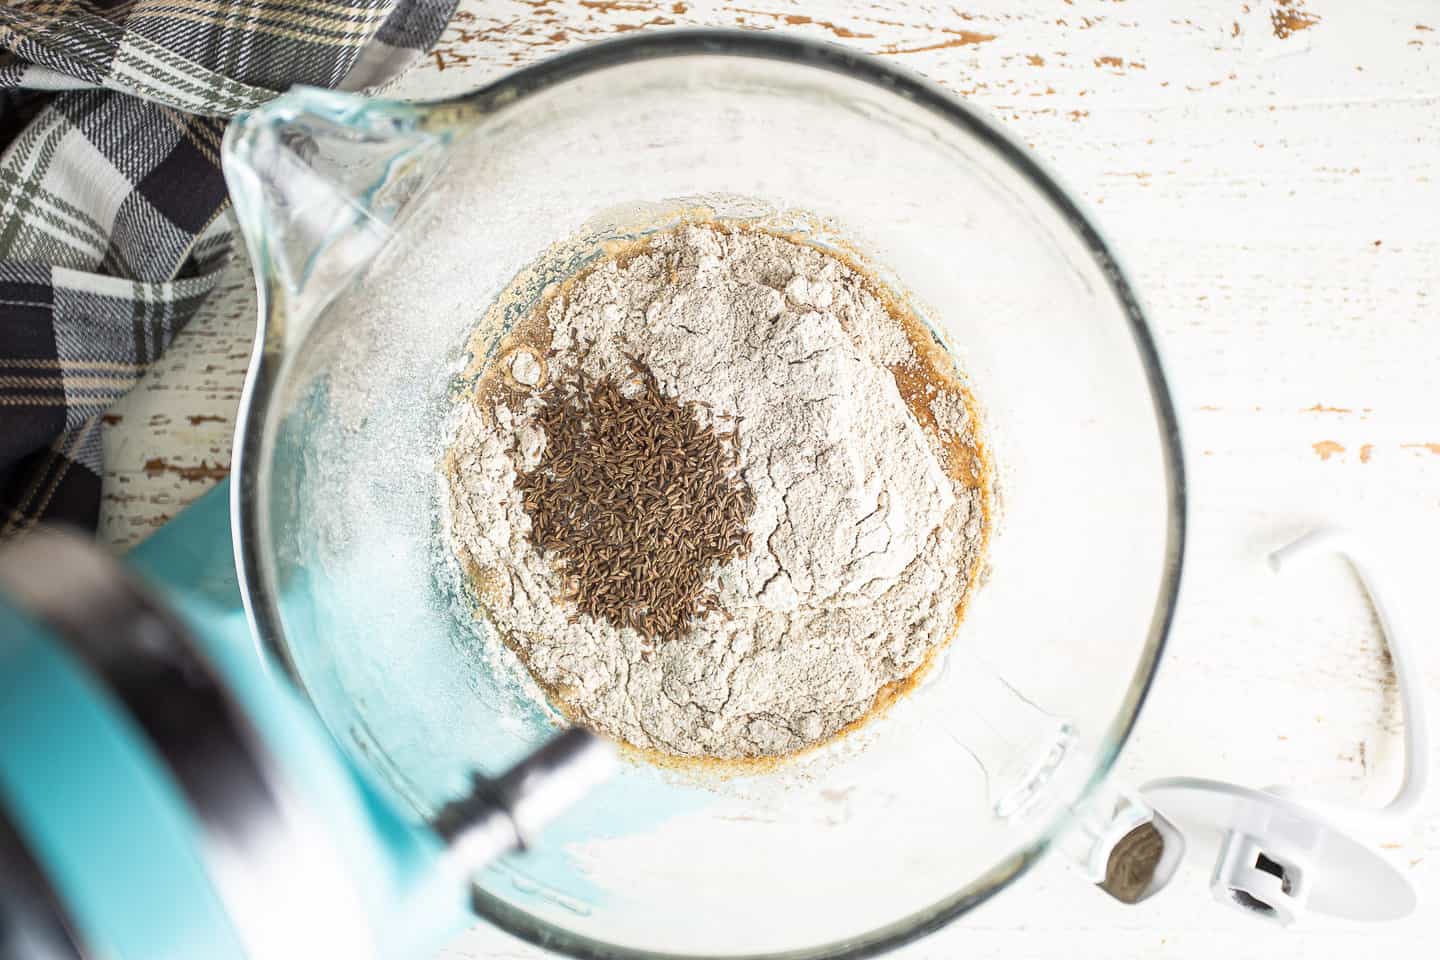
Stir these in until they're almost fully incorporated. You should have a very runny batter.
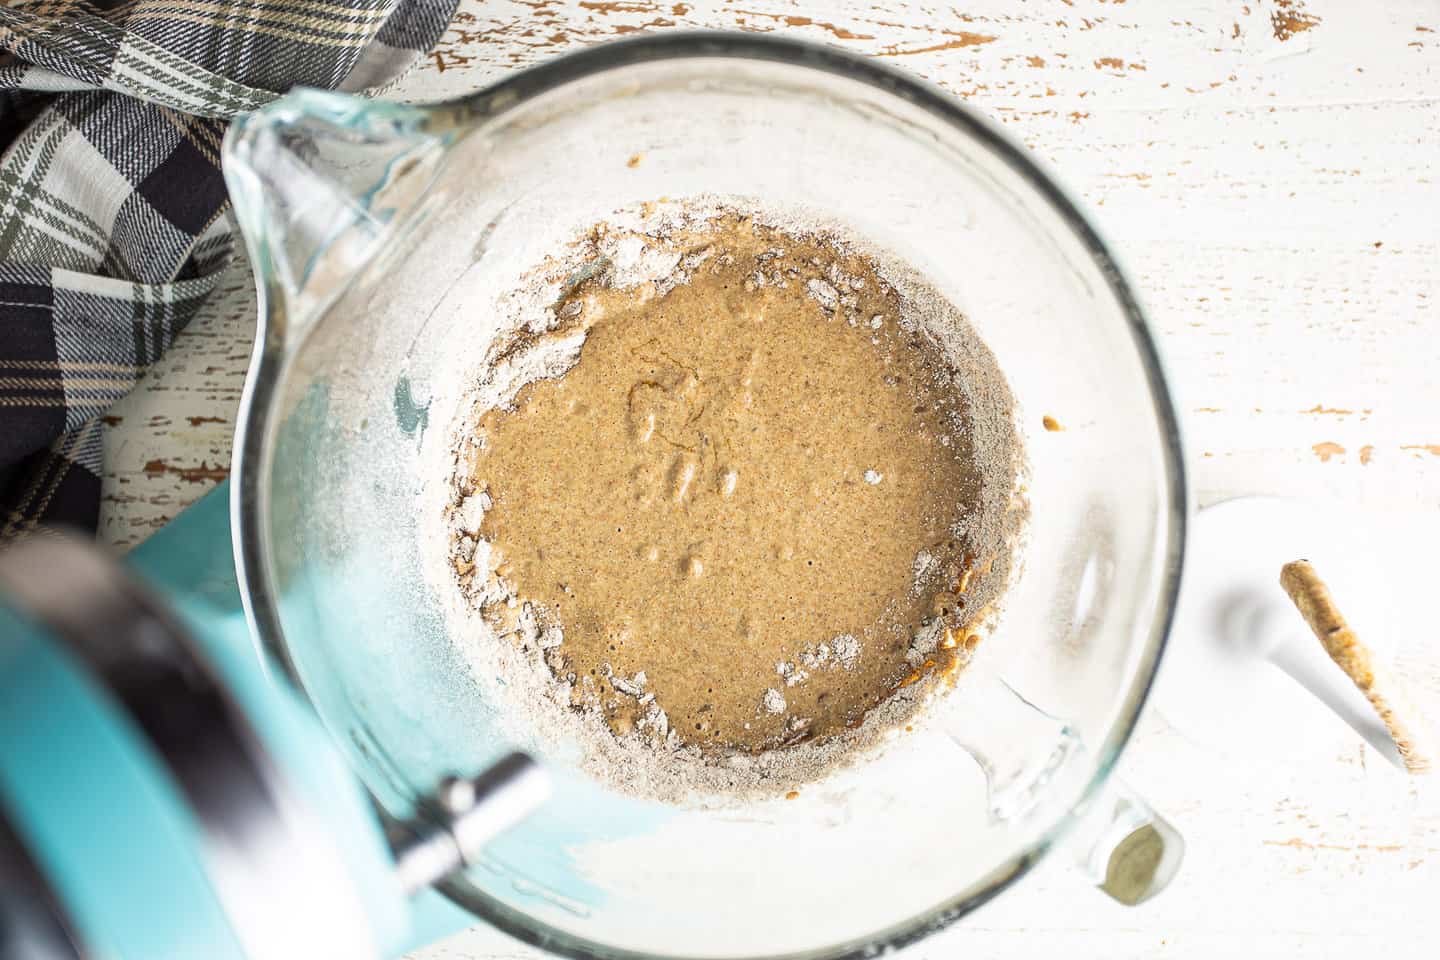
Stiffen it up to the proper consistency by adding in bread flour, about a half a cup at a time.
Once you have a stiff dough that pulls away cleanly from the sides of the bowl, you can stop adding flour.
Step 3: Knead
This is a really important step and I think a lot of us tend to skimp on it! You see what the dough looks like before it's kneaded (above)? Well, look how different it looks after 10 minutes of vigorous kneading.
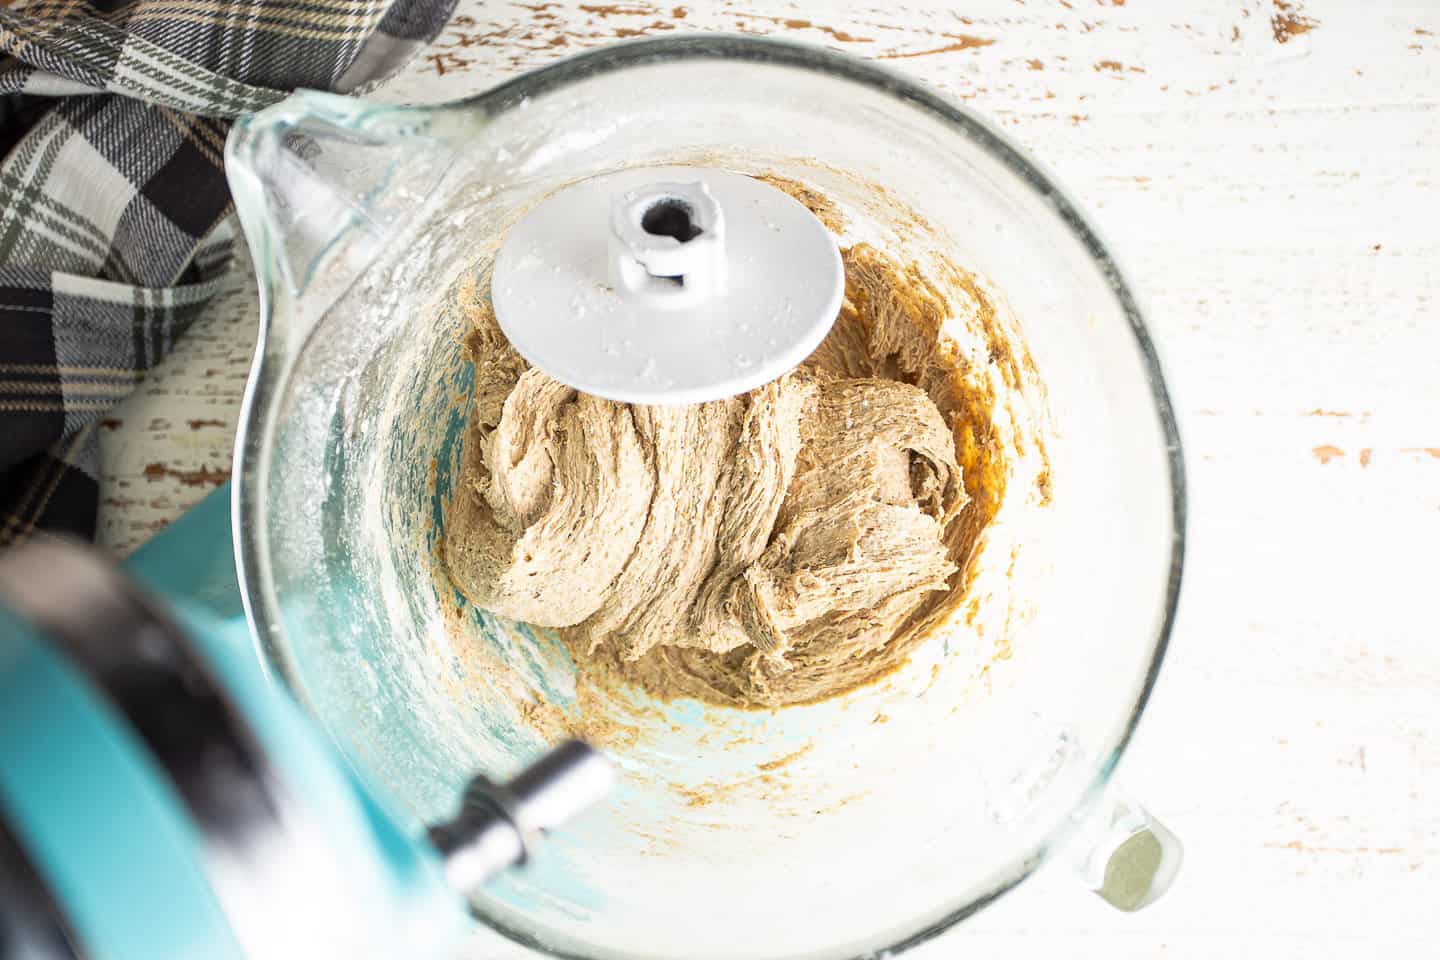
It's smoother and really stretchy. That's because the glutens have been activated and worked into long strands. This is what gives bread that satisfying chewy texture.
If you don't knead your bread dough long enough, it will come out crumbly.
I like to set a timer for 10 minutes and let my mixer do all the hard work.
Step 4: Rest
Once your dough has had a good long knead, cover it lightly with plastic wrap and allow it to rest and rise to double its original size.
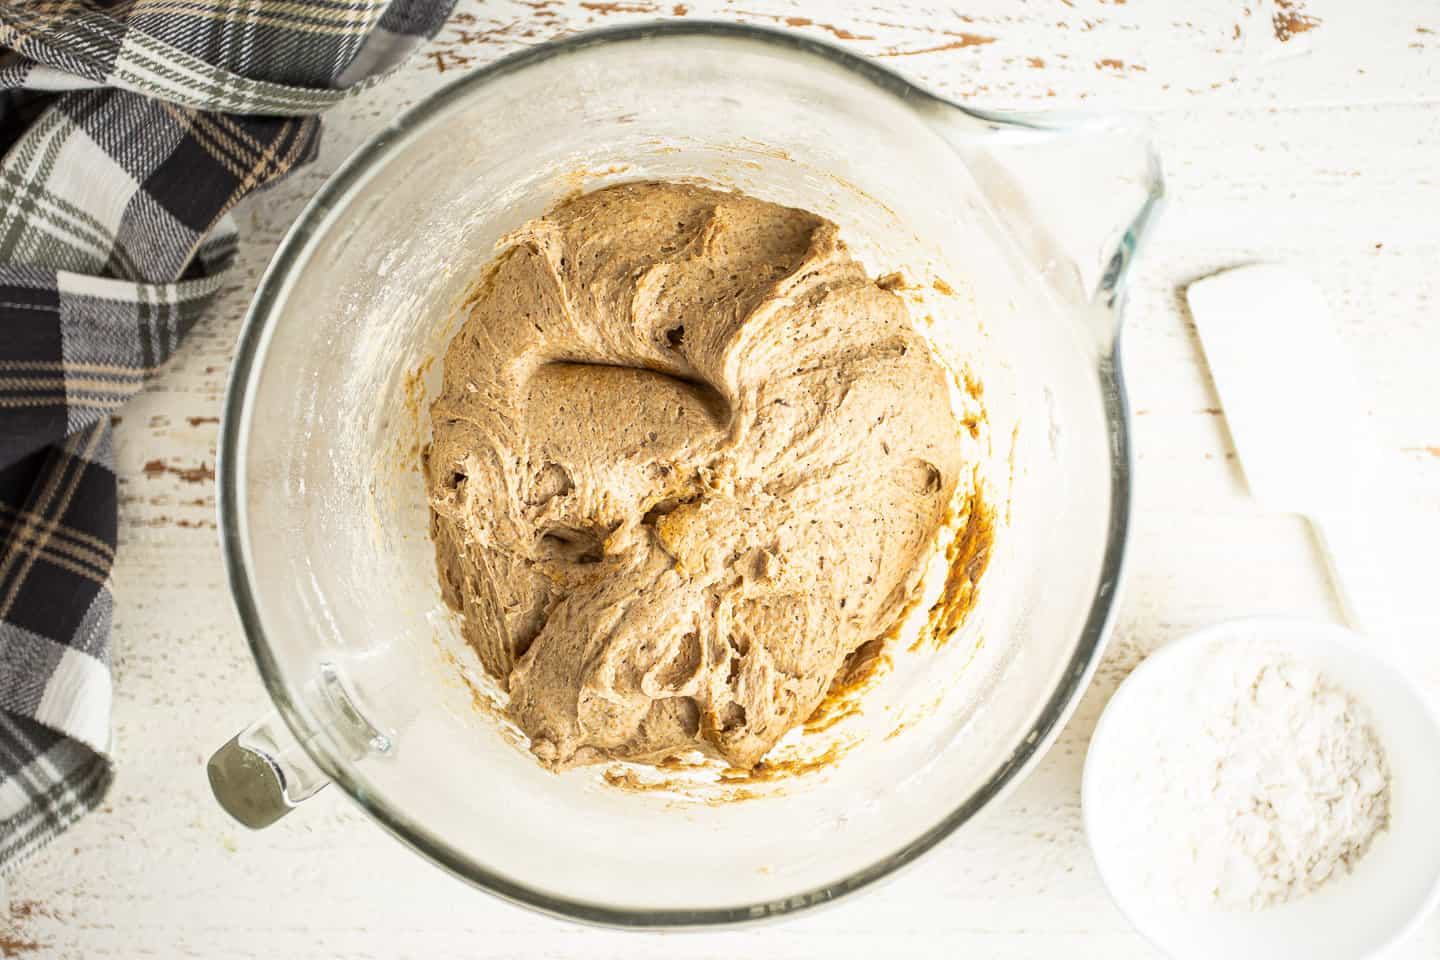
See how it puffs up with air? Without the bread flour and the vigorous knead it wouldn't be able to make those air bubbles. The bubbles would break and the air would just leak right out.
Step 5: Shape & rest again
Punch the air out of the dough and knead it a few times on a lightly floured surface.
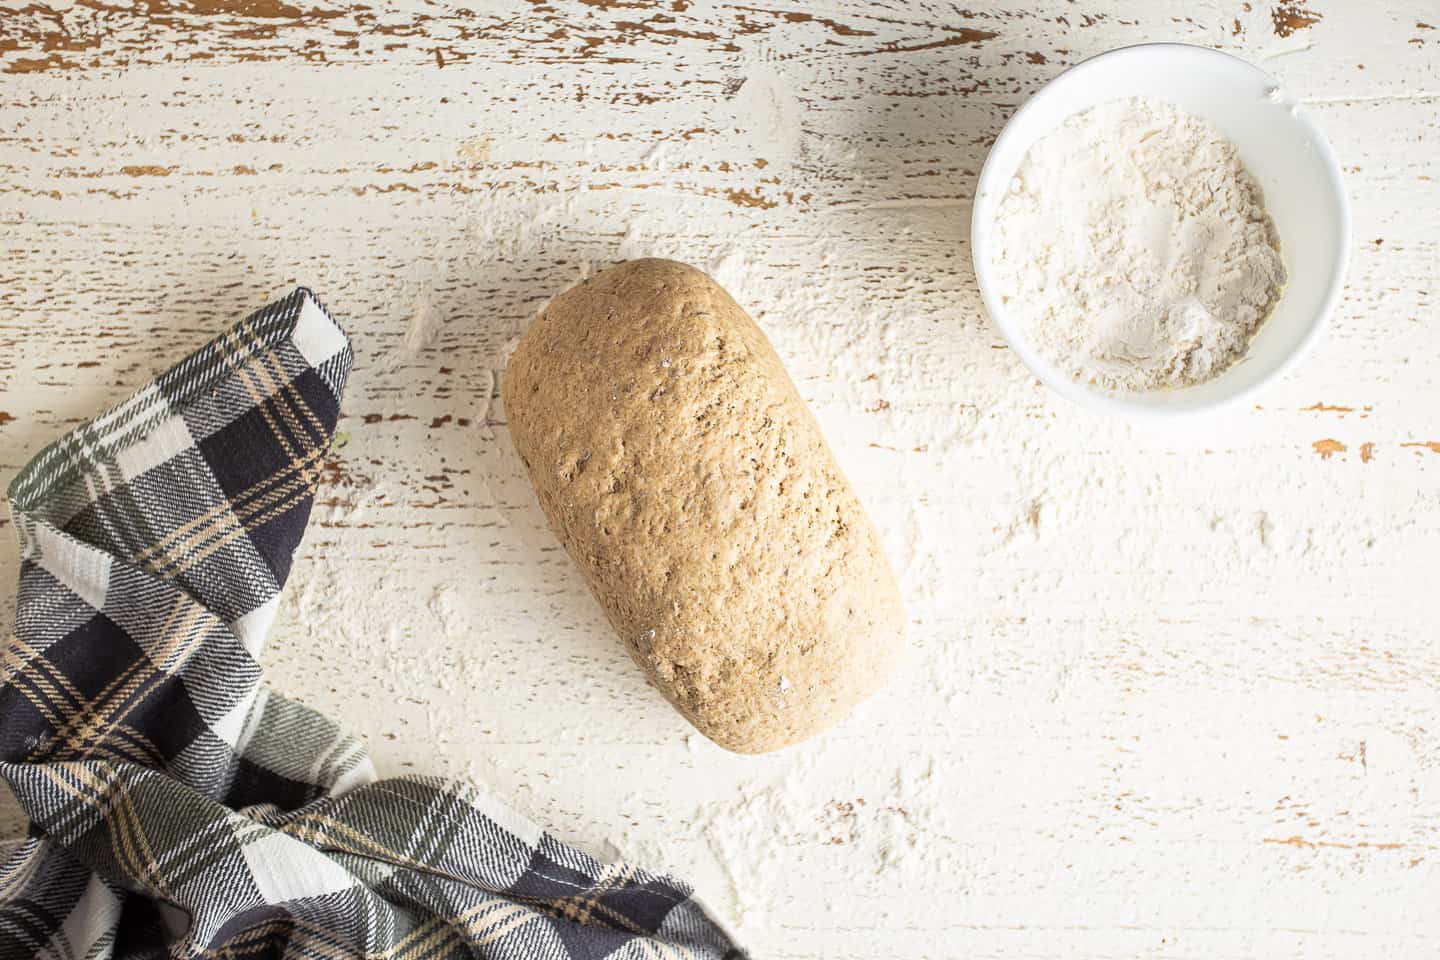
Then shape it into an oblong, or pop it into a loaf pan.
Cover it again and allow it to rest and rise one more time.
Step 6: Bake
Place a pan of water in the bottom of the oven, and preheat it.
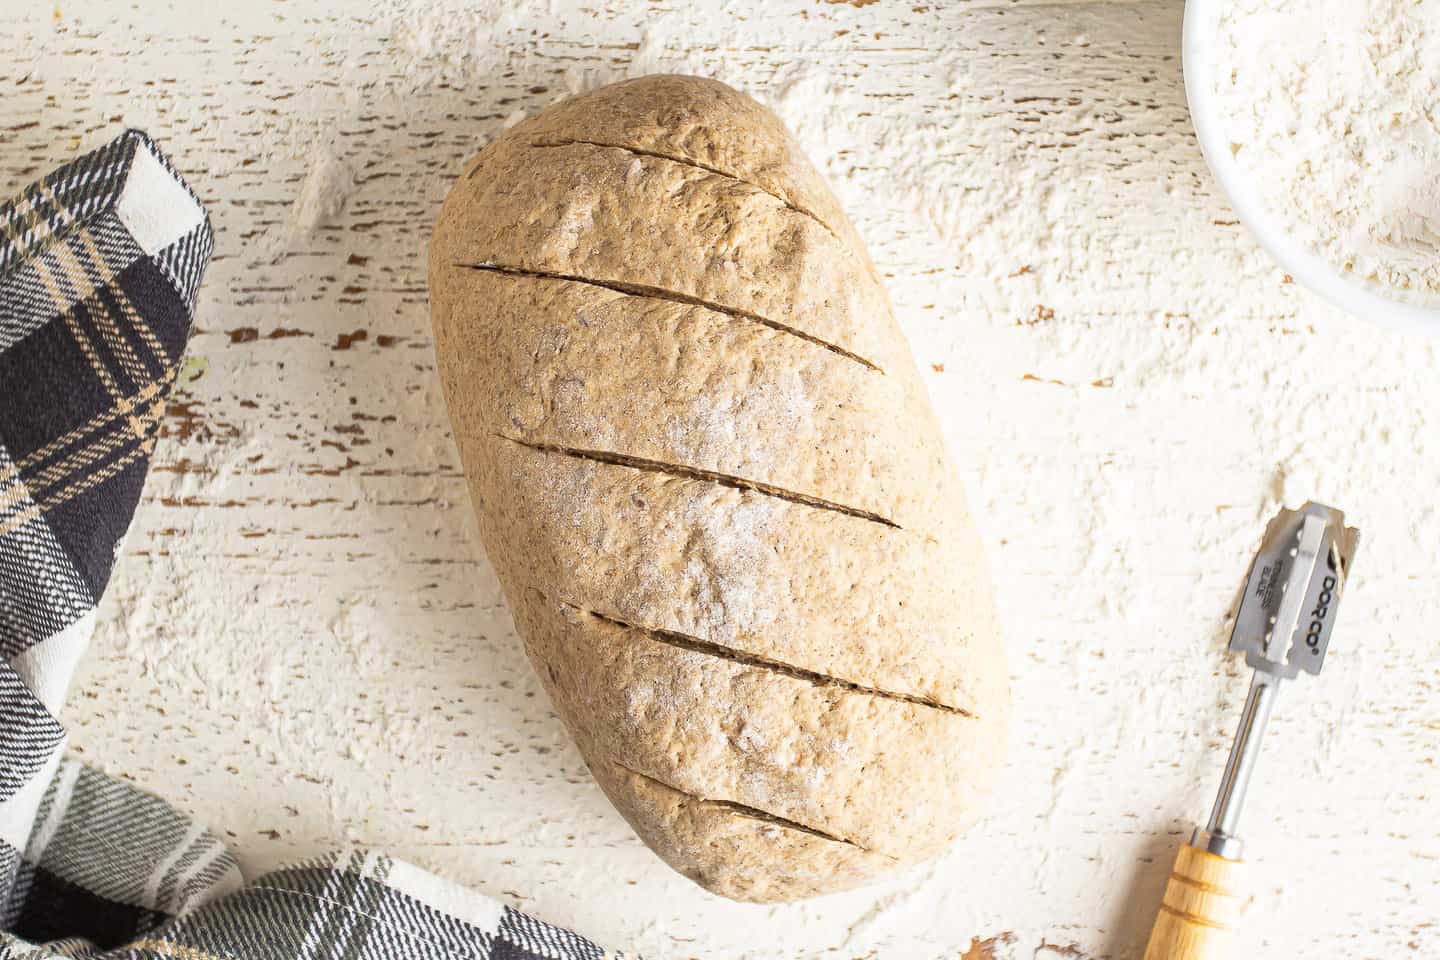
While you're waiting for the oven to come up to temperature, make a few slashes in the unbaked loaf with a lame or sharp blade. This not only looks pretty, it also serves a purpose: it allows steam to escape in a controlled way, so your crust doesn't crack where you don't want it to.
Bake the bread until it registers an internal temperature of around 200 degrees F.
How to serve
We feasted on big hunks of this rye bread, after it had cooled enough to handle. We slathered it with soft butter and a pinch of flaky sea salt. So good!
All that is to say that you can pretty much eat this bread as is, lol! There's nothing quite like homemade bread, warm from the oven.
But this also works really well for sandwiches (I can't wait to make a grilled Reuben!) and for toast. The texture is chewy yet moist and it's nice and soft in the middle.
Expert tips
Check the expiration date: If your yeast is past the date, it could be dead and your bread won't rise.
Make it comfy: Yeast likes the same kind of conditions we do. It wants to be warm but not hot. Hot water will kill it. But a nice warm environment, such as a sunny windowsill or if your oven has a "Proof" setting, will help it to flourish. It's amazing how much more the dough will rise and puff up if it's kept a little warm.
Knead it like crazy: If you don't knead your bread dough enough, it won't have the right kind of texture. Set a timer for 10 full minutes. Don't skimp!
Steam: Adding a pan of water to the bottom of the oven as the bread bakes will create the loveliest crunchy crust!
Cool: As soon as the bread is cool enough to handle, transfer it to a wire rack so it doesn't get a soggy bottom.
Frequently asked questions
Because rye flour is made with whole grains, it's healthier than the more processed white bread.
Not only does it have more fiber, it's also got lots of good-for-you minerals like calcium and manganese.
This rye bread is not gluten-free, but it is egg-free and dairy-free and it can be made vegan if you swap out the honey.
This can happen if the yeast is dead. Be careful not to kill the yeast with water that is too hot. Aim for the temperature of a baby's bath or around 105 degrees F.
It's also a good idea to allow your dough to rise in a warm place. This will encourage the yeast to burp out lots of air and make the dough grow in bulk.
Yes! Use 100g of active sourdough starter in place of the yeast, and keep in mind that you may need to extend the rise times a little longer.
You can, but you'll probably want to reduce the rise time by 10 or 15 minutes.
This can happen if your bread hasn't been given enough time to rise, or if it's had too much time to rise (because it eventually collapses back down again).
But I think the number one cause is not kneading enough! Be sure to give your dough a full 10-minute, vigorous knead.
The dough will keep for 2 days in the fridge or 2 weeks in the freezer. After that point, the yeast just comes to the end of its lifespan.
So feel free to make overnight rye bread by shaping the loaf and stashing it away until you're ready to bake it.
Fully baked rye bread can be kept (loosely covered) at room temperature for around 3 days, but you can extend its shelf life to several weeks by refrigerating it, or several months by freezing it. Thaw at room temperature or in the fridge.
This recipe makes one loaf.
The nutritional info in the recipe card below is for the whole loaf and it includes the caraway seeds. Divide it out by how many slices you choose to cut it into.
A few more of my favorite yeast bread recipes
As an amazon associate I earn from qualifying purchases.

Ingredients
- 1 ½ cups (354.88 g) water, warm
- 2 tablespoons (28 g) oil
- 1 tablespoon (21 g) honey
- 1 tablespoon (20 g) molasses
- 2 ¼ teaspoons (7 g) active dry yeast
- 1 ½ cups (153 g) rye flour
- 1 tablespoon (6 g) caraway seeds, (optional)
- 2 teaspoons (12 g) kosher salt
- 2 ½ cups (312.5 g) bread flour, (you may need more or less)
Instructions
- Place the warm water, oil, honey, and molasses in a large bowl and sprinkle the yeast on top.
- Allow the yeast to dissolve (approx. 5 minutes).
- Mix in the rye flour, caraway seeds (if using), and salt.
- Add the bread flour, a little at a time, stirring, until a stiff dough forms (the dough should pull away cleanly from the sides of the bowl).
- Knead the dough vigorously for a full 10 minutes.
- Mist a sheet of plastic wrap lightly with non-stick spray and lightly cover the dough with it, allowing it to rise in a warm place until doubled in volume (approx. 1 hour).
- Punch the dough down, sprinkle it with flour, knead it a few times, and shape it into a rough oblong.
- Lightly mist a sheet of plastic wrap and use it to lightly cover the unbaked loaf, allowing it to rise in a warm place until doubled in volume (approx. 1 hour).
- Place a large metal pan filled with water in the bottom of the oven and preheat it to 350 degrees F.
- Slash the unbaked loaf with a lame or sharp knife to allow steam to escape during the baking process.
- Bake the loaf in the steamy oven until it registers an internal temperature of around 200 degrees F (approx. 1 hour).
- Cool in the pan* (if using) for 20 minutes, then transfer to a wire rack to cool completely.


This bread had a nice flavour from the rye and caraway seed. It was easy to cut into thick or thin pieces. I doubled the recipe and baked it in bread pans. There was too much dough for my KitchenAid, so I kneaded it by hand. It was a workout, but worth the effort.
So glad to hear it Dee-Dee! TYSM!
Fantastic homemade rye bread recipe! Look no further if you want bread for Reubens, ham sandwiches, tuna melts, or something toasted with the slather of butter.
Soft and slices beautifully.
Thanks!
Hi Allie. I am a retired commercial Architect. Cooking has become a hobby for me too. I often play with recipes after I make them once. Sort of like we did at end of DD phase, to see how they adapt. Your dough is rising right now. I will let you know how it works out.
This is indeed an easy, straightforward recipe with clear directions. The bread turned out well, had decent flavour and was easy to cut in thin or thick pieces. I had to add a lot of extra flour while kneading it. I made this in a loaf pan. Thanks for adding that extra information. It rose into beautiful bread for sandwiches.
This rye bread is perfect! It makes a great baguette for party rye pizzas. I followed the recipe as is, shaped it into 2 baguettes, and baked for 30 minutes. Thanks for sharing such a good recipe.
My pleasure Karen! I'm so happy it worked out so well for you. Thanks for sharing!
After initial rise can the dough be stored in the fridge for a day or 2 to enhance flavor?
Yes it should keep in the fridge for up to 48 hours. Good luck!
I just made this rye bread, and I’m in love! The hearty crust adds so much flavor, and the soft inside is perfect for sandwiches. Thank you for the clear instructions and tips—they made the process so enjoyable! Can’t wait to share it with my family.
2nd time I made this bread recipe. I take it out of the oven at around 52 minutes and it’s perfect. My new favorite bread recipe . Thank you
So happy you like it! Tysm for the positive feedback!
Question: Can I alter the proportions a little a make it 50% rye and 50% bread flour? I like the dense texture of whole grain. Or will it help if I use dark rye flour since dark rye is supposed to have more of the rye kernel than medium rye flour? Thank you for your help.
I'm sure that would be just fine! Just keep in mind that when you increase the amount of whole grain flour the dough can become a little more dry and crumbly. So you may want to either add more water or use a slightly less flour. You'll know by the feel. Good luck!
AMAZING! this bread breaks up light and airy just like she says it will! I was amazed that my first baking with rye flour came out so beautifully! I was looking for a recipe that required proofing the yeast, needing the dough, using bread flour, and baking with steam as I knew these were basic techniques for a good bread with a fine texture. I’ll never try another recipe!
So happy you liked it Hilda! Thanks for the positive feedback and the 5-star review!
So happy to find this rye bread recipe on your site since I use so many of your bread recipes. My question is…is this at all similar to the bread served at Outback restaurants ? My grandson is begging me to make the small loaves they make. It resembles pumpernickel but online info says it is a honey wheat with rye added.
It is a fairly dark bread. Thank you so much. Even if not a similar bread, I intend to try to make this. I have such success with your breads, doughs in general. In fact …thank you again for being my first source for any bread items.
Wow Jennie first allow me to thank you for the kind words! I'm so happy that you've had success with my bread recipes and that you see Baking a Moment as a reliable source. I am familiar with the type of bread you are referencing, and to answer your question, I would say that this is similar but not exactly the same. Another similar recipe might be my Irish brown bread which can be found here: https://bakingamoment.com/irish-brown-bread/, although you may want to cut back on some of the seed topping. Unfortunately I don't have anything that's exactly like the Outback brown bread but I thank you for asking and I am actually going to put that idea on my to-do list for this year!
No, this recipe is not at all the same as the sweet brown bread served at Outback Steakhouse. That one is served with butter too and tastes good but does not have the distinctive taste of caraway seeds like this rye loaf has. Also this loaf is not sweet tasting and is good for sandwiches like salami and cheese or whatever you like. Grilled rueben sounds good too.
Ron from San Bernardino
If you would like a recipe for a brown bread similar to what they serve at Outback, it can be found here: https://bakingamoment.com/outback-bread-copycat-recipe/.
My bread did double in size and I punched it down kneading a few minutes more and shaped into an oblong loaf. Then let it rise again, it did but not high, it flattened out. What did I do wrong.
Hey Stephen I'm so sorry you didn't get the results you were after. May I ask how long did you allow the dough to proof? I'm wondering if it could have been a little too long, and the yeast kinda gave out. Is that a possibility?
Hi! Would love to try this. Can you substitute bread flour for all purpose flour? Thanks!
Hi Cheyenne! You can substitute with bread flour– the main difference will be that it produces a chewier texture (still delicious!)
This recipe is delicious! First time making a rye bread and it was so worth it. It came out picture perfect. I set a timer as suggested, so simple and good. My husband and boys ate it up!
I'm so thrilled you guys liked it! Thank you for the 5-star review that really helps me out a lot! xo
Very tasty and hearty rye bread. I have not made a yeast breast in several years (probably 20+ years) and I no longer have a bread machine, so I was back to kneading the dough myself. I did it! I used a large loaf pan and it rose 4.5 inches. This recipe was easy to follow with great pictures and directions. It was a perfect rainy day activity. Thank you.
Oh Michele it's my pleasure! So happy you enjoyed. And thank you for the 5-star review and for the positive feedback!
I've wanted to try a
rye bread recipe for a long time but most I've found were for dark or Russian Rye which would have too strong of a taste for me. I followed this recipe to the tee but the dough was tough or heavy. I should have added more water while still mixing but didn't want to change any part of the recipe just in case. The bread has a very good flavor but didn't rise like I would have liked and it has a very tight crust. I try this again but I will add more water.
I know altitude makes a difference but we're in Indiana which is not a high altitude. Thanks for the recipe and I'll try some of your others too.
Thank you so much for your feedback Carol!
This was my first time baking rye bread and I will be making this regularly, especially during the fall and winter months. I was worried my dough got too hot while proofing, but kept with it and it was amazing! I did cover it with a foil tent about halfway through baking because we prefer a lighter top. I followed all other instructions to a T. Thanks for this amazing recipe!
My pleasure Carie! I'm so glad it worked well for you. Thank you for the feedback and for the 5-star rating!