Crusty French Baguette Recipe
As an amazon associate I earn from qualifying purchases.
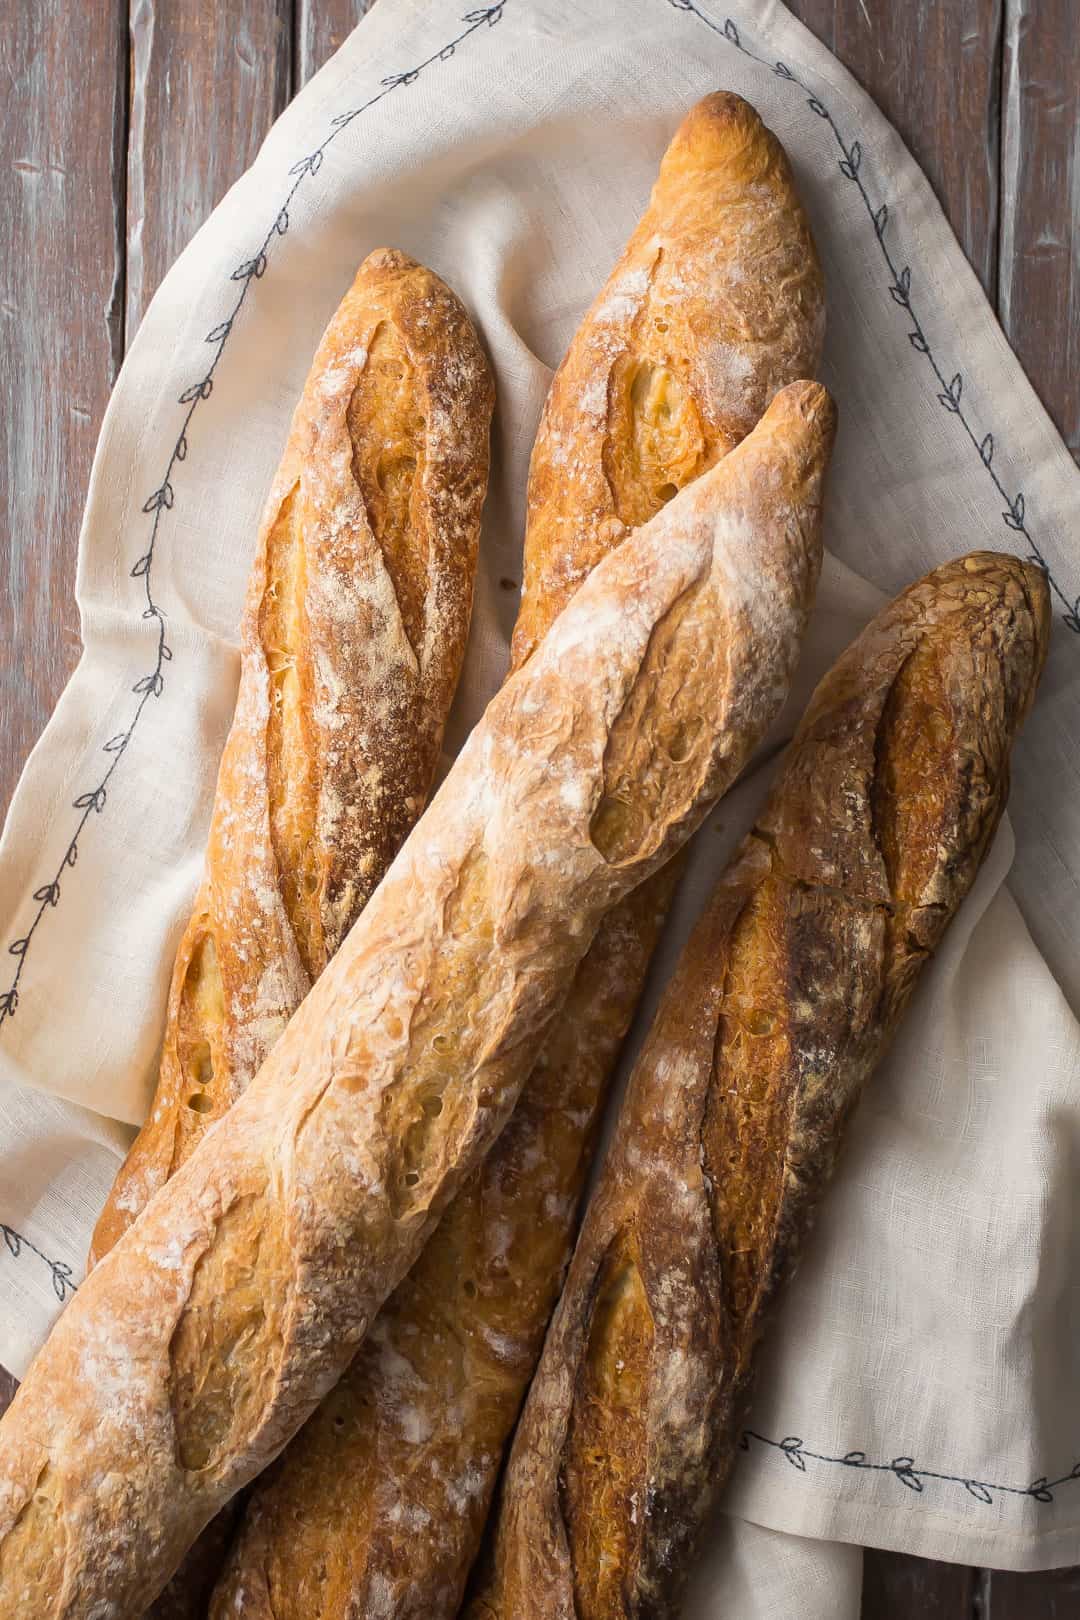
Few things compare to the magic of a crusty French Baguette fresh from the oven. With its golden, crackly crust and tender, airy interior, this bread is irresistible served alongside a bowl of hot soup, piled high with sandwich fillings, or torn off piece by piece to enjoy with butter.
The best part? This recipe is made with just four simple ingredients, and most of the work is hands-off. A little patience goes a long way here, and the results are so worth it.
I am over the moon about that crunchy, splintery outer crust. See how it shatters? And the interior- soft, pillowy, and so airy. It's perfection.
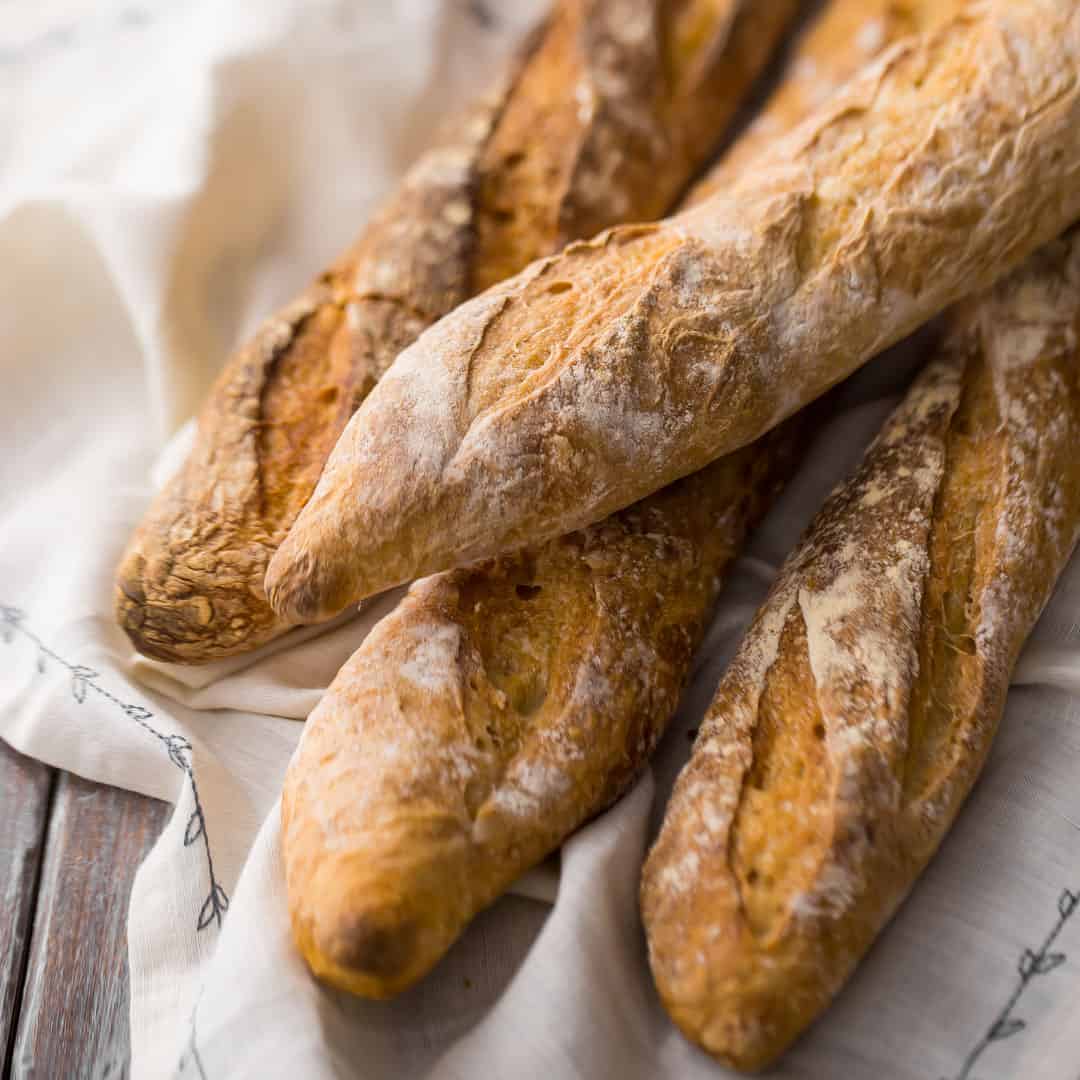
Table of Contents
- Why You'll Love This Baguette
- Ingredients You'll Need
- How To Make A Homemade French Baguette
- Classic French Baguette FAQ
- More Homemade Bread Recipes
My family loves a good crusty French baguette. We eat this kind of bread with so many things! It's so chewy, yeasty, and good. I've always been a little afraid to try making it myself. Everything you hear suggests it's complicated and fussy, and only a French boulanger could ever get it right.
WRONG! Here's living proof that anyone can make a killer baguette.
Why You'll Love This Baguette
- Bakery-style at home: You don't need fancy equipment to get an artisan-quality loaf.
- Simple ingredients: Just flour, water, yeast, and salt.
- Crispy crust, tender crumb: For the perfect balance of crunch and softness.
- Versatile: Enjoy it as a snack, side dish, or as a base for sandwiches.
Ingredients You'll Need
The recipe card at the bottom of the post contains the full list with all of the amounts. Refer to that when you're cooking.
- Bread flour - Provides the higher protein content needed for that perfect chewy texture and airy interior.
- Kosher salt - Balances flavor and strengthens the gluten structure.
- Active dry yeast - The key to a good rise and light texture. Instant yeast can also be used.
- Water - Warm water helps activate the yeast, while cool water keeps the dough manageable.
- Additional flour - For dusting your work surface and shaping the loaves.
How To Make A Homemade French Baguette
Step 1: Start the Dough
Sprinkle the yeast over the warm water and let it sit until it becomes foamy. This ensures the yeast is active and ready to work.
In a large bowl, combine flour and salt. Make a well in the center and pour in the dissolved yeast. Slowly stir in cool water until you have a shaggy, stiff dough. You may not need all of the water. Cover and let the dough rest for 30 minutes.
Step 2: Fold and Rise
Turn the dough onto a lightly floured surface. Gently press it into a rectangle, then fold the sides into the center and flatten and rotate it. Repeat the process. Place the dough in an oiled bowl, cover it, and let it rise until it has doubled in size (about 1-2 hours).
Step 3: Shape the Loaves
Divide the dough into four equal portions. Shape each into a long, thin loaf, approximately 15 inches long, with tapered ends. Transfer to a parchment-lined baking sheet, cover loosely, and let it rise again until doubled in size (30-45 minutes).
Step 4: Bake with Steam
Preheat your oven to 450°F (230°C). Place a pan of water on the bottom rack to create steam, which helps form that signature crust.
Slash each loaf with a sharp blade, dust lightly with flour, and bake until golden brown and crusty, about 30-40 minutes. The baguettes should sound hollow when tapped.
Helpful Tips and Tricks
- Don't rush the rise: A slower rise develops more flavor and better texture.
- Use steam: That pan of water in the oven is the secret to a crisp, golden crust.
- Slash with confidence: Clean cuts help the bread expand properly in the oven.
- Cool before slicing: As tempting as it may be, let the loaves rest for at least 10 minutes to allow the crumb to set.

Classic French Baguette FAQ
This type of loaf is infinitely versatile! Slice it into ½-inch rounds and it's perfect as a base for bruschetta or crostini. Or it can be used as a dipper for your favorite party dip. And we love it toasted with garlic butter, for garlic bread. So good with a pasta dinner! Or just tear into it and eat it with a hot bowl of soup. So satisfying!
Baguettes are best when they're freshly baked, but they're still pretty darn great after a few days!
To store a French baguette, wrap it loosely and keep it at room temperature for 2 to 3 days. If you notice it's not as crusty after a while, just pop it in a warm oven (around 170 degrees-ish) for 5-10 minutes, and it should come out good as new.
A fancy French boulanger might not agree with me on this one, but I say go for it!
I do this a lot at my house. When the baguette is still fresh, slice it into thin rounds. I'll often cut on the diagonal so there is more surface area to spread yummy things on. Then, just slip the baguette slices into a zip-top freezer bag, and into the freezer they all go.
Whenever we want a slice of crusty French bread, we just pull out what we need.
The baguette slices thaw in just a few minutes at room temp. Alternatively, they can be warmed in the oven or toasted. It's super convenient!
Yes, but the texture won't be quite as chewy or airy. Bread flour is best.
No. A parchment-lined baking sheet works beautifully for this recipe.
This could be due to inactive yeast, cool rising conditions, or using too little water. Ensure your yeast is fresh and allow the dough plenty of time to rise.
Spritz the loaves with water right before baking, in addition to using a steam pan.
More Homemade Bread Recipes

Ingredients
- 3 ½ tablespoons (52.5 g) warm water
- 1 ½ teaspoons (4.67 g) active dry yeast*
- 3 ¾ cups (468.75 g) bread flour
- 2 teaspoons (12 g) kosher salt
- 1 ¼ cup (295.74 g) cool water, (you may not need all of the water)
- additional flour,, for dusting
Instructions
- Place the warm water in a small bowl and sprinkle the yeast on top. Set aside and allow the yeast to dissolve and become foamy.
- Place the bread flour into a large bowl and stir in the salt.
- Make a well in the center of the flour mixture, and stir in the dissolved yeast.
- Add the cool water, a little at a time, while stirring, just until a stiff, shaggy dough (watch the video below to see what this should look like) has formed (you may not need to use all of the water).
- Cover the bowl with plastic wrap and allow it to rest for 30 minutes.
- Transfer the dough to a lightly floured work surface, gently press it into a rectangle, and fold the short sides into the center. Flatten, turn 90 degrees, and repeat.
- Place the dough in a large oiled bowl, and cover with plastic wrap. Allow it to rise in a warm place until doubled in bulk (about 1 to 2 hours).
- Divide the dough into 4 equal portions, and shape each one into a long loaf (about 15-inches long and 1 ½-inches in diameter), with pointed ends.
- Place the loaves on a parchment-lined baking sheet, cover with oiled plastic wrap, and allow to rise until doubled in bulk (about 30 to 45 minutes).
- Preheat the oven to 450 degrees F, and place a pan of water on the bottom rack.
- Bake the breads until crusty and brown (approx. 30 to 40 minutes). The baguettes should give a hollow sound when tapped.


So this recipe is magic. Not going to lie, I needed some baguette in a few hours time to go with soup for dinner, so chose this because of the quick and absurdly hands off approach. I've made baguette before and have never been too pleased with the results, but this recipe was so easy and I really just needed a vehicle for soup dipping, so I wasn't going in with high expectations.
This was by far the best baguette I've made. I don't know what voodoo you've done to make this so easy and so delicious, but this is THE recipe I will always use going forward. The exterior was super crunchy and the inside was pillowy. For the lack of effort I had to put into making this, I can't imagine choosing a different recipe. For transparency, I did halve the recipe (only two adults and a baby, didn't need a lot of bread!) And made one baguette. It was perfect. Thank you for posting this!
You're so welcome! I'm really happy it worked so well for you. I give so much credit to Sarah Black, who wrote the original recipe from which this was adapted. If you are interested in learning more about bread baking, I highly recommend her book "One Dough, Ten Breads." It's linked in the recipe card above. Thanks so much for the great feedback!
How long should the dough rise the first time? It doesn't say in the recipe. Also, how long before baking the bread should we put the water in the oven and preheat? Is it the full 45 minutes that the bread is rising? Do we leave the pan of water in the oven when the bread is baking? How full should the pan be? Thanks!
The dough should first rest for 30 minutes (see step 5), then comes the folding process noted in step 6, then the rise time in step 7 is 1 to 2 hours, or until doubled in bulk (this should not take more than 2 hours if the yeast is alive and the environment is warm enough). Put the pan of water in the oven right when you start to preheat it (see step 10). And yes, you want the pan of water in the oven while the bread is baking. A few inches of water should be all you need, you just want to create steam so that the crust comes out crunchy. Hope this is helpful! Let me know if you have any other questions.
Wow. Just baked my 2nd batch even better than the first. Decided to make 3 from the recipe as i wanted them a little thicker. First time i have ever made a baguette. I was amazed how easy it was. No kneading reqd. Great, simple, easy to follow instructions. Thanks so much. I will never buy another one.
You're so welcome! I'm glad you're having such great success!
For my first attempt at baking bread i was very happy with these . i made 3 instead of 4 as when the 4 were proving they looked very thin and i was concerned. The 3 were a perfect size and the house smelled amazing while they were cooking. Ripped off a piece of one as soon as they came out of the oven and spread some creamy gorgonzola cheese on. OMG. Will use one tonight with some pasta to mop up the sauce. Thanks for a great recipe
Omg I love the gorgonzola idea! I bet that was fantastic. So glad you were happy with the recipe! Thanks for the great feedback!
The loaves turned out nice and crusty! I probably over baked them but I cannot bear underdone bread. However, they did not have a lot of flavor. Do you have any suggestions? It's not that I wanted flavored bread, e.g. with spices, it's that it seems to be missing some kind of depth that I've had with other loaves. I could start w/ more salt but just wondering what your thoughts are.
Thanks for the recipe!
Hi, I love this recipe. Thank you. I am doing something wrong, I can only get 2 loaves ara time, not 4. Not sure what I need to adjust. I live at high altitude, in Colorado. Any advice?
Thank you again.
Hello! In order to get 4 loaves, you will just divide the dough into 4 equal portions before shaping each one into a loaf. To shape them, roll them to about 15-inches long and 1 1/2-inches in diameter. They will seem very long and thin, but they will expand quite a bit as they proof and bake. You can see what this looks like in the video which can be found just below the recipe instructions. Hope that's helpful!
Very disappointing snarky answers to the cook time comments and the request for volume measurements. Glad I've kept my ad-blocker on.
I'm not sure what you mean or how the ad blocker changes anything, but thanks anyway for reading! I hope you enjoy the recipe.
Amazing recipe! I’ve made this 4 or 5 times already, and it comes out great! Somehow this past time the bread came out a bit dense and not as fluffy as in the past. Any idea what I could’ve done wrong? Too much water maybe? Thanks for you help!
Great recipe and they turned out just as the pics, but I read all of the comments first!
Here are some observations:
1.. I used 74 less grams of water, it's almost like the 50 g in the yeast proofing should be subtracted from the 284 used in the bread. If the dough is too wet you end up with flatbread!
2. I raised my loaves directly on oiled parchment paper on my baking sheets, I found this easier than trying to move them from the raising sheets to the cooking sheets..
3. I used a box cutter to put the diagonal slips on the loaves and a small sieve to flour them before baking.
4.. I found 2 cooking sheets in my oven cause uneven heat distribution so I just cooked then 1 sheet at a time.
5.. The cooking time at 450F was 15 min for me.
6. I have also added 1 tsp of diastaic malt and it works well in this recipe.
The pictures, instructions and video were fantastic.
Amazing recipe. I used instant yeast on accident and it turned out okay. Only needed to bake for about 30 minutes at 450. They are soooo crusty and soft on the inside!! I added parmesan and minced garlic to one for a creative twist, it's delicious 🙂 thank you!
Wow that sounds fantastic! Great to know instant yeast will work well too... Thanks so much for sharing!
First time success. First time my bread didn't taste yeasty.
Light. Crunchy.
Baked 2 loaves on 2 trays. Uneven baking. The bottom two loaves were a bit chewy
Mary
Thanks so much for the feedback Mary!
Recipe is brilliant. I am a baker in Scotland and was a bit sceptical about the lack of mixing. I always believed the crunchy French bread was down to the type of flour that was used . I now know differently! Thanks.
I have fallen in love with bread baking recently and found your recipe. This is my third time making this recipe and I love it! The first time I made it I cut the dough in four loaves and they were good but kind of thin, the second time I cat the dough in half and I liked them even more! Today as we speak I have the baguettes in the oven as this time I cut the dough into three loaves. I have total confidence the three baguettes will be just as great as last time! Since my wife is on a constant diet, and she doesn’t need to be... she doesn’t eat much bread, I bake them cool them and freeze the whole baguette till the next time I want bread with dinner, usually the next night. My wife thinks I’m kinda crazy now that I wanna bake all the time but she will get over it cause I ain’t gonna stop baking anytime soon!! Thanks for the great recipe😊
My pleasure Scott! I'm so happy you've found a method that works so well for you. I often freeze this too and it's so nice to always have good bread on hand. Thank you for the 5-star review!
Loved this recipe. Not difficult at all. I read it carefully a few times since I didn't want to make any mistakes. I made 8 baby baguettes and made a tuna salad sandwich out of one little loaf. Delish!
If I want to bake just one, should I cut the recipe in half and make a larger loaf? For just the two of us, I can't see having four baguettes at once. Thanks for a great recipe!
I think that should work just fine. Good luck and you're very welcome!
I’m 25. And I never made any bread or cake. Yesterday I made your baguette and baguette is perfect. Thank you so much.
Kind regards!
So happy to hear that Jelena! Way to start off your baking with a bang; baguettes can be tricky but if you nailed this, the sky's the limit for you!
"They say that nothing can come close the bread you can get in France." Ok... so I would be one of those people. I live in the London, but travel to France a couple of times a year and I’ve always said the baguettes in France are easily the best and they’re consistently good too. And nothing really compares...
I made my first baguette yesterday, from another recipe and it wasn’t good at all. Today I followed this recipe, along with learning what temperature is lukewarm water, so as not to kill my yeast. So this is the second time I've ever baked bread.
I overcooked slightly by accident, even though they were in for 35 mins. My oven must be too hot, so I’ll put a check on that…
However this recipe is the one ! My baguettes were certainly better than the ones I’d find in the supermarket here and pretty close to the baguettes I’d find in France.
Great work !
Thanks so much! I'm so glad you were pleased with this recipe!
This baguette recipe is incredibly easy and delicious! I love the simplicity and depth of flavor. I have made it three times in five days because my family is gobbling it up! So delicious! Thanks!
Wow that's so great to hear Tara! Thanks so much for the awesome feedback and for the 5-star review!
What temperature should the warm water be for the yeast?
The water should be warm but not hot. If it is too hot it could kill the yeast. Aim for the temperature of a baby's bath. Good luck!
What shelf of the oven should I be using. Thank you.
Middle is best. Good luck!
Thank you for a fantastic and easy to follow recipe and video, this will make for a lovely Sunday in the kitchen. I am curious how much water I should have in the pan in the oven however? Everything else is so exact and I don't want to mess up this crucial part. Thank you!
Hi Brooks! You should have about 2 inches of water in your pan. Enough to create steam, and enough that it won't all evaporate during the baking process. Hope that's helpful! Good luck and enjoy!