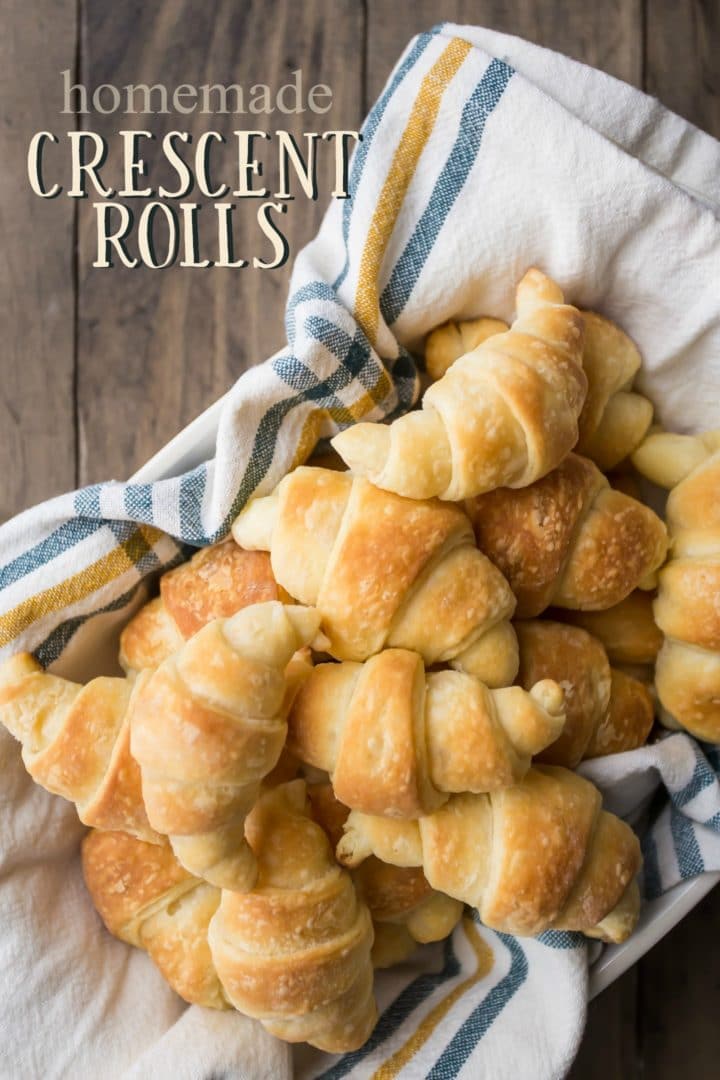
Homemade Crescent Rolls
As an amazon associate I earn from qualifying purchases.
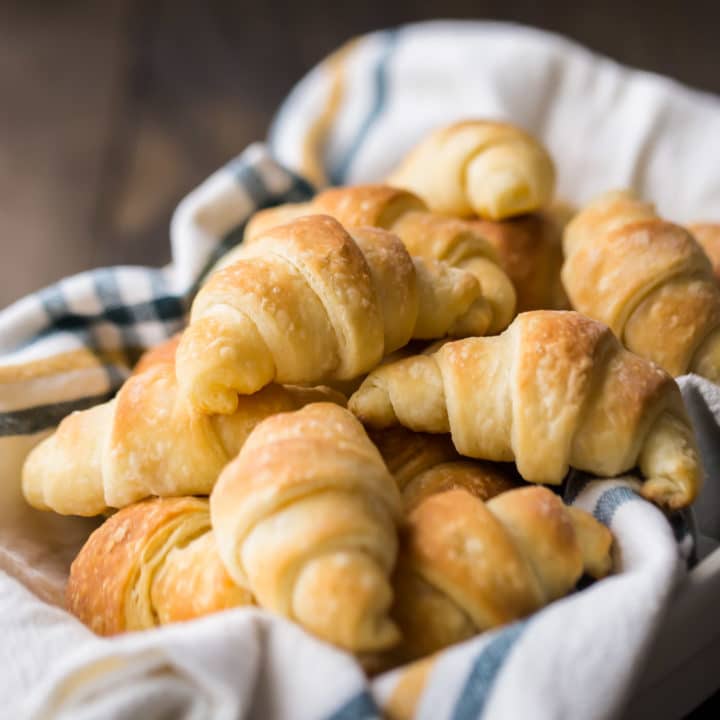
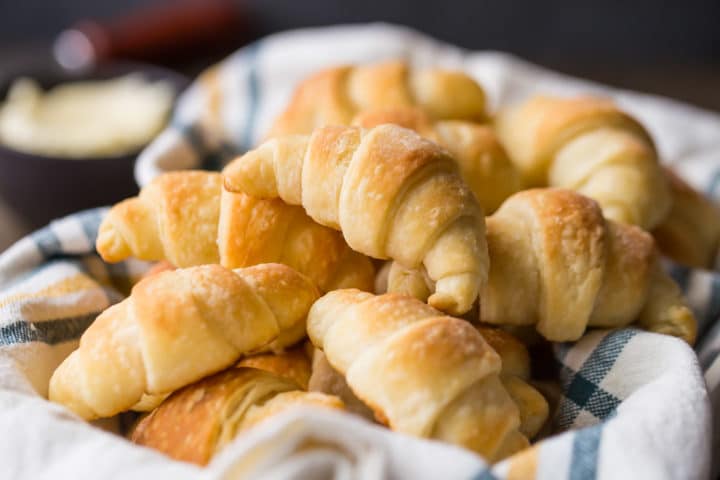
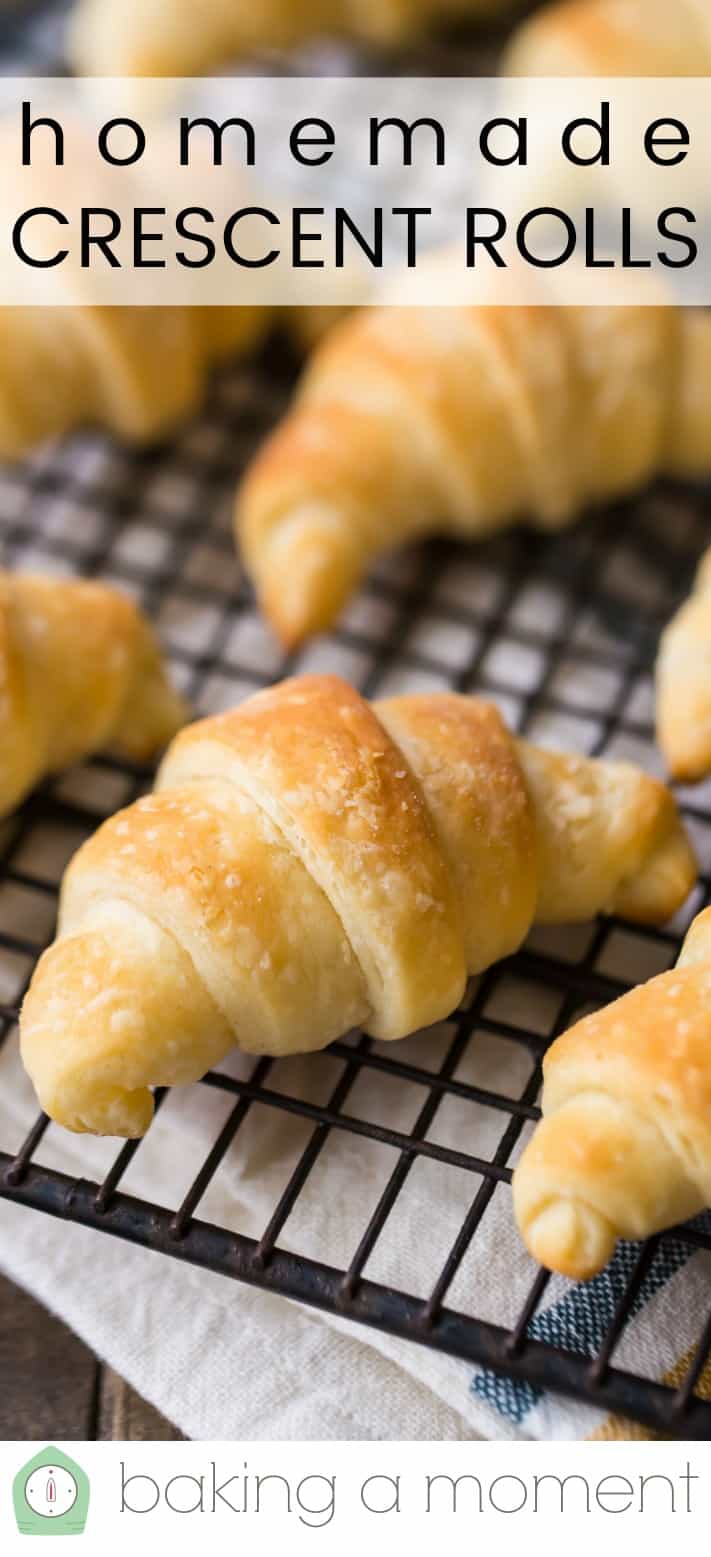
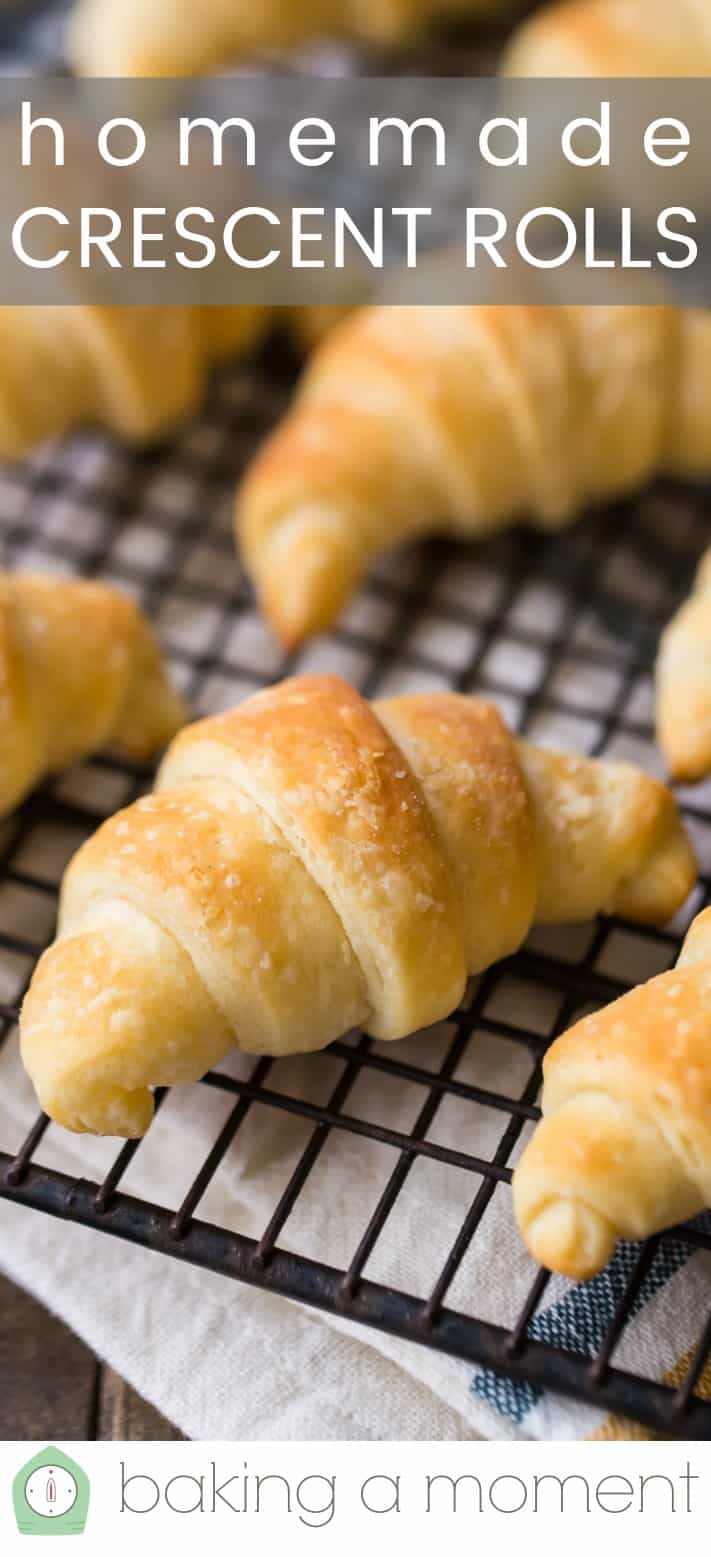
Light, flaky, and soft homemade crescent rolls! Made with just a few simple ingredients. These will take your dinner to the next level!
Who doesn't love crescent rolls?? Am I right?
There is just something so irresistible about those light, fluffy, flaky dinner rolls. They have a little hint of yeasty sweetness, and they're so buttery and delicious.
Having any kind of homemade bread to pass around the dinner table truly makes any meal so much more special. My family always enjoys my homemade wheat bread, challah, and these beautiful stenciled bread rolls. But they really go crazy for homemade crescents!
I don't blame them for a second! But have you ever thought about making them homemade?
I'm here to tell you that it's so worth it! Everything tastes better when it's made from scratch, and dinner rolls are no exception!
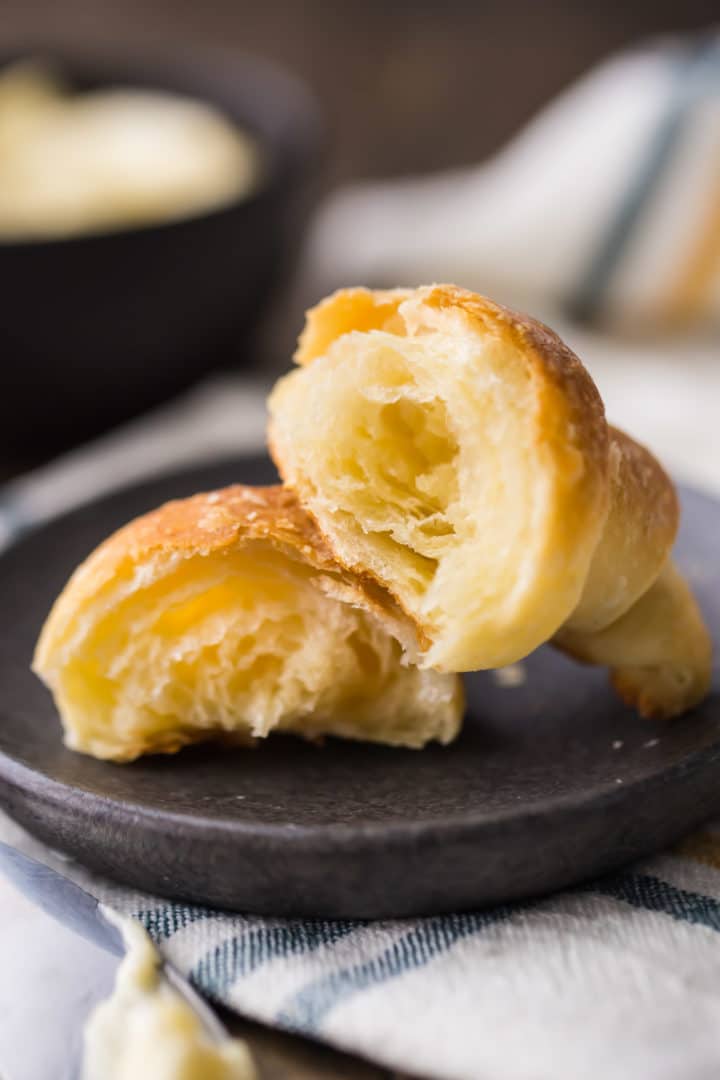
This recipe bakes up soft, puffy, and so incredibly delicious! And it's actually pretty easy to make, with just a few simple basics.
There's a little bit of downtime for chilling the dough, but other than that you're looking at only around 45 minutes of active time 'til crescent roll heaven!
HOW TO MAKE HOMEMADE CRESCENT ROLLS FROM SCRATCH
This dough is really easy to make. You don't even need a mixer! And it only has a few basic ingredients.
Start by placing the flour, sugar, yeast, and salt into a large mixing bowl. Whisk all those dry ingredients together, just to get them combined.
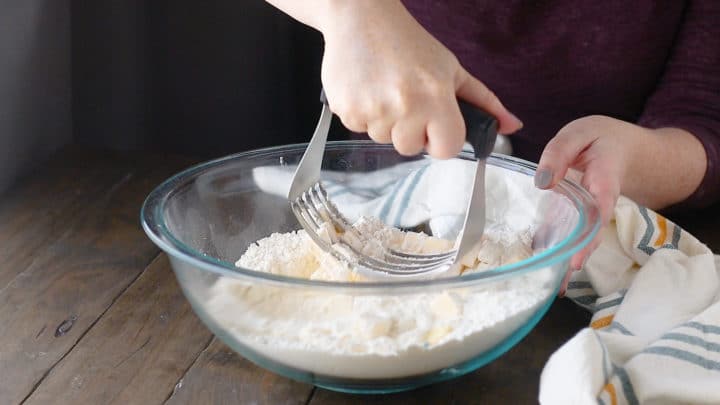
Next, add your cold butter. Cut the cold butter in until only pea-sized pieces of butter remain. I like to do this with a pastry blender, but if you don't have one, you can do it the old-fashioned way with 2 knives. Or you could use a food processor.
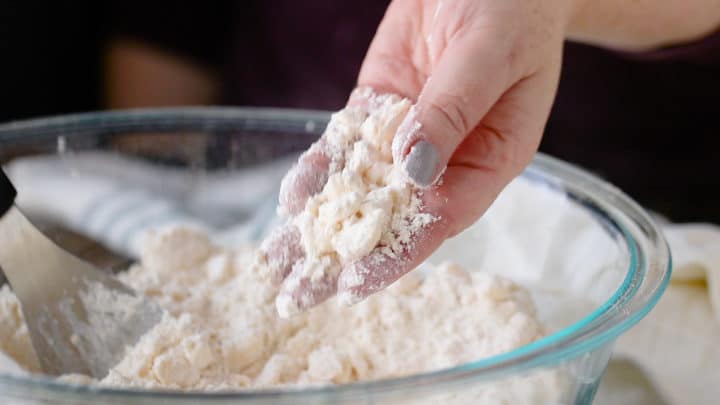
Whichever method you use, just be sure that the butter stays nice and cold! This is really a really important detail. Cold butter will allow your crescent roll dough to form all those flaky layers!
Once the butter is all worked in, add the liquid ingredients. Milk, water, and egg get whisked together and added to the dry mix.
Stir everything until the dough comes together into a ball, then wrap it in plastic and let it chill in the fridge.
WHAT IS THE SECRET TO FLAKY CRESCENT ROLLS?
This is the best part of this whole recipe. I absolutely love the results you get with this special technique!
It's a little extra, but I promise you it is SO worth the effort!
Once your dough is made and nicely chilled, just roll it into a long rectangle shape, and fold it into thirds, like a letter. Turn it 90 degrees, and repeat a few more times. You can do this step maybe 3 to 5 times.
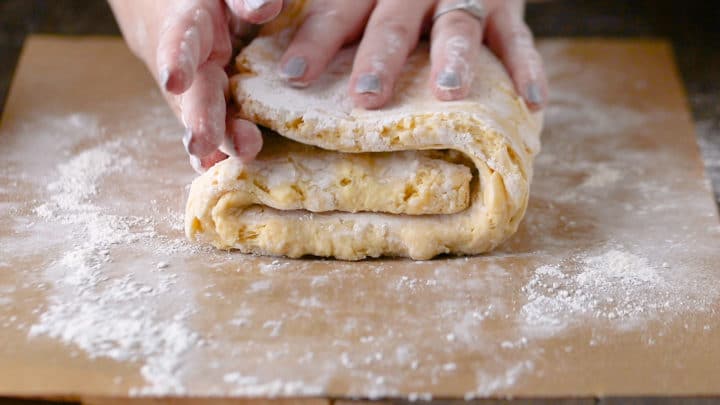
Every time you do, you're creating hundreds of layers of dough and butter. When this gets baked, you'll have the flakiest homemade dinner rolls ever!
This step is called lamination, and it's a pastry chef's secret weapon for recipes like this one. I do this with my pie crust, Danish, and homemade puff pastry, and the results are amazing. Take a look at the video below (within the recipe card) to see just what this looks like.
You don't have to do it, if you're short on time. You can just make the dough, roll it, cut it, and shape it into crescent rolls and they will still come out fantastic. But if you can spare a few minutes for that extra step, you will be rewarded with the most incredible flaky layers.
HOW TO SHAPE CRESCENT ROLLS
Once your crescent roll dough is made, laminated, and chilled, it's time for the fun part: shaping the bread rolls!
Start by dividing the dough into 3 equal portions. This will just make things a little easier to manage.
Roll out a portion of dough into a long rectangle shape. You want to get it pretty thin! The thinner you roll your dough, the more flaky layers your crescent rolls will have.

Once your rectangle of dough is about ⅛-inch thick, trim away the rough edges, and cut it into long, kinda skinny triangles. (Ideally, you want the triangles to be about 2 inches at the wide end, and about 4 inches long. But please don't get too hung up on these dimensions!)
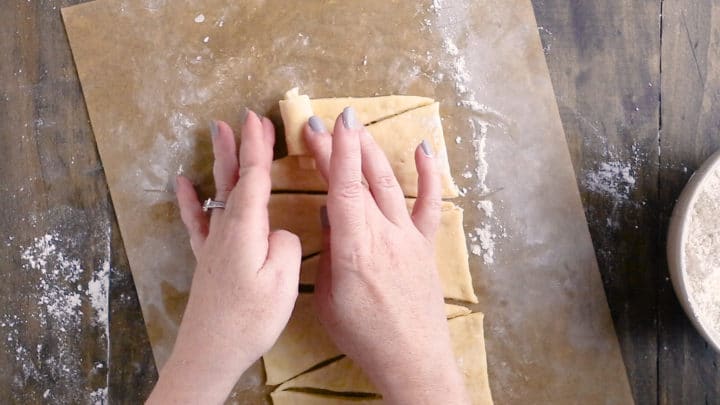
To shape the crescents, start at the wide end of a triangle and roll your way along, all the way to the point. Make sure the point is tucked under the roll, and then just bend the roll into a curved crescent shape. I have a little video within the recipe card, so you can see just what I mean!
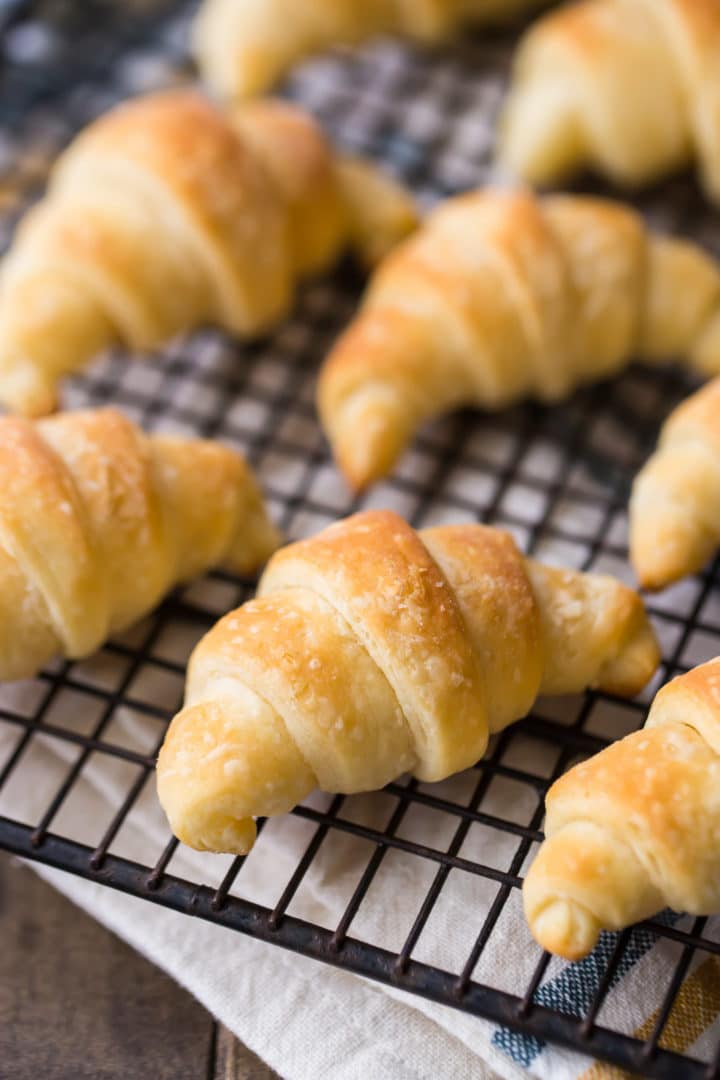
Pop these onto a parchment-lined baking sheet, let them proof, and bake!
CAN HOMEMADE CRESCENT ROLLS BE MADE AHEAD?
One of the reasons I love this recipe so much is because it can easily be made ahead.
Follow all the steps of the recipe, right through to the one where the dough is cut and shaped into crescents. When you've got all your little crescents shaped and laid out on the baking sheet, cover them loosely with plastic wrap and pop the whole tray into the fridge.
The unbaked crescent rolls can be kept in the fridge like this overnight, or up to 24 hours.
A few hours before you're ready to serve them, take the trays out of the fridge and let them come to room temperature. Then just continue on with the proofing and baking steps of the recipe.
HOW LONG WILL HOMEMADE CRESCENT ROLLS KEEP?
Once baked and cooled, just slip any leftover crescent rolls into a zip-top bag to keep them fresh. They will keep at room temperature for a few days, or in the fridge for around a week.
You could also freeze them. They'll last in the freezer for several weeks to a month. When you're ready to have some, just warm them gently in the oven (on the lowest setting) for about 10 or 15 minutes.
Your friends and family are going to love these homemade crescent rolls! They truly make the whole meal- so soft and light! And everyone will be so impressed that you made them from scratch.
This post contains affiliate sales links.

Ingredients
- 2 ¾ cups (343.75 g) all-purpose flour
- 3 tablespoons (36 g) granulated sugar
- 2 teaspoons (6.22 g) dry active yeast*
- 1 ¼ teaspoons (7.5 g) kosher salt
- 1 cup (227 g) unsalted butter,, cold
- ½ cup (122 g) milk
- ¼ cup (59.15 g) water
- 1 (44 g) egg, (large)
Instructions
- Place the flour, sugar, yeast, and salt in a large mixing bowl and whisk to combine.
- Cut in the butter with a pastry blender (or two knives), until only pea-sized pieces remain.
- Whisk the milk, water, and egg together in a small bowl, and add to the flour/butter mixture.
- Stir together until the dough gathers itself into a ball.
- Wrap the dough in plastic wrap and chill for at least 30 minutes.
- Dust the work surface with flour, and roll the dough out to a rough rectangle shape, about ½-inch thick.
- Fold the dough into thirds, like a letter.
- Turn 90 degrees, roll, and fold again.
- Repeat about 3 to 5 times, wrap the dough in plastic wrap, and chill for at least 30 minutes.
- Divide the dough into 3 equal portions.
- Roll each portion out into a long rectangle, about ⅛-inch thick, 16-inches long, and 5 inches wide.
- Cut the dough into skinny triangles, and roll each triangle, starting at the wide end and tucking the pointy end under the roll.
- Place the crescents on parchment lined baking sheets, cover loosely with plastic wrap, and allow to rise for 1 hour or until puffy and nearly doubled in size.**
- Preheat the oven to 400 degrees F, then bake the crescent rolls for 10 minutes or until puffed and golden.
Notes


I have written about these rolls years ago. I have been quite ill and in and out of hospital for over a year. I’m healing …and finally back to baking for my family and friends. I decided to make these rolls for our Sunday dinner as family was coming in. We had forgotten just how delicious they were. You can’t imagine the joy I had in being able to make these again. I loved the whole process. So easy, steps so well laid out and the lightest ..most delicious rolls were in our heated bread basket today. God has blessed me with healing and the stamina to cook for others again. Your many recipes were part of my past baking experiences and now they are finally back in use for others to enjoy.
Aw, I love this so much Jennie! I'm so glad to hear you are on the mend and can finally get back to what brings you joy. Sending big hugs to you, and lots of love!
After adding the liquid, my dough became really soupy—not at all like the photos—and wouldn't form a ball no matter how I much I stirred it. I had pretty much lost all hope but continued with the lamination process anyway. Against all odds, they still turned out soft and flaky!! Great recipe, trust the process!!!
Second time I've made crescent rolls. But the first time i used the laminate method of 5 layers with butter spread between each . This one is much easier. I did make the rolls ahead of time before baking and before proofing I put them in the fridge overnight. took a bit longer to rise (about 2 hours) but worked great. As one pan baked I put the other pan with proofed rolls in the fridge to cool the butter down before baking. Some butter cooked out but not enough to dry out the beautiful crescent rolls. Thank you.
Will never buy crescents again. This recipe is great! Thank you!
Hooray! Thank you so much for the positive feedback!
The recipe is easy to follow. The rolls are soft, flaky and just a tiny bit sweet. I will make again.
So glad to hear it! TYSM for the 5-star review!
Delicious! Could have skipped the main course and eaten nothing but these rolls! 😝 Will definitely make again and have already sent the recipe to friends and family.
This recipe is amazinggg!! I put cooked sausage links in the middle and roll, brush the tops with a cinnamon, sugar, milk mixture for the best breakfast pigs in a blanket! So great with ham & cheddar as well! Soft as pillows & beautiful flaky layers!
We're so glad that you loved these Macy! Such a great idea with the sausage in the middle!
I used 2/3 to bake crescent rolls but the last 1/3 I used to make pigs in a blanket and cooked them straight from the cutting triangles step. They cooked 14 minutes (with the cheese and beef hotdogs) and were exceptional! I can't wait to try the others. They haven't even finished their hour proofing yet, ha!
Thanks for the review, Christina! We're so happy to hear that you loved these!
Thank you for sharing! I will give this a try.
I made these for last night's Thanksgiving dinner, my son wanted crescent rolls but I don't like buying store-bought baked goods. I could have gone for an easier recipe, but am used to laminating dough so stuck with this one. The rolls were extremely soft, and delicious, but not flaky. I think that was my fault, maybe let the butter get too warm when cutting it in. I'll try again sometime.
Interesting to see people griping about flour conversion, and yeast activation. Flour weights vary by brand, King Arthur and Gold Medal are 120g per cup, Arrowhead is a whopping 136g. This recipe goes with 125g per cup which is common.
Active yeast is often pre-activated, but it's not always necessary. This recipe works without it. I always test my yeast (and baking powder/soda) before using, you can't just rely on the expiration date, IMO.
Good to know! Thanks so much for weighing in!
Allie, what are some troubleshooting tips for first-timers? I’ve made your recipe exactly as stated and both times, my dough hasn’t rose. I’m wasting time and money on ingredients and it’s very frustrating. Please help.
Hey Charllotte I'm so sorry you're having trouble. Please keep in mind that enriched doughs won't rise as much as leaner doughs that don't contain any fat. But they will however puff up a ton as they bake. I would also suggest checking the expiration date on the yeast package to make sure it hasn't past, and placing the shaped rolls in a warm (not hot) place to rise before baking. A sunny windowsill is perfect, or if your oven has a "proof" setting, or even just in the oven with the light switched on. Hopefully this info is useful to you! Good luck!
Great recipe unfortunately my crescent rolls deflated after the second proofing before baking.
Hey Lisa- I'm so sorry this happened to you. Just for future reference, this usually happens when you extend the proof time beyond what it should be. So maybe next time you just decrease that rise time a bit. It can be tricky since the ambient temperature in your kitchen can have an effect, but the rolls should go into the oven as soon as they've doubled in size.
I am interested in making your crescent rolls.
I have made yeast breads many times but have always had to active the yeast if not using rapid yeast. Your recipe doesn't say (or I didn't find) where it reads to use rapid yeast.
My question is do I have to active the yeast in warm liquid first? How does it become active if I just mix it with the other ingredients? Please if I am missing something here. Teach Me. I love baking and learning. I purchase the crescent rolls in the cans to make hot sandwiches. I would like to try making my own using your recipe.
Hi Patty. You can use active or rapid yeast. For both you will still need to activate it in warm liquid first.
I wish the recipe mentioned putting the yeast in warm water first. This is the second time I’m attempting to make this recipe, and I’m having to trash everything. They’re not rising. It would be helpful to add that edit so people trying it for the first time don’t waste time and money on ingredients.
Thanks for the feedback but I don't really find that step to be necessary. The yeast dissolves just fine from the moisture in the dough. If they aren't rising it's more likely to be because the yeast is dead or the environment isn't warm enough for it to thrive. Also, keep in mind that with a dough like this that's so enriched with butter, milk, and egg it's not going to proof up super huge. But it will puff a lot as it bakes!
Can you freeze this dough for later use?
Hey Jozee! Yes you can for sure. It should last about 2 weeks in the freezer. Good luck!
This recipe turned out perfectly - I used for "pigs in a blanket" - they were the best anyone at the party had ever had!
Of course, all the extra rolls without the hot dog were gobbled up (by me) over the course of the next 24 hours. Thank you!
My pleasure Janice! So glad you enjoyed. And thank you for the 5-star review!
Hey there! I would like to use this recipe as the base of Chicken Broccoli Braid - the main difference is instead of doing individual crescent rolls I would leave the dough a flat sheet, stuff with the filling, then "braid" the dough above the filling. I'm curious if you think I should do the filling before the hour proofing period? Thanks for your help!
Hey Lauren! Thanks so much for the excellent question! I would suggest filling the dough right after step 9 of the recipe instructions. So yes, fill it and then let it rise at room temperature for about an hour before baking it off. Sounds like a delicious preparation, by the way! Good luck!
Hi! I am hoping to use this recipe to make broccoli/cheese rollups for my kids. That recipe takes a can of crescent roll dough rolled out flat then spread with cream cheese, broccoli and cheese, then roll up and slice before baking. How do you recommend using your dough for this recipe with the proofing period? Thank you!
Hey Rachel! That sounds delicious I love that idea! I would suggest spreading on the filling & shaping the rollups before the second proof. So right before step 13. Some other readers have done similar stuff and commented in this section, if you feel like having a quick skim! Good luck!
is this dough like puffed pastrey?
Hey Tammy! It's similar in that it's laminated (or folded) but puff pastry does not contain sugar, milk, water, or egg. So it is different in that way. The result here is more pillowy-soft, whereas puff pastry is a little more crisp and crumbly. If you'd like to compare, you can check out my puff pastry recipe here: https://bakingamoment.com/easy-homemade-puff-pastry-recipe/. Hope this answers your question!
Hey Allie! Do you know if this will work if I make the dough on Friday, leave in the fridge then bake on Sunday morning? I want to make resurrection rolls where I wrap a marshmallow with the dough on Good Friday then bake on Resurrection Sunday.
Hi Nalini! What a fun idea! The unbaked rolls should keep in the fridge for up to 48 hours or in the freezer for up to 2 weeks. Good luck!