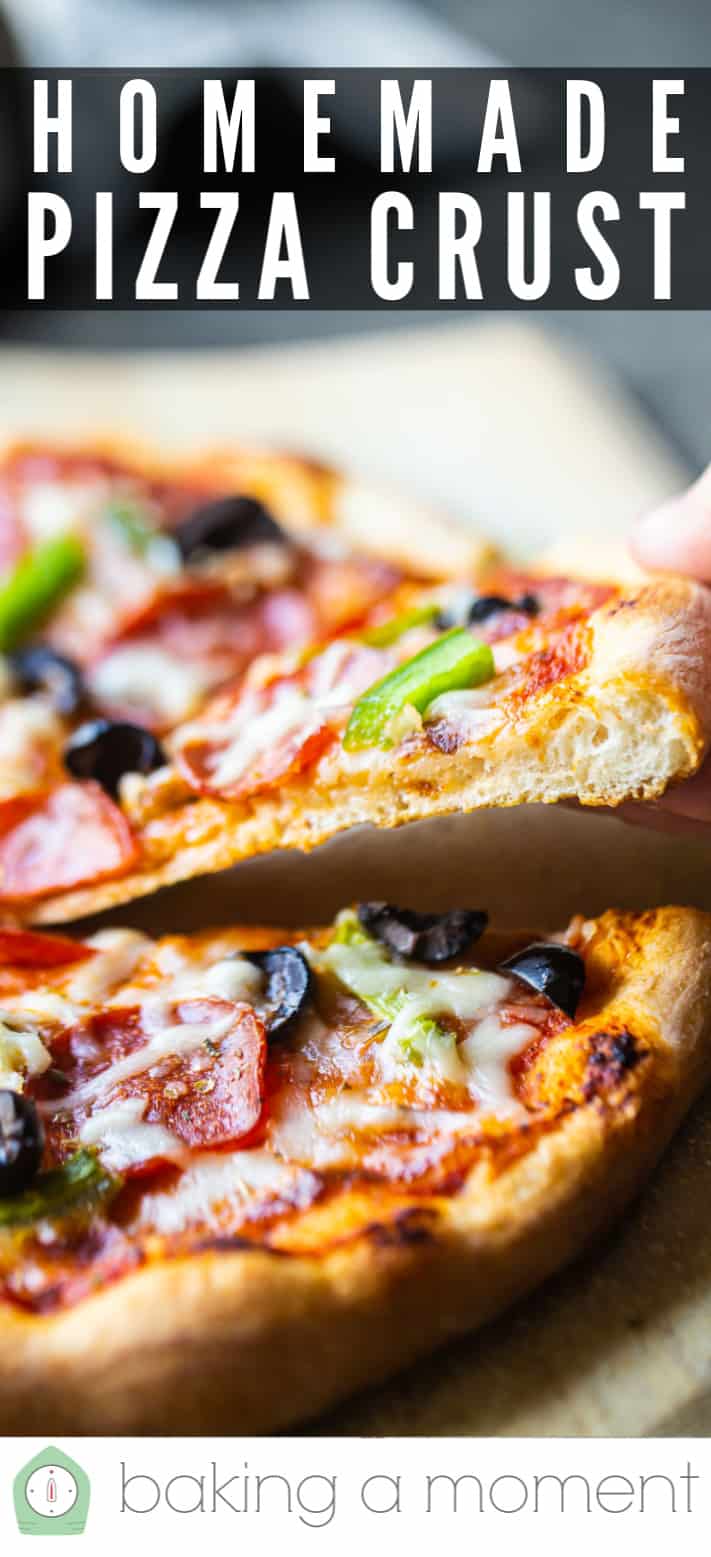
Pizza Dough Recipe
As an amazon associate I earn from qualifying purchases.
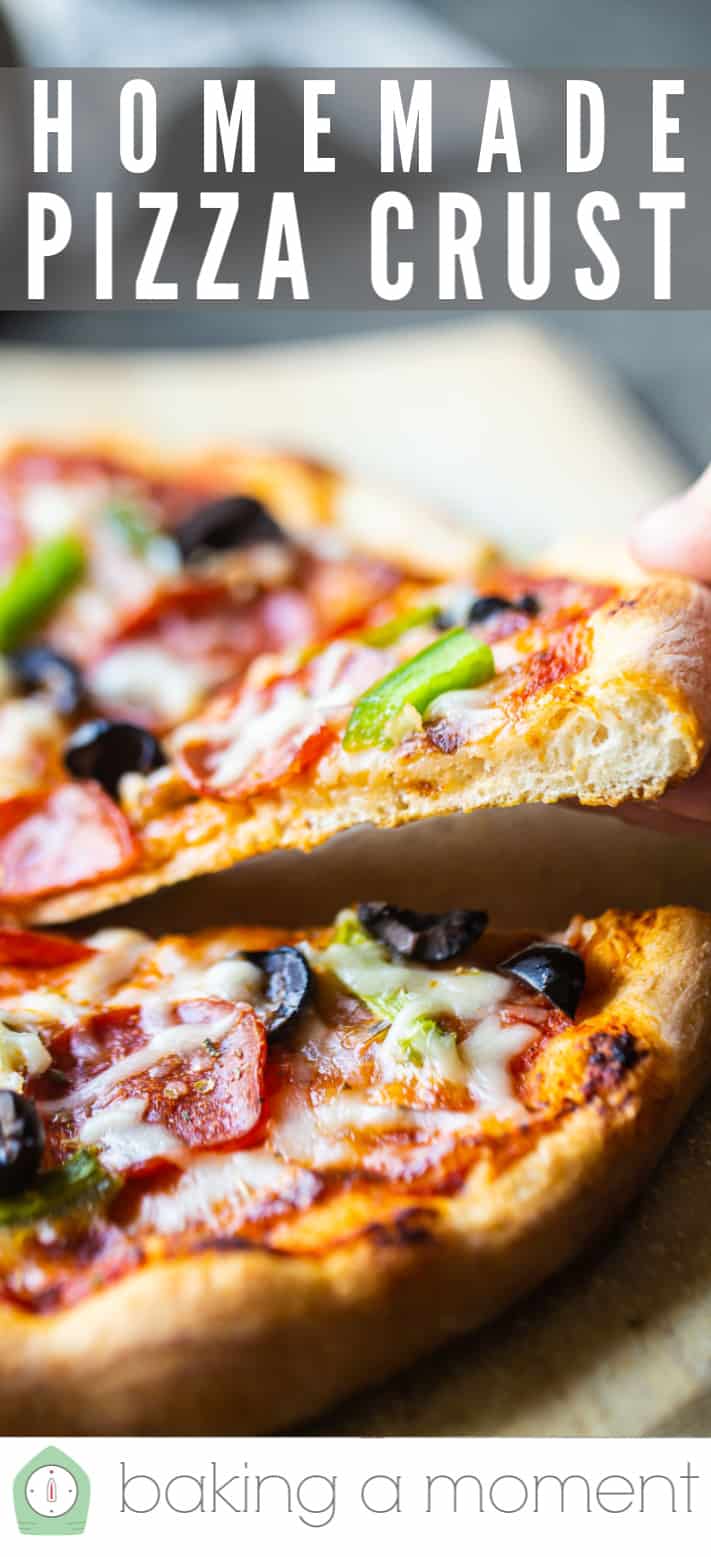
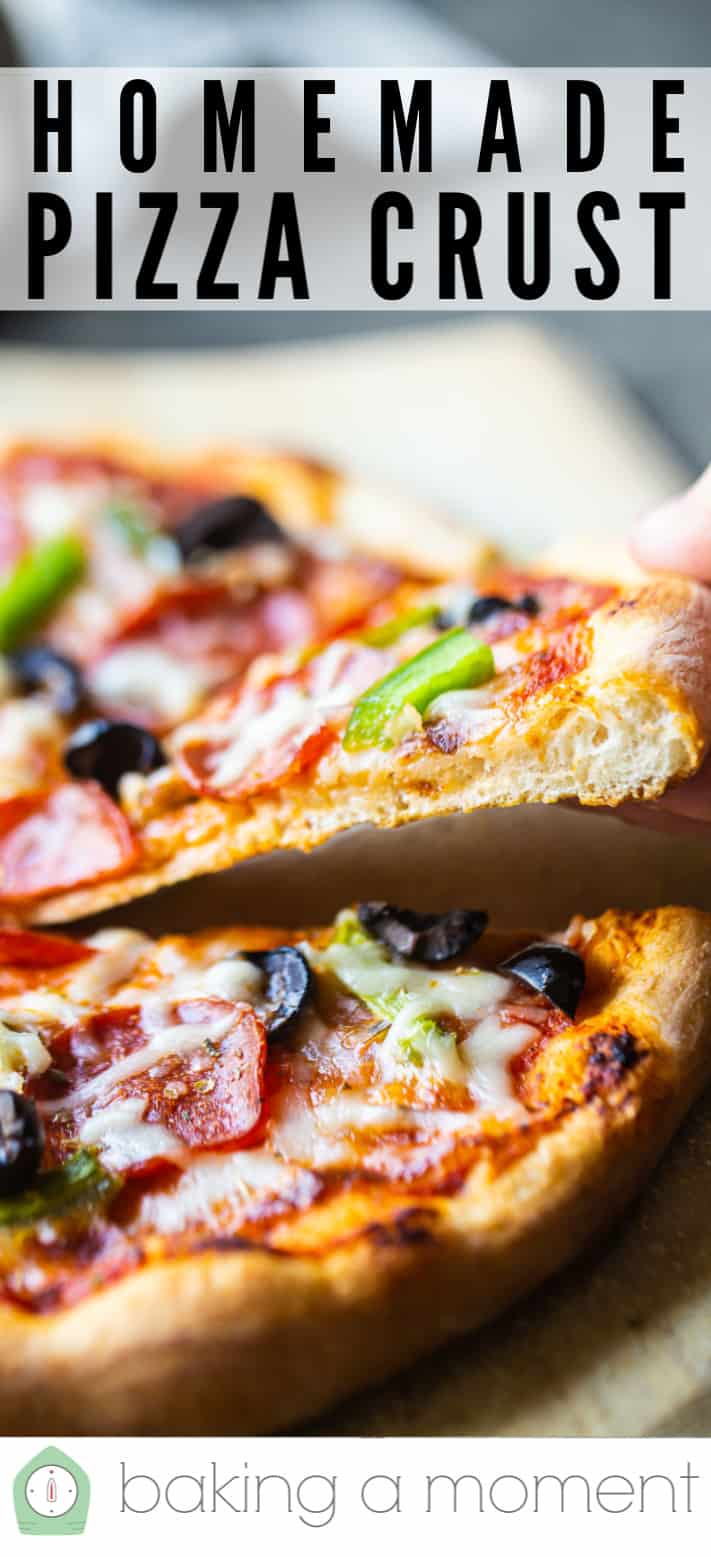
Easy pizza dough recipe, for the best ever homemade pizza! Make a big batch to keep in your fridge or freezer. Just 6 simple ingredients!
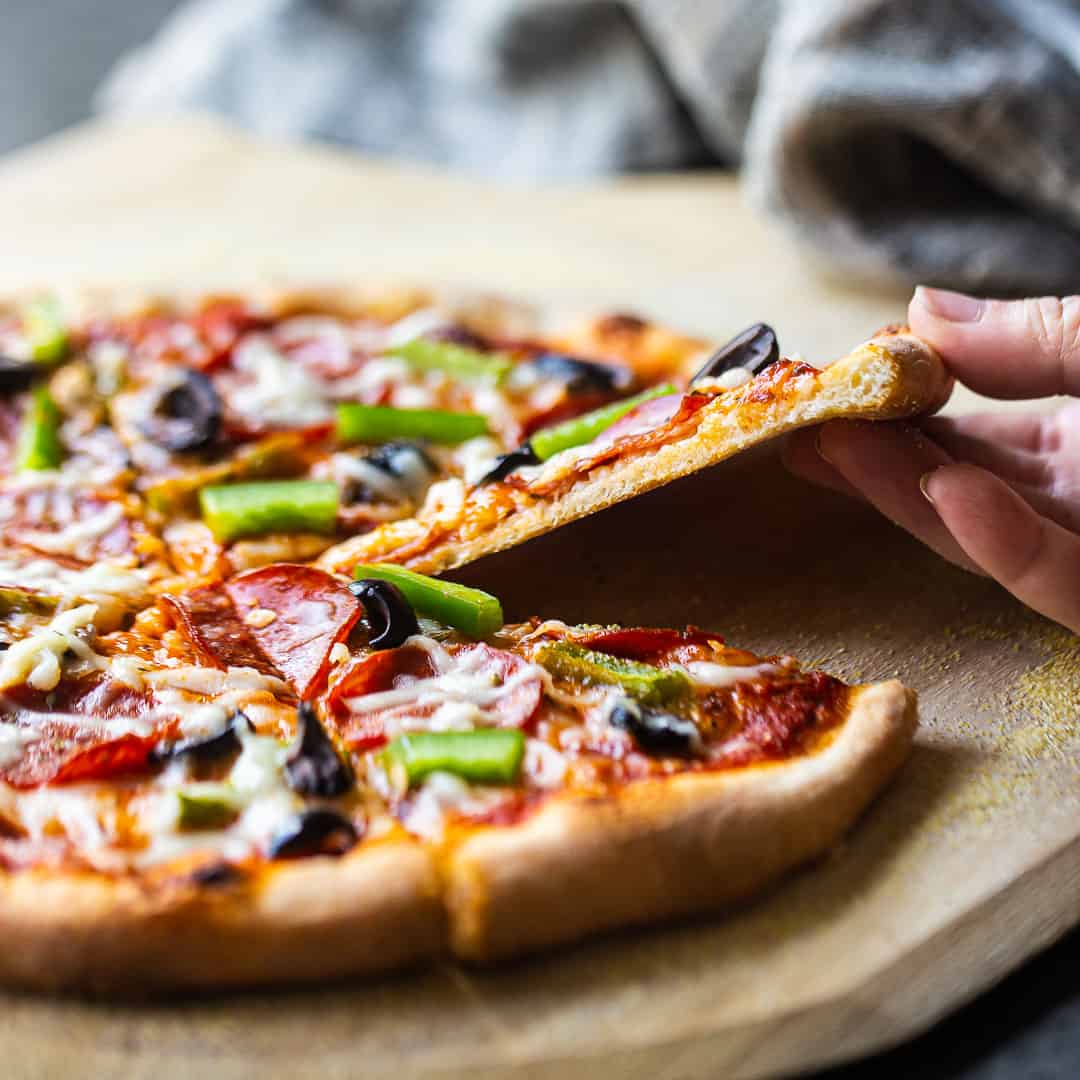
Who wants some pizza?!
With everything that's been going on lately, my family has been doing homemade pizza more and more. Like so many others I see on social media, we've really been getting in touch with our inner bread makers!
Over the weekend, my older son made soft Italian breadsticks + homemade pesto, and I think this soft pretzel recipe might be next on the list! Or maybe another batch of crusty French baguettes, they're so good with a hearty bowl of soup... There are just so many amazing yeast bread recipes to choose from!
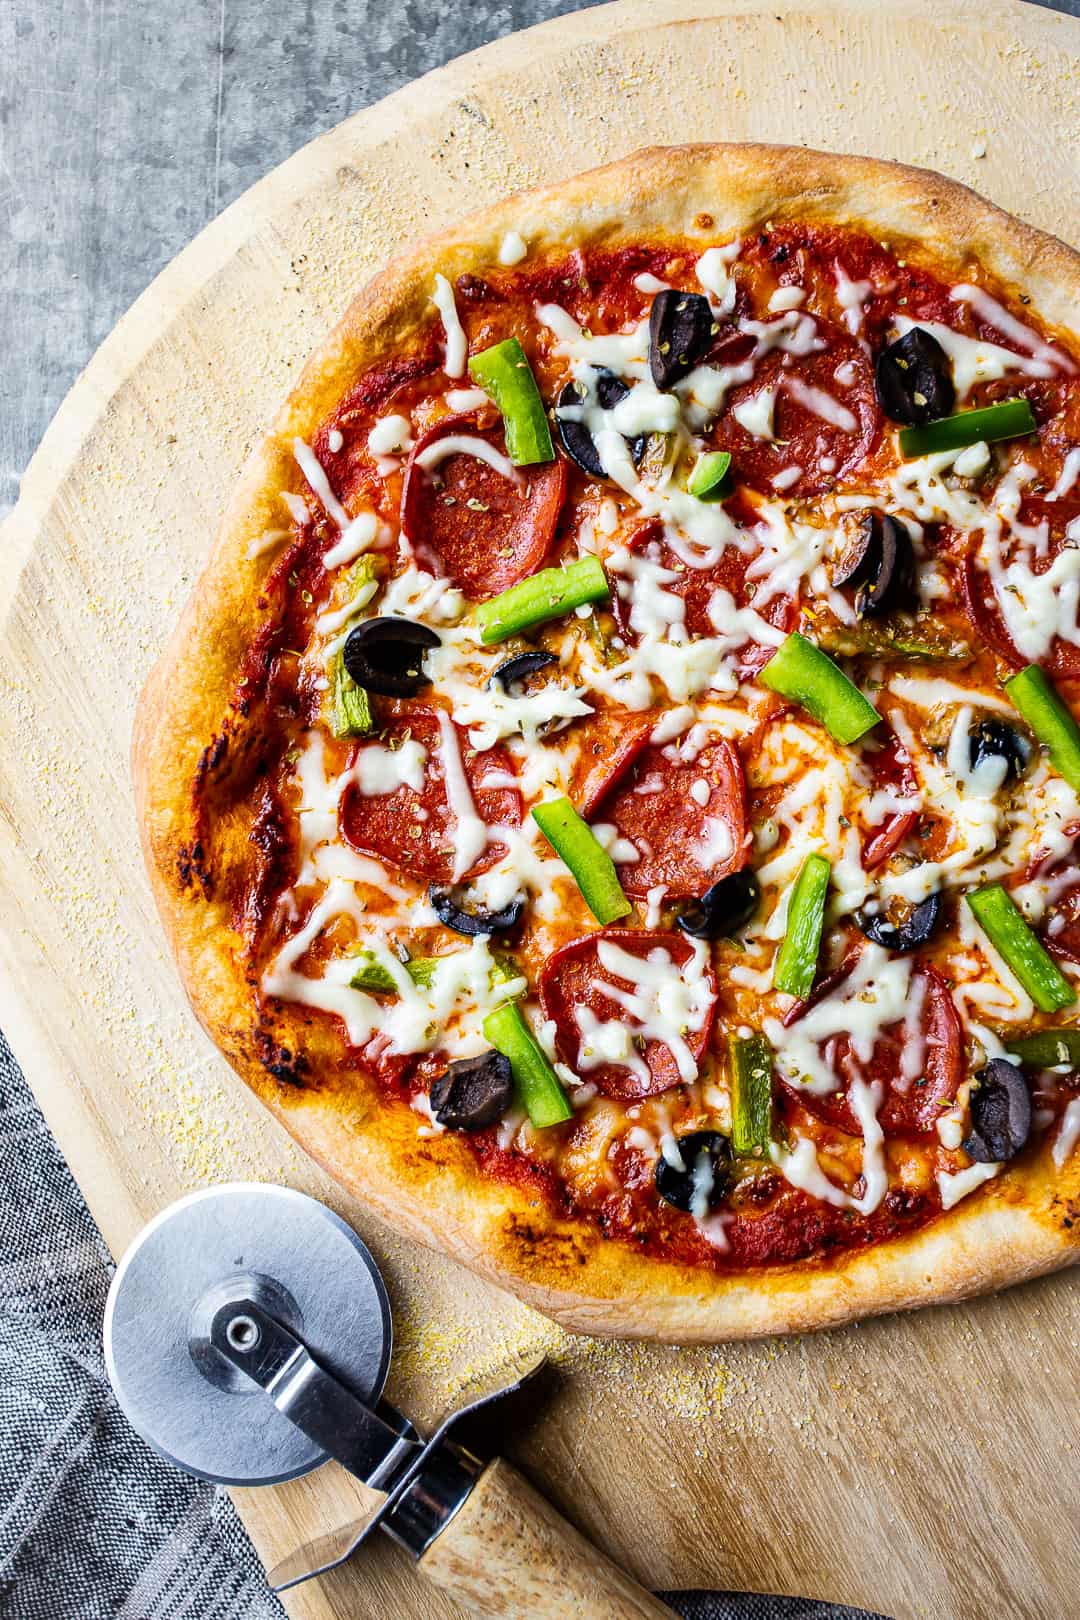
But truly, nothing beats pizza night at our house. My whole family loves it- they get to pick their own toppings, really get creative, and make it their own.
Before we can do any of that though, we need a really great pizza dough recipe.
I've been making this one for years. It's a very easy recipe so it's perfect for beginners. You only need a few simple ingredients, and it's so quick to make.
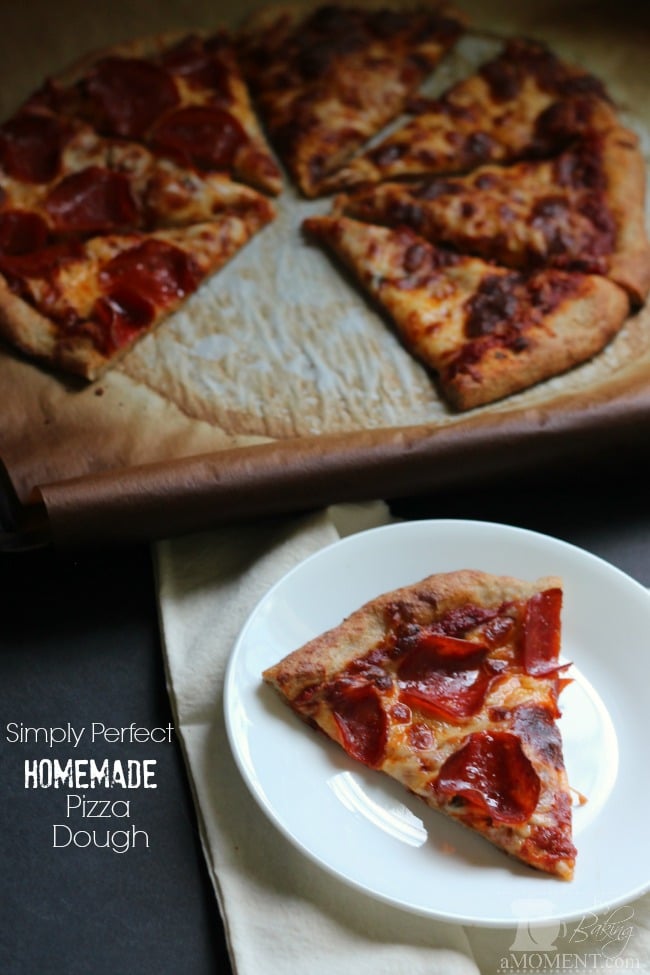
It bakes up toasty and crisp on the bottom, with a really great balanced flavor and a chewy texture that's so satisfying.
You can make it as thick or as thin as you like, and best of all, it can be made ahead and stored in the fridge or freezer, so you can have homemade pizza any time the craving strikes!
This is an information-packed post, and it's quite lengthy, so if you don't care about all the nitty-gritty details, just click the "Jump to Recipe" button at the top of the post. It will take you straight to the recipe card.
Or, read on for everything you ever wanted to know about the best pizza crust recipe out there!

INGREDIENTS FOR HOMEMADE PIZZA DOUGH
This easy pizza dough recipe has just 6 basic ingredients:
- Water
- Sugar
- Yeast
- Flour
- Olive Oil
- Salt
Let's talk a little about each of them, so you have an understanding of the parts they play and how best to use them.
WATER
The purpose of the water is for moisture (obviously) but also to hydrate the yeast.
It's really important that your water is warm but not hot. You want the water to be just barely warm to the touch. If you have a thermometer, shoot for 100 to 110 degrees F. If not, that's ok, just aim for the temperature of a baby's bath.
Be really careful the water's not too hot or it can kill the yeast, and then your dough won't rise.
SUGAR
This is to feed the yeast. If you don't want to use sugar you could replace it with honey. (I think this is especially yummy in whole wheat pizza dough!)
It is possible to leave the sugar out entirely, but I like to include it not only for the yeast but also for flavor and for browning. Sugar will caramelize as it cooks, giving you a lovely brown color and toasty flavor.
The end result is not sweet (because it's such a small amount of sugar) but it just tastes balanced and flavorful.
YEAST
Yeast is a living thing. It eats and digests and then burps out carbon dioxide gas. (Sorry, it sounds a little rude but that's what's happening!)
That carbon dioxide gas is what leavens the dough. Little bubbles get trapped inside and when you bake it, you have a light, airy result. If you didn't use yeast then you'd basically have a flat, crunchy cracker.
Be sure to check the expiration date on your yeast before you begin. There is a limited shelf life for yeast, and once it's past it's prime, it's dead and it will no longer work properly.
Here's some useful on how to substitute for active dry yeast:
FLOUR
Flour is the main component in this pizza dough recipe. There's more flour in this recipe than anything else. It's the bulk of the dough and it provides the structure.
You can get fancy with flour or keep it simple. Personally, I like to keep it simple and just use all-purpose flour.
But it is true that different types of flour will yield different results. I'll touch on some of the most commonly used (and asked about) types of flour for pizza dough.
Whichever you choose, it's important to bear in mind that it's really impossible for me to tell you exactly how much flour to use. Baking with yeast is not an exact science; it's more intuitive. You need to look at your dough and touch it and respond to what it looks and feels like it needs.
On a really humid day, you may need less flour. On a dry day, you may need more. If you live at a high elevation, that can impact it too.
So in other words, you have to use your own judgment, not rely solely on the range that's given in the recipe card.
BREAD FLOUR
Bread flour is sometimes recommended for pizza dough because it's higher in protein and gluten, so it can provide more of an elastic, stretchy texture. For reference, all-purpose flour usually has around an 8 to 11 percent protein content, while bread flour is around 12 to 14 percent.
I know bakers who will only use bread flour for pizza crust, but honestly, I don't feel like it's necessary for most people. If you are a real connoisseur, then by all means. But most of us mere mortals have to think about things like storage space and being able to use something up before it expires, so all-purpose flour is often the most reasonable option. And it is truly not that much different than bread flour.
WHOLE WHEAT FLOUR
I often sub a little of the white flour out for whole wheat flour when I make this pizza dough recipe. I like the nutty flavor of whole-grain pizza dough, and it's also healthier.
But in my experience, it doesn't work well if you use all whole wheat. There needs to be some regular flour in the mix, to provide that chewy, elastic quality that we look for in pizza crust.
I've found that a blend of 2 parts all-purpose to 1 part whole wheat gives a result that's just slightly crunchier, but not noticeably "whole grainy." Like slightly healthier, but with a barely perceptible difference in flavor.
While a 1:1 or 2:1 ratio would give more of a pronounced whole-grain flavor and feel.
Feel free to experiment, but again, bear in mind that the total amount you'll need to use can definitely be impacted by using different types of flour.
GLUTEN-FREE FLOUR
My experience with gluten-free pizza dough is honestly extremely limited, so I am far from an expert on this topic.
However, I can tell you that there are some really great gluten-free flour blends that claim to work just as well as all-purpose flour. You'll want to look for one that subs 1:1 for regular flour.
- King Arthur Flour Gluten-Free Measure for Measure Flour
- Bob's Red Mill Gluten-Free All-Purpose Baking Flour
- Cup4Cup Multi-Purpose Gluten-Free Flour
Side note: This pizza crust recipe is dairy-free and vegan!
OLIVE OIL
Olive oil is added to this pizza dough recipe for 3 reasons:
- For flavor
- To provide a more tender, fine grained texture, and
- For moisture.
Again, it's possible to leave it out. Your crust will still be edible. I just prefer to add a small amount for these reasons.
If you don't have olive oil you can substitute with any other kind of oil that has a flavor you like and that is liquid at room temperature.
SALT
Salt is obviously added for seasoning and to provide flavor. And salt is also magical in that it carries and enhances other flavors as well, so your yeast will taste yeastier and your flour will taste wheat-ier and your olive oil will taste olive-ier.
I use kosher salt for almost all my baking, because there are no additives so the flavor is pure, and also because it's a very inexpensive product to buy.
If you'd prefer to use another type of salt, just google "kosher salt to [your preferred type of salt] conversion" to find out how much more or less of it you should use for this recipe.

HOW TO MAKE PIZZA DOUGH
Pizza dough is one of the easiest things you can make with yeast, so if you're new to bread making, this is a really great place to start.
MIXING UP THE DOUGH
We begin with water. See above for more details, but again, the water should be warm but not hot.
Stir a little sugar into the warm water, allowing it to dissolve.

Now sprinkle on the yeast. It will immediately begin to dissolve, and after about 5 minutes, it should start to look foamy.
If it doesn't bubble or foam up, it's probably dead. Double-check the expiration date on the package and try again, making sure the water is not too hot.
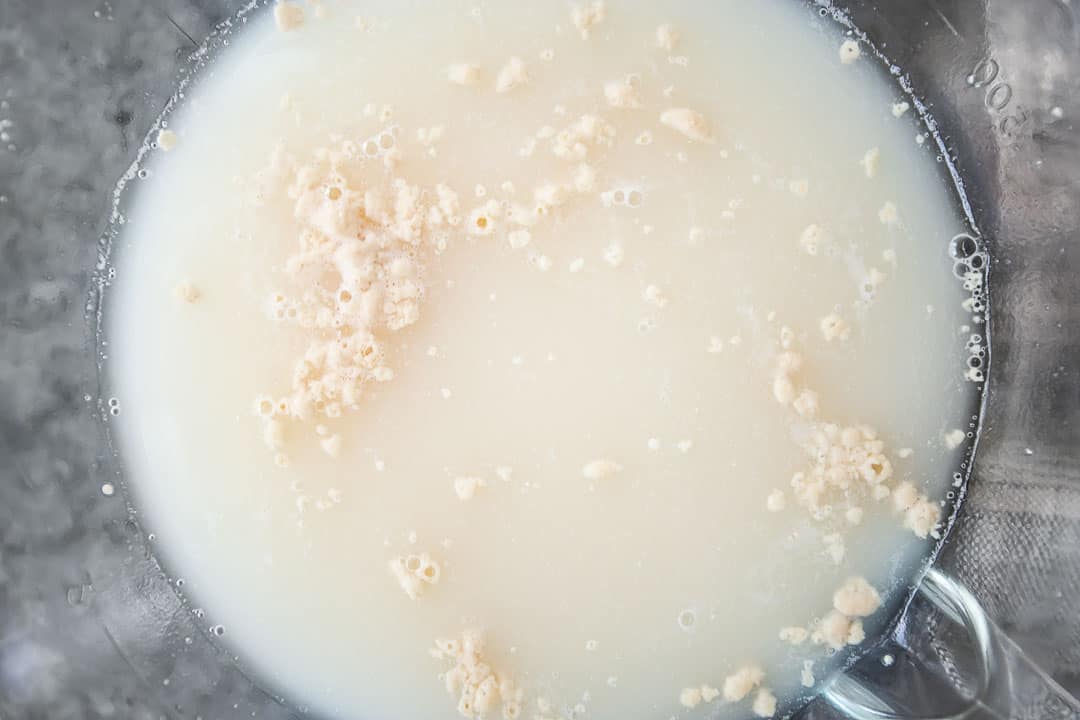
When you see that foam forming, and you know your yeast is alive and well, you can go ahead and start working in the flour.
The total amount of flour you will need can vary based on a lot of factors, so this step will need to be a bit intuitive. I give a rough estimate in the recipe card below, but you may need slightly more or less when you make it. Pay attention to what the dough looks and feels like, and use as much or as little flour as you need based on that.
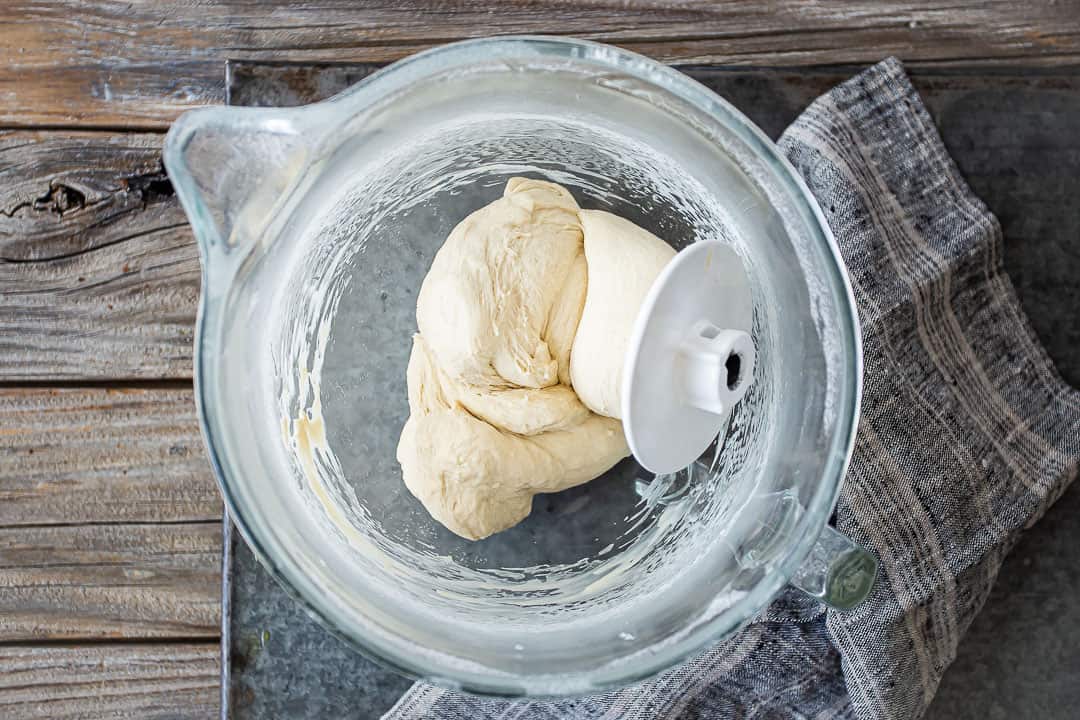
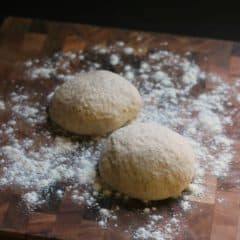
Start by stirring in 2 cups of flour. When it's all incorporated, you should have a very loose, wet mixture. Add the olive oil and salt, and then continue stirring in more flour, a little at a time, until the dough becomes firmer and less sticky.
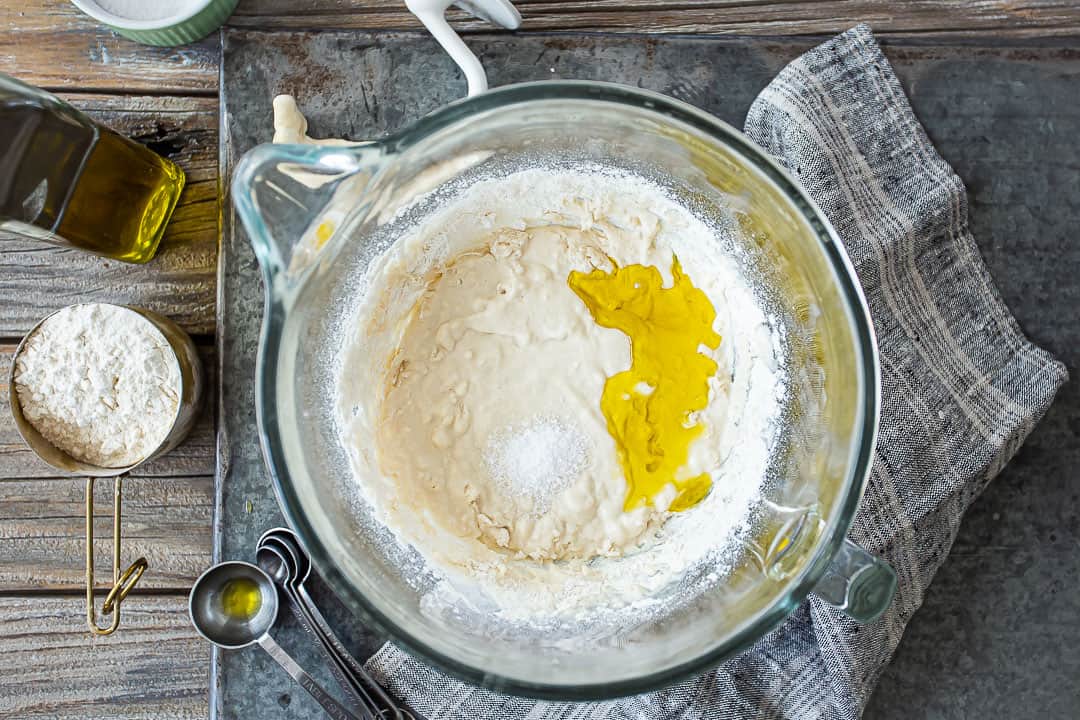
You'll know you've added enough flour when the dough gathers itself into a ball and pulls cleanly away from the sides of the bowl, like this:
KNEADING THE DOUGH
Now it's time to knead the dough. Kneading the dough helps to develop the glutens and give that beautiful chewiness we are looking for. You can do this step by hand or with a mixer, using a dough hook attachment.
Once again, the amount of time you should knead can vary. It usually takes around 10 minutes of kneading (give or take) to get the proper result, but the easiest way to know if your dough has been kneaded enough is by giving it the windowpane test.
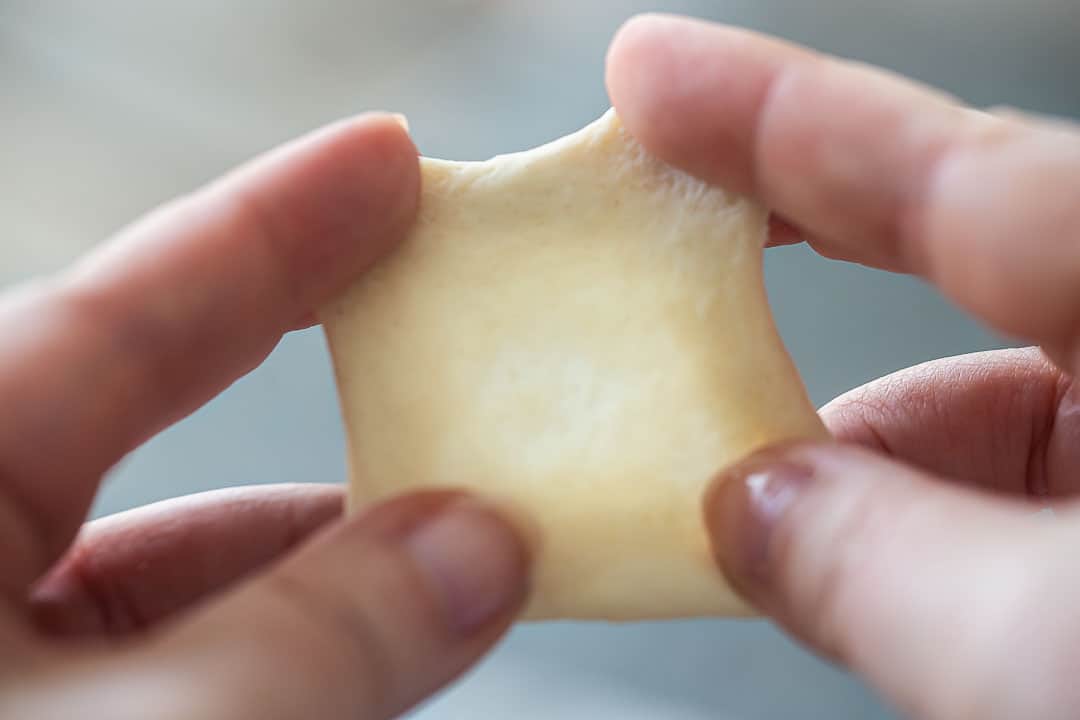
Pinch off a little piece of dough and using your fingertips, stretch it gently from the center outward. You should be able to pull it tissue-thin without it tearing. It should be so thin you can see light passing through it, just like a windowpane.
If your dough doesn't pass this test, keep kneading until it does!
Then, remove the dough from the bowl, mist the bowl lightly with non-stick spray, add the dough back in, and cover the bowl with plastic wrap.
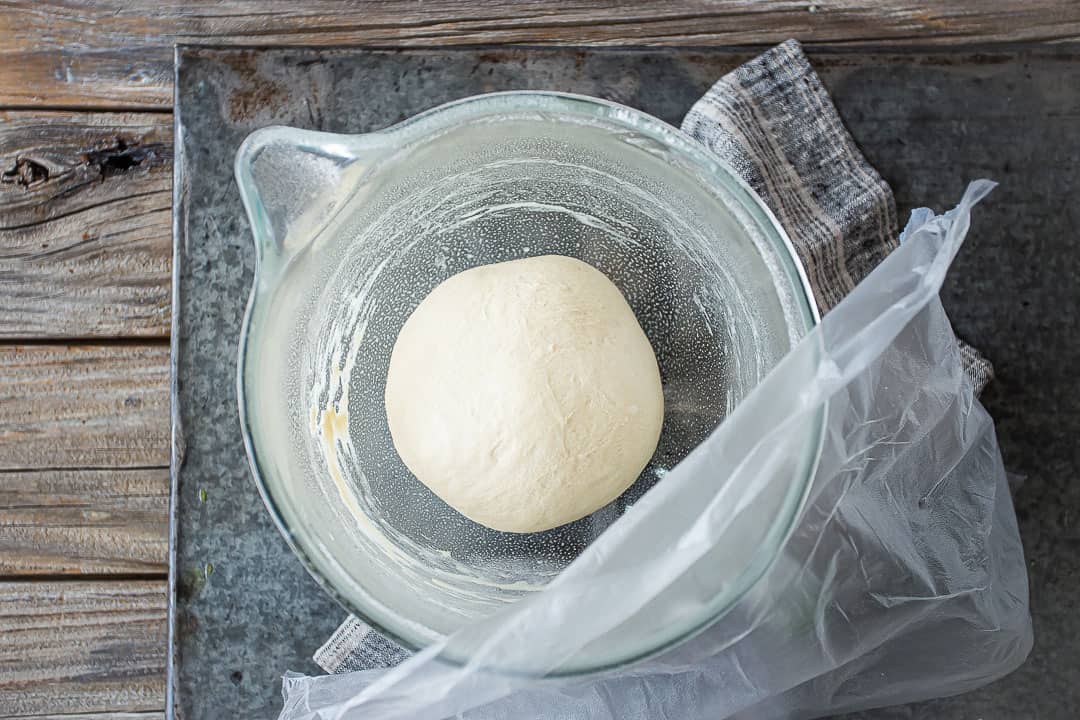
ALLOWING THE DOUGH TO RISE
Now it's time to let it rise. Just place the bowl in a warm place and allow the dough to grow to double its original size. Again, there's no set answer as to how long this will take. That can vary based on a lot of different factors, so you just have to keep your eye on it.
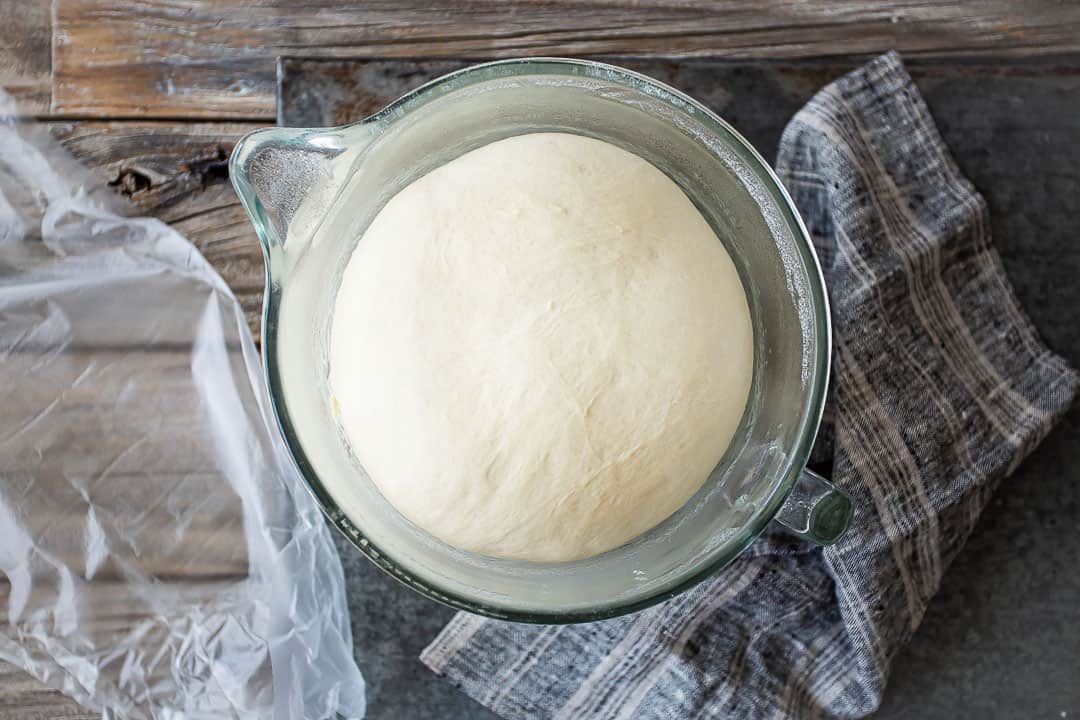
Once it's big and puffy, smoosh it down and divide it into portions.
Congratulations, you just made pizza dough!
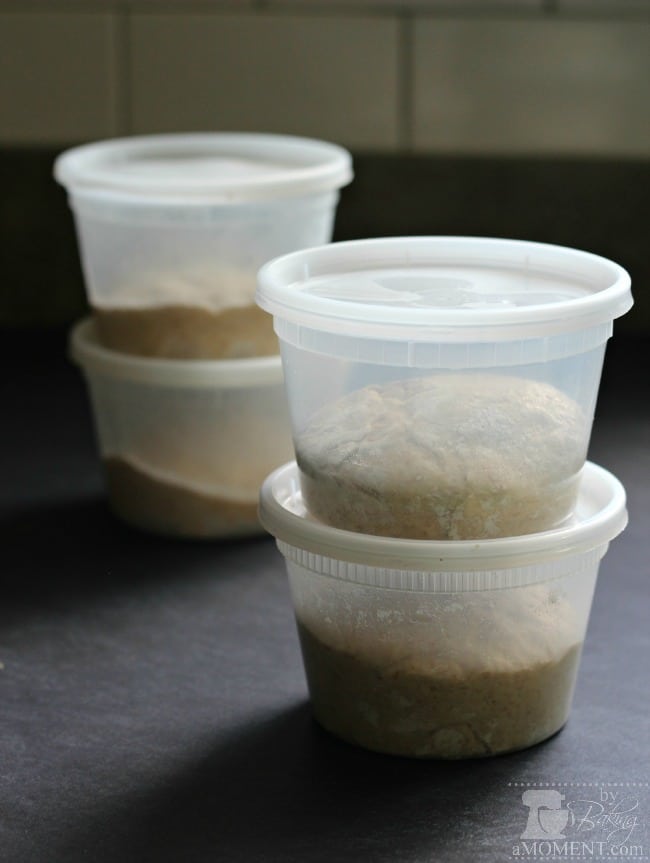
MAKE-AHEAD PIZZA DOUGH
Now you can either start making pizzas right away or stash the dough balls for later.
If you're not going to bake them right away, place each portion in a lightly oiled container, allowing plenty of extra room (they will grow a bit, even if kept cold).
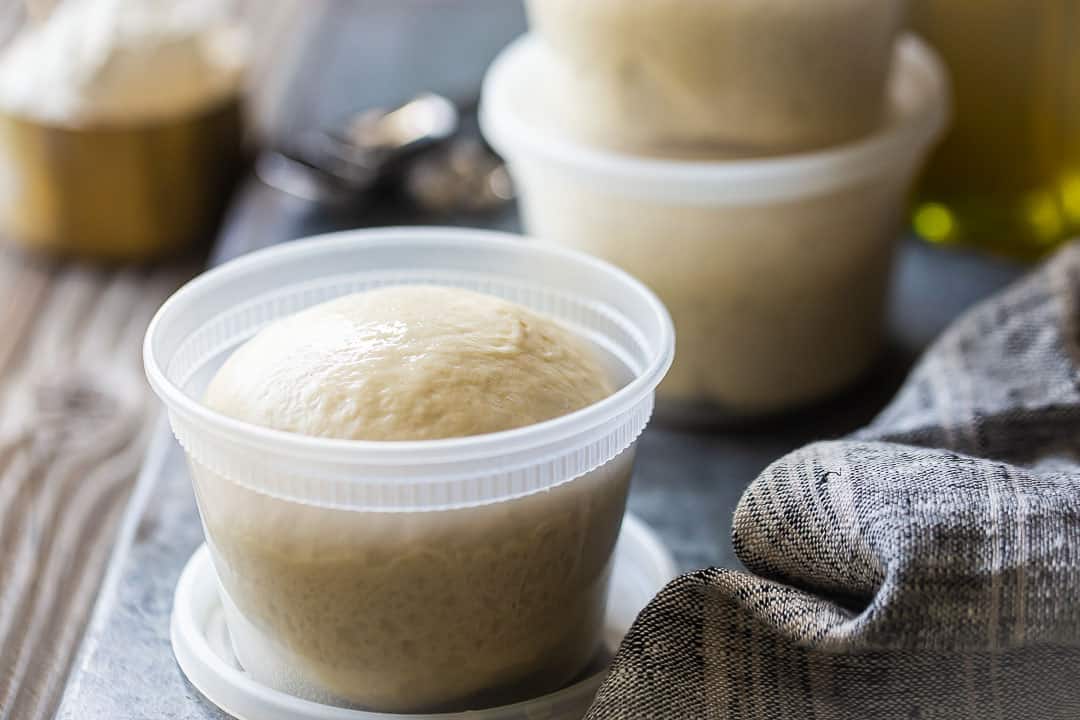
Place the containers in the fridge or freezer (more info on this below). When you're ready to use them, just allow them to come back to room temperature first.
HOW MANY PIZZAS WILL THIS RECIPE MAKE?
That all depends on how you shape them! Do you like your pizza thin and crispy, thicker and chewy, or really thick and doughy, like a Sicilian or Detroit-style pizza?
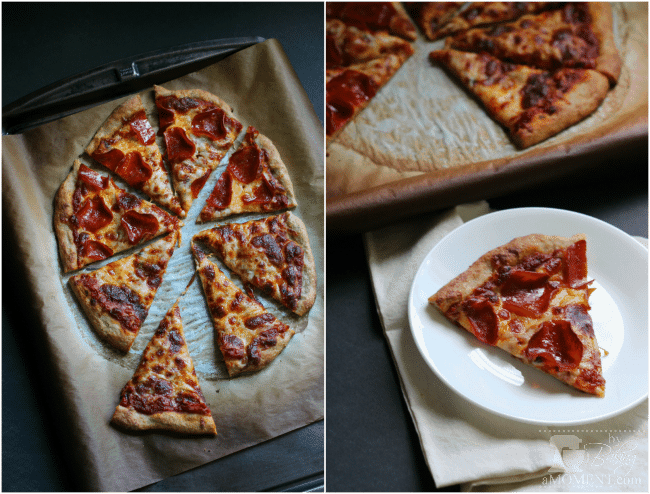
I have found that when I stretch the dough really thin, I can get three 10-inch diameter pizzas or four 8-inch diameter pizzas from one batch of this dough. Or you could divide it in half and get 2 really huge thin and crispy pizzas, or the same number of slightly thicker, chewier ones.
It's entirely up to you! But I can tell you that for my family of 4 (three boys, one mama) one batch feeds us all with a few nice leftovers for lunch the next day.
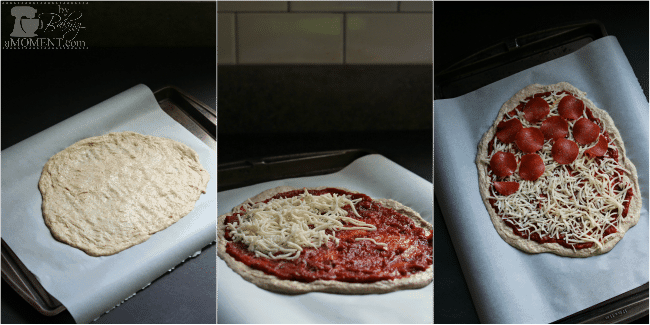
HOW TO SHAPE PIZZA DOUGH
This dough is quite forgiving, so you can shape it however works best for you.
My preferred method is to flatten it with my hands, then allow it to sort of drape over my knuckles, turning it around and around, and allowing gravity to stretch it downward.
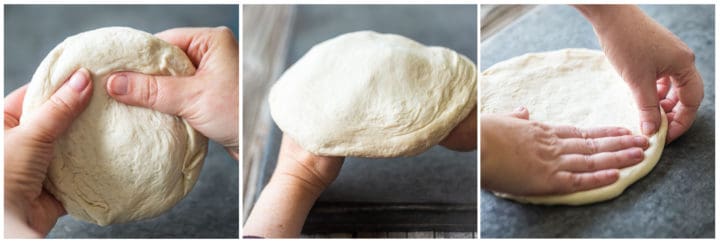
I wish I was one of those talented pizza-makers who can toss dough into the air and spin it until it's thin as can be! But since I don't have that ability, I'll often resort to the rolling pin to get it as thin and round as I possibly can.
But don't stress about the shape! It's fine if it's not a perfect circle. Oblong-shaped pizzas taste just as good.
I've also baked my pizza on a sheet pan, into a big rectangle shape. (If you use a baker's half sheet pan, you will get roughly 2 thin-crust pizzas per batch of dough.)
Pro-tip: If your pizza dough is fighting you and wants to shrink/bounce back out of shape, allow it to rest (covered) for 10 to 20 minutes at room temperature before trying again.
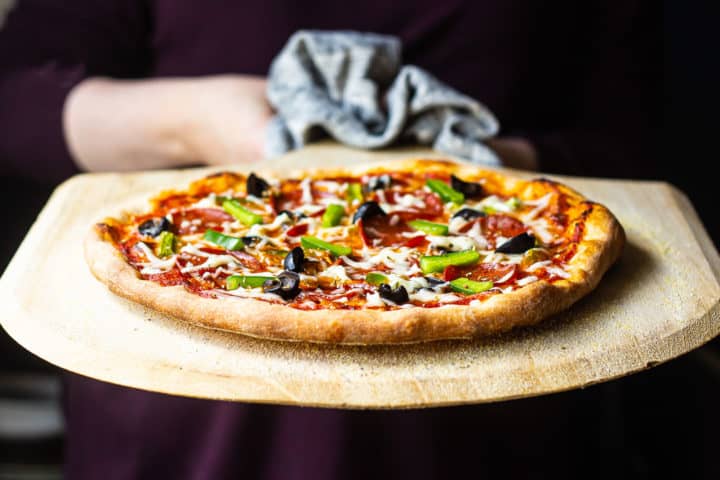
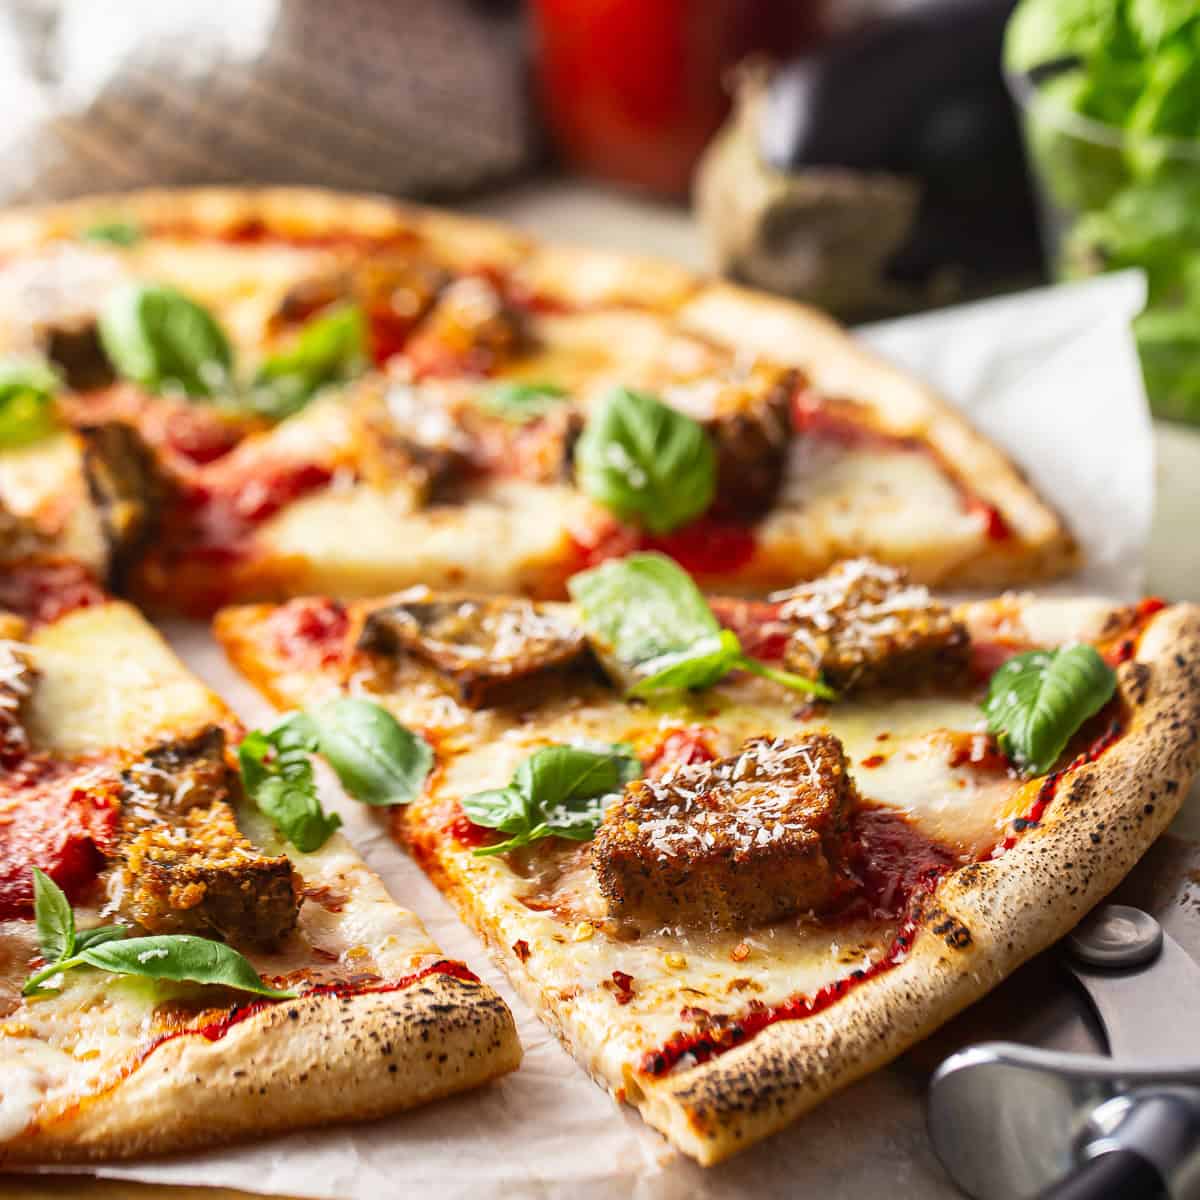
HOW TO BAKE HOMEMADE PIZZA
Here at my house, we like to use a pizza stone. (I've also heard really great things about baking steels; they work the same way.) They basically just heat up really hot and really evenly, which is what you want.
So I shape the pizzas, lay them on a pizza peel that's been heavily dusted with cornmeal or semolina (to prevent sticking), then add the toppings and slide them onto the hot stone.
You don't need a stone or steel to make homemade pizza. It can totally be done in a pizza pan or even just on a cookie sheet. You can even do it on the grill! It will work no matter how you decide to cook it.
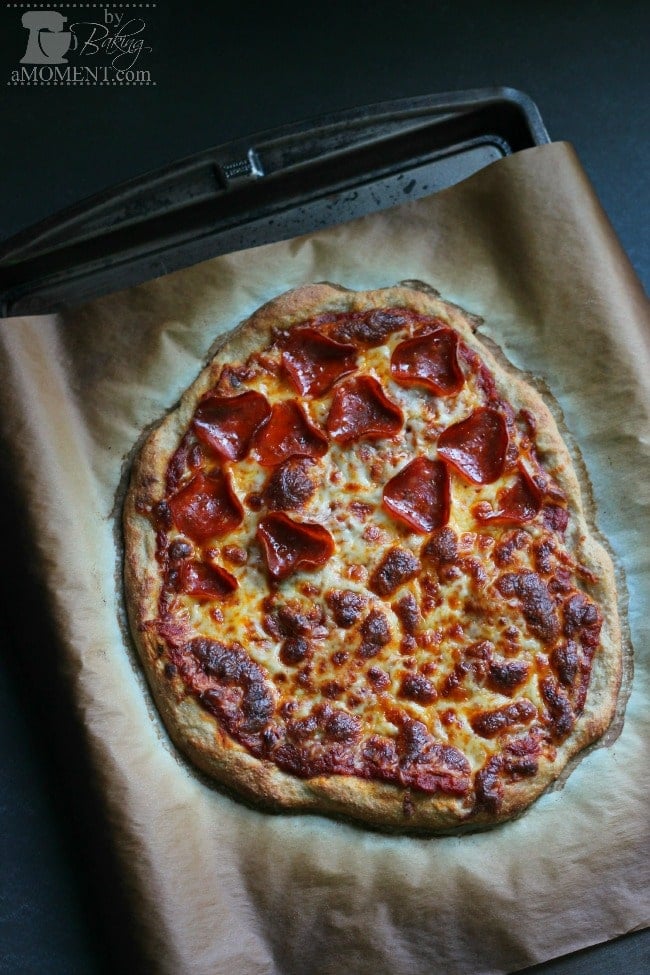
But I would advise you to bake your pizza at the highest possible temperature. My oven only goes up to 500 degrees F, but a real pizza oven (like the brick oven kind) can go upwards of 900 degrees F. The hotter the oven, the faster your pizza will cook and the more blistery and brown it will get.
In my oven, at 500 degrees F and on a pizza stone, my 10-inch thin-crust pizzas are brown and crispy on the bottom after around 10 to 15 minutes, just as a guideline.

CAN ADD-INS BE MIXED INTO THIS DOUGH?
Absolutely! Feel free to work fresh or roasted garlic, dried herbs, parmesan or pecorino cheese, chopped olives, chopped sun-dried tomatoes, or anything else you can think of into this dough. Make it your own!
TROUBLESHOOTING: MY DOUGH DIDN'T RISE. WHY?
There are basically 3 main reasons why bread dough fails to rise:
- The yeast was expired.
- Your water was too hot and it killed the yeast.
- The dough wasn't kept warm enough for the yeast to grow and thrive.
If your yeast doesn't foam up in the sweetened water after 10 minutes, then it's probably dead and you should start over.
If it bubbles up initially but then the dough fails to rise, try moving it to a warmer spot, like near a heat vent or next to the fridge, or on a sunny windowsill.
HOW LONG WILL DOUGH LAST IN THE FRIDGE OR FREEZER?
You can keep balls of dough in the fridge (in lightly oiled containers, covered) for up to 48 hours, and they will keep in the freezer for up to 2 weeks. After that, the yeast will start to die off.
Thaw frozen pizza dough in the fridge or at room temp. Once they are no longer cold, they can be punched down, shaped, topped, and baked.
CAN THIS RECIPE BE SCALED UP OR DOWN?
Yes! You can double, triple, or even quadruple this recipe! Just make sure you have a bowl big enough to handle the volume.
The recipe can also be halved if you want to make a smaller amount.
A FEW MORE OF MY BEST YEAST DOUGH RECIPES:
As an amazon associate I earn from qualifying purchases.

Ingredients
- 1 ½ cups (354.88 g) water,, warm (not hot)
- 2 teaspoons (9.86 g) granulated sugar
- ¼ ounce (7.09 g) active dry yeast , (1 packet or about 2 teaspoons)
- 4 cups (437.5 g) all-purpose flour, (approximately, you may need more or less)
- 1 tablespoon (14.79 g) extra-virgin olive oil
- ¾ teaspoon (3.7 g) kosher salt
Instructions
- Place the warm water and sugar in a large mixing bowl and stir together to combine.
- Sprinkle the yeast on top and allow it to dissolve.
- When the mixture looks foamy (after approx. 5 to 10 minutes), stir in 2 cups of the flour until incorporated.
- Stir in the olive oil and salt.
- While continuing to mix, add in more flour until the dough gathers itself into a ball and pulls away from the sides of the bowl cleanly. (You may need slightly more or less flour; use your judgement.)
- Knead the dough until it passes the windowpane test* (approx. 10 minutes).
- Lightly mist the bowl with non-stick spray, place the dough back in, and cover the bowl with plastic wrap or a damp towel.
- Place the bowl of dough in a warm place and allow it to rise until doubled in bulk (approx. 45 to 90 minutes).
- When the dough has grown to twice its original size, punch it down, knead it a few times, and divide it into portions.
- Shape the dough, add toppings, and bake it at the highest possible temperature until brown and crisp on the bottom, OR place it in lightly oiled containers (covered) and chill in the fridge or freezer until ready to use.**


We have loved making this dough. Thank you so much. It’s so easy and absolutely delicious. Quick question, if I want to double the recipe, do I double ALL the ingredients EXCEPT the yeast? Thanks so much.
So happy to hear that! I would double the yeast as well! And make sure your mixer is big enough to handle the volume. Good luck!
What a wonderful pizza dough!! This is so simple and a huge hit. If I want to double the recipe, do I double ALL ingredients, EXCEPT for the yeast? Thanks so much.
I would go ahead and double everything Carlotta! That is what I usually do when I make it. Just make sure your mixing bowl is big enough to handle the volume; it's a lot! Good luck.
I want to try making this dough. I used to make homemade pizza with one of my aunt's when I would spend the night with her and my uncle. It's been so long ago that I can't remember if I helped her make the dough, or if my cousin and I would just help with the toppings. I'm one of the weird ones who used to love using the old hand crank ice cream churns. It was very rewarding to work for the sweet lucious homemade ice cream.
Hope you enjoy it Beverly!
Hi. I ordered whole wheat flour from Amazon and they sent me bread flour. I'm learning how to bake and I'm trying to figure out what else I can use the bread flour for. Can I make pizza dough using bread flour?
Yes, I wrote all about this under the subheading "Bread Flour." I know the post is long and it's tempting to not bother reading it, but if you have a specific question like this, you might want to go back and make sure it's not already covered. Good luck!
Thanks Allie. I will make it a point to read the posts from now on.
Hi,
So can I make like garlic bread with this dough? Do you have any other ideas for this dough?
Thanks
I would just use it for pizza, Annie. If you want to make bread you probably want to use a recipe that's meant for that. I would try googling "Italian bread recipe," or something along those lines. Good luck, hon!
Do you bake your pizza on a pan, baking stone, directly on grate, or other? Do you also cook it on the paper shown in the picture.....what is it? Thanks!
Hi there, Pizza Lover! I bake my pizza on a parchment lined baking sheet. I'm partial to this kind of pan: http://astore.amazon.com/yinmomyangmom-20/detail/B000G0KJG4, and this is the kind of parchment I use: http://astore.amazon.com/yinmomyangmom-20/detail/B000E7A6BM. (Please note that these are affiliate links.) I really like this method because it's so easy and nothing sticks! Thanks for the great question! 😉
Guess you just made pizza? Guess who needed this recipe today? That's right, Jack Frost. You're so smart!!! 😀 Great recipe.
This one's an oldie but a goodie, Margaret Anne! I've tried a few other pizza recipes since this was originally posted, and none of them held a candle. I love how crispy it gets on the bottom, and it's so easy to get it nice and thin. Glad you enjoyed!
There are a zillion uses for pizza dough. Can't wait to try this!! Pinned 🙂
Thanks so much for sharing on Pinterest, Mariel! I use this recipe all the time- so easy and versatile. I'm so glad you liked!
I will definitely try these. We love some homemade pizza in this house. 🙂 Would have been perfect today on a blizzard day in WY.
You are so right! I'd love to snuggle in with a few slices of blistery homemade pizza on a cold winters eve... So happy you liked the post, and good luck with your pizza, Adin! 🙂
Your pizza looks so pro! Like the ones we have at Italian restaurants!
Thanks, Erika! I like it thin and crispy, can you tell? Thanks for the sweet comment, as always... xx
Looks amazing! We make homemade pizza at least once a week, but I haven't found a whole wheat dough recipe that I am in love with... Can't wait to try it! Quick qustion though, do you bake the crust before topping it, then bake it again?
Hi Amanda! There is no need to pre-bake the crust. If you are baking it at a super-high temperature, as the recipe suggests, the crust will bake really quickly, and the cheese and toppings will get good and hot too. It's a thinner crust so it cooks fast. I really hope you enjoy! I've found it to be really easy to work with, since the dough's pretty lax it's easy to stretch/flatten. Good luck and thanks for reading and for the excellent question! 🙂
Hey b.o.p.! I made your dough recipe on Saturday, and it turned out so nice. Usually my crust isn't baked in the center and turns all mushy. Yours did not do that! I also love how you bake it at a super high temp. I've always struggled with non-stringy/non melty cheese. (Lower temp longer time in oven...dark cheese and not melty). With your recipe, my mozzarella melted just right and was nice and stringy!
Thanks so much!
Xoxo
Oh, I'm so happy you liked it, Mo! It's a little different than a lot of other pizza dough recipes, in that it's so lax, but I really like it because it gets thin and crispy pretty easily. And I do think a high temp is the way to go. You know some of those brick oven pizzerias get to be like 800 degrees!
Show me ONE kid begging for kale, salmon and quinoa!!! I'm sure EVERY mother knows exactly what you are talking about! It's hard to nurture the kids properly but your pizza dough with whole wheat flour topped with fresh veggies looks amazing!! So fluffy and delicious! This is saved for my next pizza dinner (which will follow in probably a few days 😉 Love your post Allie!
xox Amy
Thanks for the positive affirmation, Amy! It certainly does feel like I'm fighting a losing battle most of the time, lol! Glad you enjoyed the post, and I hope you enjoy your own homemade pizza dinner... <3 <3 <3
I'm going to need to pull out my stretchy pants to make this glorious dough! Pizza is my weakness and I love trying new recipes. Can't wait to give it a shot!
Ha ha! Hope you enjoy it, Amy! Thanks for stopping by! 😉
Little things are better than a homemade pizza on a crispy crust warm from the oven, and yours look amazing!! :--)
I couldn't agree more, Consuelo! Thanks so much for reading and commenting! 🙂 🙂 🙂
Always been looking for a pizza dough recipe I can make ahead of time and freeze. One question that probably most yeast-bakers know already, how much yeast is in one packet? Reason I ask is that I am cooking in Egypt and things aren't always the same as they are here. Looking forward to trying this in a few weeks when I am back in Cairo.
Hi, Julie! Thanks for the excellent question! I dragged out a packet from my cupboard, and it's 1/4 ounce per envelope. That is equal to 7 grams, or 2 1/4 teaspoons. Thanks for reading and I hope you and your family enjoy the recipe! Safe travels back to Cairo... <3
Thanks for the yeast answer. What about a dough hook? necessary? I guess it is more work, but I don't have a dough hook so can I just mix it by hand. I only have a regular mixer otherwise. Back in Cairo now and looking forward to making (and especially, eating) this.
Hi Julie! Sorry for the delayed response, I've been out of town for the last several days. 😉
If you don't have a dough hook or stand mixer, you can certainly do this by hand. It'll be a great upper body workout, lol! Traditionally, pizza crust, and breads in general, were always mixed and kneaded by hand. It can be a little bit more effort, but a lot of bakers find that to be very therapeutic. And we both know how much better things taste when that extra bit of love goes into making them!
Good luck with your pizza making and I'm so happy to hear you're back home safe and sound! Love to you and your beautiful family!
I adore homemade pizza and I love how adaptable this recipe is!
Thanks, Kayle! So glad you enjoyed! Thanks for reading and commenting! 🙂