Easy Dulce de Leche Recipe
As an amazon associate I earn from qualifying purchases.
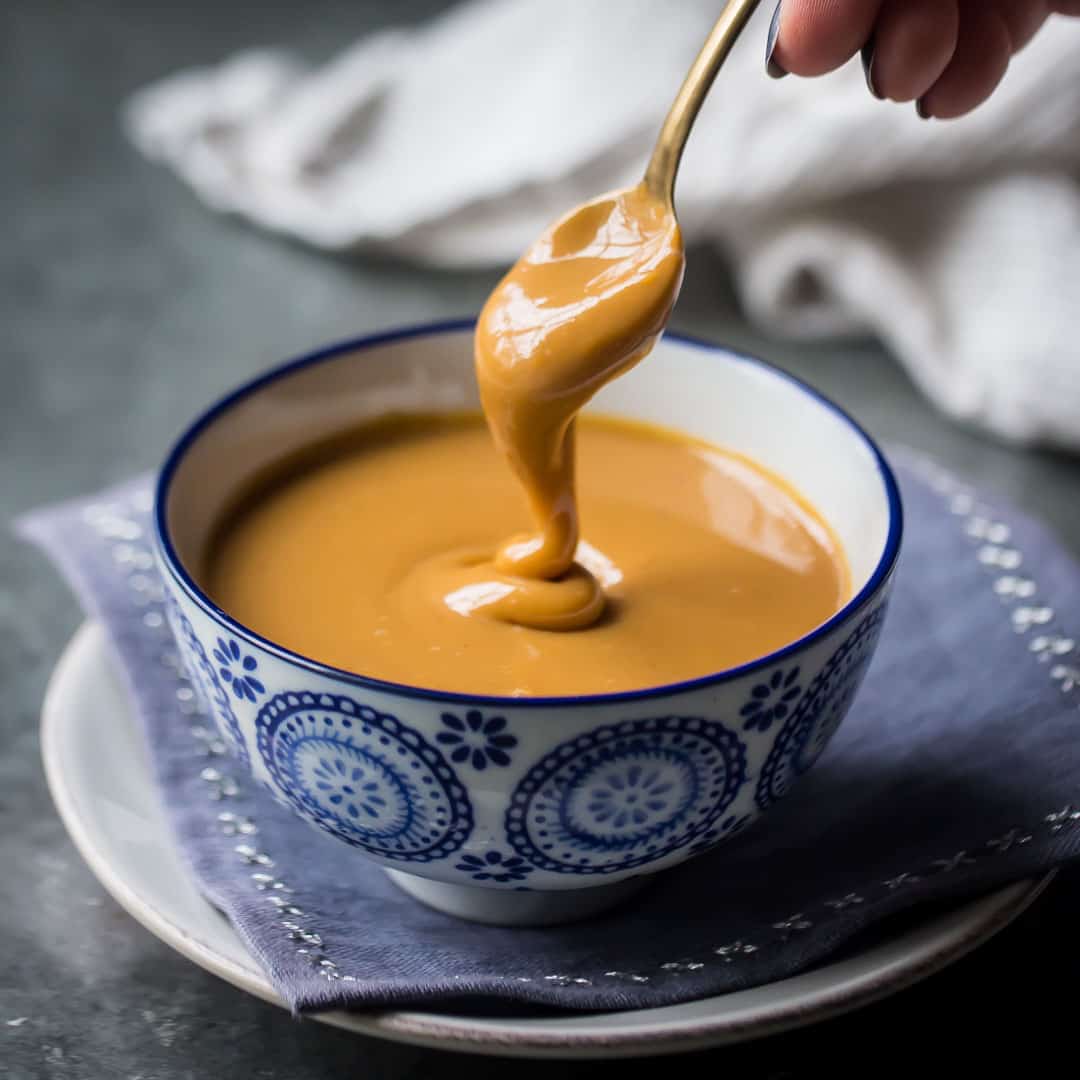
This Easy Dulce de Leche Recipe is rich, creamy, and unbelievably simple to make with just one ingredient! It's sweet, sticky, and smooth, and perfect for drizzling over ice cream, layering into cakes, or enjoying by the spoonful. If you've ever wondered how to make dulce de leche at home, this method is completely foolproof and oven-friendly.
*This post was originally published on April 29, 2019. I thought it was due for an update, so I've added additional info and answers to some frequently asked questions. Hopefully, you'll enjoy this dulce de leche recipe as much as I do!*
Table of Contents
- Here's Why You'll Love This Recipe
- Ingredients You'll Need
- In Photos: How To Make Dulce de Leche
- Ways To Use Dulce de Leche
I love cinco de Mayo! Any excuse to get out in the sunshine, drink margaritas, and eat fabulous Mexican dishes like guacamole and churros is ok with me!
One of the most iconic Mexican sweets would have to be dulce de leche. I'm so happy to be bringing you this easy recipe today! It is so simple to make and it tastes fantastic!
Here's Why You'll Love This Recipe
- This recipe uses just one ingredient, so you won't need to hunt down anything special.
- There are no fancy tools involved, just a baking dish, foil, and a roasting pan.
- It's almost entirely hands-off with no need to stir or monitor a pot on the stove.
- You can customize it to your preferred consistency by baking it longer for a thicker, more intense flavor.
- It's incredibly versatile, working beautifully in desserts, on toast, or even straight from the spoon.
Ingredients You'll Need
The recipe card at the bottom of the post contains the full list with all of the amounts. Refer to that when you're cooking.

- Sweetened Condensed Milk: Ideal for making dulce de leche because it's milk that's already been sweetened and reduced, allowing it to caramelize evenly and develop that signature thick, toasty flavor with minimal effort.
In Photos: How To Make Dulce de Leche
This may be the easiest recipe on this site. It only has one ingredient! Doesn't get much simpler than that, right??
I've seen dulce de leche made in all sorts of different ways, from stove top to microwave to slow cooker. But I really think this is the best method because it's safe, almost entirely hands-off, and relatively quick.
Step 1: Preheat
Preheat your oven to 425°F (220°C).
Step 2: Prep
Pour the sweetened condensed milk into a pie plate or shallow baking dish.

Step 3: Cover
Cover the dish tightly with foil.

Step 4: Water Bath
Set the dish inside a larger roasting pan and pour in hot water until it reaches about 1 inch up the sides.

Step 5: Bake
Bake for about 2 hours, checking occasionally to top off the water if needed.
Once it reaches your desired golden-brown color and thickness, remove it from the oven and give it a good whisk to smooth out any lumps.
Helpful Tips and Tricks
- Use a deep roasting pan so the water doesn't evaporate too quickly.
- Be sure the foil is sealed tightly to prevent a skin from forming.
- The longer you bake it, the thicker and darker it becomes.

How To Store Dulce de Leche
Most of the recipes you see will instruct you to keep dulce de leche refrigerated. If you have any doubt whatsoever, you should definitely do that.
I tend to be more relaxed about these kinds of things, and I know that with the sugar content being as high as it is, it's very unlikely that any type of microbes would be able to grow. It's truly a candy, similar to soft caramel sauce, which usually does not require refrigeration.
So, use your best judgment!
Honestly, I doubt you'll have leftovers hanging around for very long anyway!

Ways To Use Dulce de Leche
Dulce de leche can be used in so many different ways. Here are just a few ideas:
- Drizzled over ice cream.
- As a dip for churros, fruit, or cookies.
- As a filling for cakes and cupcakes, cookies, or macarons.
- It can also be swirled into your favorite brownies or blondies!
- And think about giving out jars of dulce de leche as gifts! It would make an awesome party favor.
Yes! While this recipe uses the oven method, you can also simmer an unopened can of sweetened condensed milk in water for 2 to 3 hours (fully submerged at all times), or cook it in a slow cooker covered in water on low for 8 hours. Always cool completely before opening if using the canned method.
Not quite. Caramel is made by heating sugar, while dulce de leche is made by slowly cooking milk and sugar together. Dulce de leche has a more milky, toffee-like flavor.
Ingredients
- 14 ounces (396.89 ml) sweetened condensed milk, (1 can)
Instructions
- Preheat the oven to 425 degrees F.
- Place the sweetened condensed milk in a pie plate or similar baking dish, and cover it tightly with foil.
- Place the covered dish in a larger pan, and pour hot water into the larger pan until it comes about 1 inch up the sides.
- Bake in the oven for about 2 hours (checking every so often to refill with water if needed), or until the desired color and thickness* are achieved.
- Whisk the dulce de leche to smooth out any lumps.


Worked perfectly for the 1 1/2 hour bake time. Next time I might keep it in for an additional 1/2 hour for a little darker Carmel though.
Worked perfectly for me! A lovely peanut butter color, no lumps, no burnt parts. I used a 9-inch glass baking dish and double wrapped it in tin foil. I placed it in a LARGE ROASTING TIN that could hold a lot of water (I suspect the people who said theyre water boiled off used a smaller container that was capable of holding less water). Even though it was never close to boiling off, I refilled the water every 45 minutes anyway, to ensure that it would cook slowly. My baking dish was actually floating in the water and was never sitting directly against the roasting pan, so it didnt have a chance to burn. After 2 hours at 425 deg, I carefully took it out (careful not to spill boiling water on me) and the dulce de leche is a lovely tan color. I had previouslu checked 4 different grocery stores for dulce de leche but the shelves were empty!! So thank you for this recipe.
You're very welcome, and thank you so much for sharing your tips!
Hi, can you add alcohol eg. rum or brandy ? If so, during cooking or after?
Hey there! I've never tried that so I can't say for sure, but definitely feel free to play around!
Very easy. Superb
Loved this recipe! First time trying it, and I will definitely do it again! I used half of a can because it’s what I had left over, roasted at 425 in a water bath for about an hour and a half and it was absolutely perfect! No lumps or burning here! I checked it every so often because it was a smaller amount than the recipe, but again, so happy I tried this! 🙂
Great recipe, really simple and easy. However, I made a few changes. An hour after putting it in the oven, I read the reviews and became worried mine was going to burn. So I took a glass and poured about two more cups of water in. This seemed to work fine and mine came out not burned!! However, My recipe is a little bit lumpy and I couldn't get all the lumps out with a whisk. Will try again tomorrow heating it up in a pan while whisking.
Mine burned at 2 hours too but it's my own fault. I should've checked it at an hour. This method does work just need to check sooner for desired consistency. A good tip to keep in mind is your oven. Convection ovens run 25 to 30 degrees hotter than conventional. So either turn the fan off or turn the oven temp down if needed.
THANK YOU so much for this simple and easy method! I was too scared to heat up a can of condensed milk for a few hours and this has saved me from can explosions. I read and follow your instructions step by step & I also set a timer in 20-minute intervals to check if the water has evaporated from the water bath. I only had to refill the water once because not much evaporated in my oven. My dulce de Leche also didn’t burn like other reviewers stated, I just kept checking on it for the right consistency and texture. I will totally be doing this method again in the near future.
So happy to hear it's worked well for you Hannah! Thank you so much for the positive feedback!
I cooked this according to the recipe exactly , except I took it out of the oven a half hour early because I smelled burnt sugar. Yep, burned black. Do you ever test theses recipes?
Of course I do- how else would I be able to photograph them if I hadn't actually made them? I've made this many times as described, and there are other readers who have as well and have been pleased. You can read about their experience right here in the comments section. I'm sorry you had trouble and I'm happy to help you troubleshoot but please be respectful and kind.
Just put the unopened can in a deep pan, cover with water and boil 3 hours. keep the water covering the can at all times.
I have done it this way too and it works, but it's not as safe as this method, which has no danger of exploding cans.
I absolutely give it a 5 star rating. I think the ladies that are complaining should read the instructions carefully and try again! It's well worth the attempt!
So glad you were pleased with it Kristen! Thanks so much for the positive feedback!
Yes! I made it. I have made it many, many times now... I usually use it to drizzle over my coffee or frappe and use some to make a nice add-in for homemade ice cream (or a topping for some good ol' store bought vanilla!). I am guilty of eating in right out of the jar too! It's incredible and I try not to live without it. Thank you!🙂
You're so welcome! So glad you are enjoying it so much 🙂
Just made it. Yummy.
in Brazil this is very common ‘doce de leite’.At my granny it was almost a sunday obligation.
I’m 71 and all the dearest loving ones are not here anymore.
this gave me the paradise back.
perfect &. easy.❤️❤️❤️❤️❤️😂
So happy you enjoyed reading Zenaide! I love that this was able to bring back such happy memories for you.
I've just finished making this for the 1st time. Not a fan of caramel in any way but this I like. Looking forward to using it in a few desert bakes I've got planned.
Did check after an hour, and needed to top water up, and then every 15 mins til I got the colour I wanted. Quick whisk and as smooth as silk.
Thank you
Dangerously Delicious!!
I can’t believe how easy this was to make.
So glad you were happy with it Christina! Thanks for the 5-star rating!
You contradicted yourself in the comments. You said cook it long and slow. I cooked it for an hour and half at 425 and it burned the crap out of it. I cooked it in a water bath but the water evaporates in the heat.
I'm not sure what comment you're referring to, but when I made this I cooked it for 2 hours at 425 degrees F. You can see the color and thickness that was achieved in the pics. But since every oven is different, this is only meant to be a guide. It's stated in the recipe instructions that you can and should cook this more or less, according to the color and thickness you're looking for. If the water evaporates you need to add more. It's not cooking in a water bath if you let the water dry up, and yes that would cause it to burn.
Lol I think you have to put that specifically in the instructions ("make sure your water bath does not completely evaporate or else it will burn") because common sense isn't common anymore. 🙂 I tried to do this today, but mine clumped. Not a big deal though because I was going to use it for a cheesecake recipe anyway. Thanks.
Sarah,
When you burn it (as I did following the recipe), thin it out with some cream and then put it in the food processor to get it smooth. I saved mine this way! 😁
I want to use this as a filling in bars, should I cook it longer so it's a little more firm to stand up to a cookie bar?
Yes I think that would work well! Just be careful to cook it low and slow so it doesn't burn. Good luck!
Thank you, did make this recipe, following the instructions, not extending the time, but at 425 degrees, it was burned after the two hours. What should I be cooking it at?
So sorry you had trouble Lydia! Hm, that's strange, when I make it I cook it for 2 hours at 425 degrees F. Did you put it in a water bath?
I was looking for an easy dulce de leche recipe , and i found this. I am a dulce de leche lover and there is no chance I will ever be able to stop making it after this.