Royal Icing
As an amazon associate I earn from qualifying purchases.
The only royal icing recipe you'll ever need! Perfect for decorating cookies, cakes, cupcakes, & gingerbread houses. Easy, pipes smooth, & dries hard.

*Originally published 6/14/2018. Updated 12/9/2021.*
Today I have a basic recipe for you that every good baker should know how to make: Royal Icing!
It's a total staple. You'll love this royal icing recipe because it's easy to make and perfect for so many things.
You can use it to make transfers, pipe roses or intricate embroidery-like accents on cakes, to glue together a gingerbread house, or my favorite way: as a cookie icing.
I have a few great cookie recipes on this site that are just begging for a little royal icing embellishment! Be sure to check out my Cut-Out Cookies that Don't Spread, Chocolate Cut-Out Cookies, Gingerbread Cookies, and Soft Cut-Out Sugar Cookies.
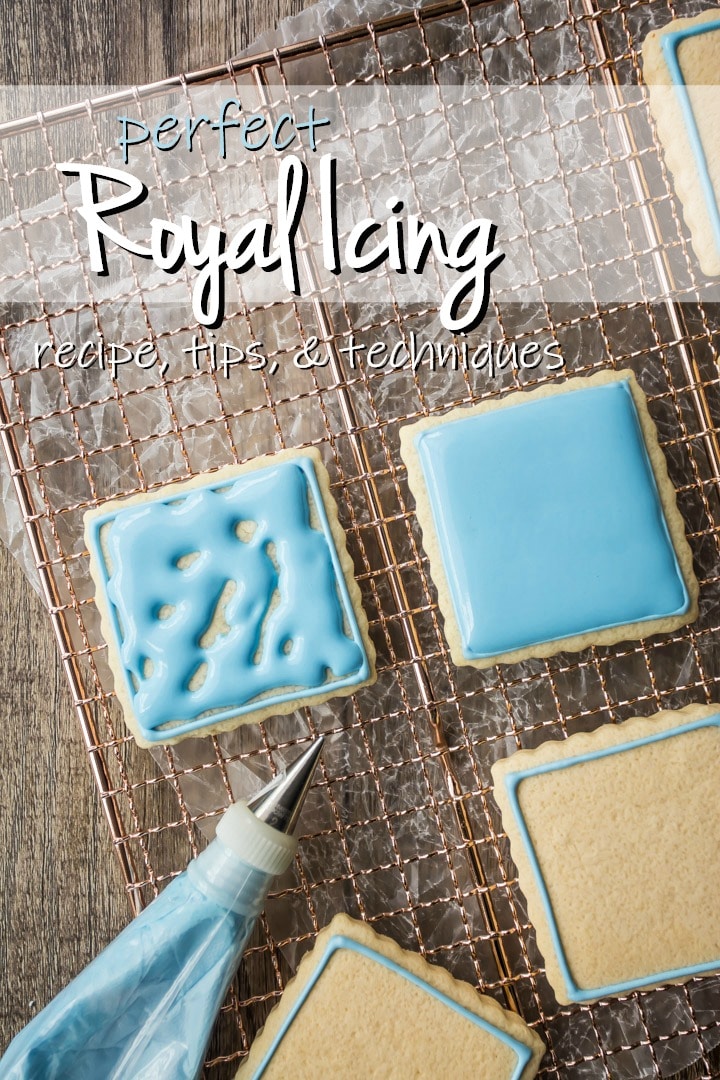
Table of Contents
- What is royal icing?
- What makes this the best royal icing recipe
- What does royal icing taste like?
- Ingredients
- Special equipment
- How to make royal icing for sugar cookies
- How to tint royal icing
- How to get the right consistency
- How to dry royal icing
- How long will it last?
- Can you freeze it?
- Can I make this recipe with real egg white instead?
- Expert tips
- A few more of my favorite icing recipes
What is royal icing?
Royal icing is an easy-to-make icing that's made from just 3 simple ingredients: meringue powder, water, and powdered sugar. (Some recipes call for egg whites instead of meringue powder, but I prefer to use the powder because the results are more consistent and it's safer to eat.)
As it dries, it hardens to the consistency of candy, similar to like button candy or a smarty. Hard enough to not smear, but not so hard you can't bite it easily.
It's perfect for piping on cookies. Pipe out your image, flower, or whatever, then set it out to dry for a few hours or overnight.
What makes this the best royal icing recipe
- Consistent results: You can count on this to work well, time and time again.
- Few ingredients: You only need 3 ingredients.
- Easy to make: It only takes a few minutes to whip this up.
- Versatile: It can be tinted and flavored with all sorts of different extracts.
What does royal icing taste like?
Royal icing mostly just tastes like sugar. It's very sweet, and most meringue powders will also give it a subtle vanilla flavor.
You can jazz up the taste by adding lemon juice or any other kind of extract, but just be aware of how liquids can affect the consistency. Decorating with royal icing is ALL about the consistency!
Ingredients
Meringue powder: This ingredient can usually be found in craft stores, in the cake decorating section. You can also order it online: Meringue Powder. It's safer to eat than raw egg white and it gives a more consistent result since the size of eggs can vary.
Water: To reconstitute the meringue powder.
Powdered sugar: Because it's so finely milled, powdered sugar dissolves easily and ensures a smooth, lump-free icing. Granulated sugar won't work because it's too crystalline.
Special equipment
- Measuring cups and spoons: For measuring out the ingredients. Use this guide: How to Measure Ingredients for Baking.
- Mixing bowl: In which to mix up the icing.
- Electric mixer: A stand mixer or a powerful handheld mixer, fitted with the whip attachment.
- Gel paste food coloring: Optional, for tinting.
- Piping bags and tips: For applying the icing decorations to your baked goods.
How to make royal icing for sugar cookies
This recipe for royal icing comes together in just 2 simple steps.
Step 1: Dissolve the meringue powder
Place the meringue powder and the water in your bowl and give them a quick stir to get them combined.
Step 2: Add powdered sugar
Next, add the powdered sugar, and whip.
Start the mixer on a low speed, so that the ingredients don't fly out of the bowl, and gradually increase the speed all the way up to high.
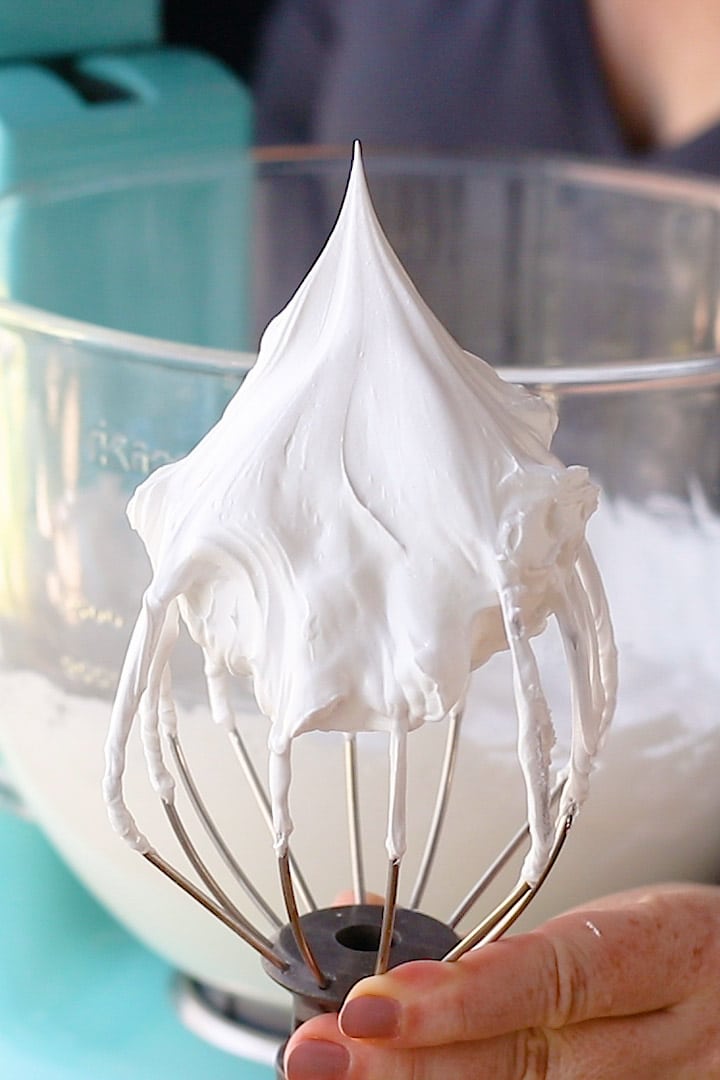
Allow the mixture to whip until it's very stiff. It should hold a stiff peak.
Even if you prefer to work with a thinner consistency, you want to start it out stiff. You can always thin it out later.
How to tint royal icing
You can tint royal icing in all sorts of colors.
Use any kind of food coloring you like, but I have a strong preference for gel paste icing colors. They are highly concentrated, so not only do you not need much, but you don't have to worry about them diluting the consistency.
How to get the right consistency
Like I said, when it comes to royal icing, the consistency is so important!
You want to start out by making your icing as stiff as possible. Whip it for a long time so it gets lots of air in it.
Then, scoop a little into a small bowl, and tint it with your icing colors.
Finally, thin it down to the consistency you need.
If you are making a gingerbread house, you probably want it to be very stiff so that it can hold the structure together. Same goes for piping roses or any other kind of flower.
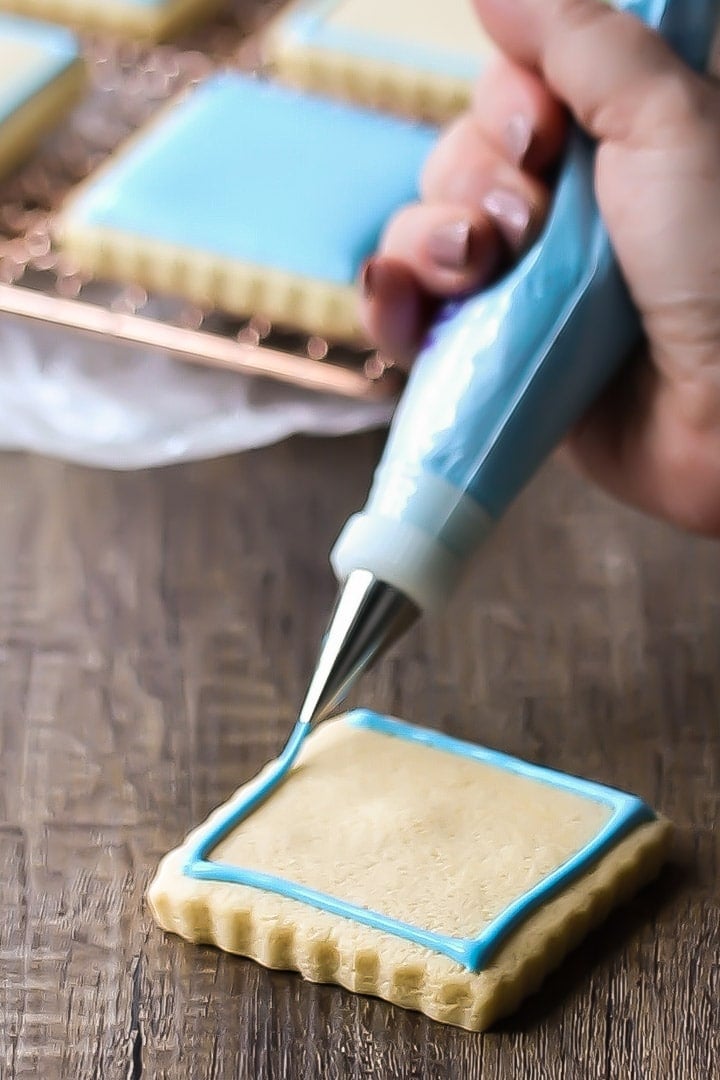
If you are making a royal icing transfer or decorating cookies, it's nice to have 2 different consistencies: one that's pretty thin for flooding (or filling in), and one that's a little stiffer for outlining.
The flood icing will sort of self-level. In other words, when you pipe it out, it will naturally spread and smooth over perfectly flat.
The outline consistency icing will hold the flood icing within its barriers, so it doesn't spill over the sides of the cookie. You can also use it for accents here and there, to give the decorated cookies a little more dimension.
Stir a few drops of water at a time into the bowl of tinted cookie icing, until you get the thickness you're after. If you're not sure, take a peek at the video (in the recipe card) to see what flooding icing and outlining icing should look like.
Go really slow here and add the tiniest amount of water at a time. Once you've added it in, it can't really be taken out.
As you stir, take up a spoonful of icing and allow it to drizzle off the spoon. Look carefully at what it does as it falls into the bowl.
Does it immediately disappear into the puddle of icing? Or does it hold its shape for a few minutes and then melt?
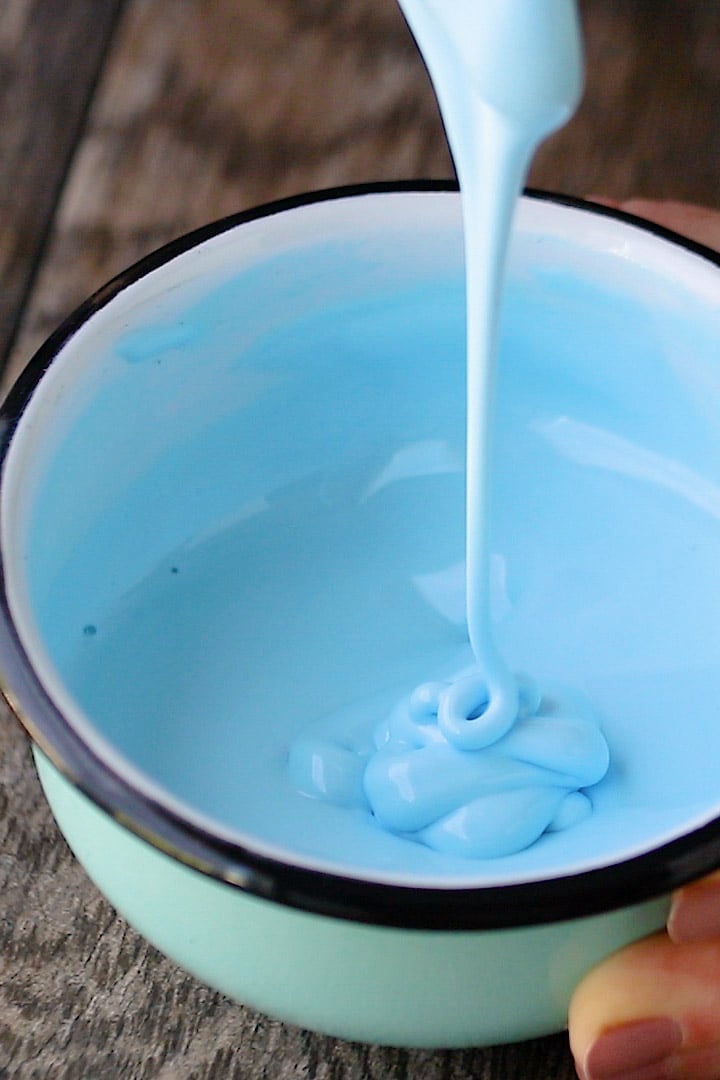
The picture above shows a good consistency for flooding. It's thin enough that it melts into the puddle after a few seconds, but thick enough that it will stay on the cookie without running over the sides.
How to dry royal icing
Once your royal icing has been piped on, you can set it out to dry. After just 15 to 30 minutes, it will form a thin crust on the surface, but it generally will stay wet underneath for several hours.
I usually set my cookies out (in a single, flat layer, on parchment-lined baking sheets) overnight to dry. They won't get stale that quickly, because the royal icing actually serves almost like a barrier from the air.
I would not recommend drying royal icing in the refrigerator or freezer. The humidity levels can be funny in there, so room temperature is best. If you need to speed up the process, just set up a fan nearby.

How long will it last?
Royal icing really won't ever spoil, because the sugar content is so high that bacteria can't grow. It's really a lot like candy. But having said that, you will notice the quality will degrade over time.
After 24 hours, the royal icing will become more thin and watery. You can thicken it back up with a little more powdered sugar if needed.
After 36 hours, it may start to separate. You can stir it though, and it will come back together.
After about 48 hours, you might start to notice a grainy texture. I don't think there's any way to recover it from that state, so I generally try to either use up or throw away any leftover royal icing after 2 or 3 days.
Can you freeze it?
I probably wouldn't recommend freezing leftover icing, since it's so easy to just make a fresh batch, and fresh is always best.
However, if you want to make and decorate your sugar cookies ahead of time and keep them in the freezer until they're ready to be eaten or gifted, you absolutely can.
I'd suggest placing decorated sugar cookies (completely dried) in a single layer in an airtight container, with sheets of parchment in between each layer. This way, if the color bleeds at all, it won't mar the other cookies above it.
And when you are ready to thaw, take the lid off and make sure there's lots of airflow around every cookie. So any condensation that may occur doesn't disturb the design.
Can I make this recipe with real egg white instead?
I don't like to do it this way, but it is possible.
You can use 3 large egg whites in place of the meringue powder and water, or about 120 grams of egg white.
Expert tips
Keep it clean: I like to reuse my piping bags (even the disposable plastic ones sometimes), so I included a little trick in the video below that makes cleanup a snap! Basically, you just enclose the icing in plastic wrap before placing it into the piping bag. That way, when you're done you can just slide out the wrapped-up icing, and you really only have to clean your tips.
Close it tight: I also like to twist the end of the bag and secure it with a rubber band or twisty tie. It keeps everything together nicely and if any cookie icing comes up the top, it doesn't harden and scatter dried icing crumbs everywhere.
Wet the end: If you've ever used royal icing before, you may remember feeling frustrated when it hardens at the tip. It only takes a few minutes for the icing in the little pinhole of your piping tip to harden, and then you can't squeeze it out at all. You can break it up with a toothpick, but then sometimes you're forcing hardened icing into your tip and creating a clog. So, try placing a damp towel in the bottom of a drinking glass, and keep your bags (tip side down) in there. That little bit of moisture in the paper towel will prevent those clogged tips from happening.

A few more of my favorite icing recipes
- Marshmallow Frosting
- Whipped Chocolate Ganache
- Cream Cheese Frosting
- Whipped Cream Frosting
- Swiss Meringue Buttercream
Do you like to decorate with royal icing? Have you ever made a recipe like this? Do you have any other great tips that make things easier? If so, I hope you'll share in a comment below!
This post contains affiliate sales links.

Ingredients
- 2 tablespoons (29.57 g) meringue powder
- 6 tablespoons (90 g) water
- 2 ⅔ cups (320 g) powdered sugar
- gel paste icing colors, for tinting (optional)
- additional water, for thinning (optional)
Instructions
- Place the meringue powder and water in a large mixing bowl, and whip (with the whisk attachment) until foamy (about 3 minutes).
- Add the powdered sugar, and whip on medium speed until very stiff and thick (the royal icing should hold a stiff peak).
- Tint as needed with gel paste icing colors.
- Thin with additional water, a drop at a time, to get the desired consistency.


I'm planning on using this recipe to ice some sugar cookies and gingerbread cookies, but I'm new to flooding with royal icing. Can you make a piping consistency icing, outline all your cookies, then thin that same icing to flooding consistency and flood them all? Or do you need to make both piping and flooding icings at the start before they sit too long?
Hey Shawna! You can definitely do it that way, although I prefer to make both at the start just because sometimes I will go back and add accents to the flooded parts (after they've dried) with the outline icing. But it's totally up to you!
Can you use confectioner’s sugar instead of powdered sugar?
Powdered sugar is just another word for confectioner's sugar.
I am having a little trouble with the drying process. I left them out overnight, and they are mostly dry but I am wondering if they need to be even drier. I live in Florida and it is very humid here. I am thinking that is slowing down the process. I don't have a fan as you suggested but do have air conditioning in the house, of course. Also, this morning, the icing is no longer glossy, it is more of a mat finish, which is disappointing! Do you think the humidity is causing both of these problems?
Hey Susie! So sorry you are having trouble! If you live in Florida, the humidity can definitely trip you up. Royal icing does dry down to a matte finish, so expect it to lose it's glossy quality. It will first dry on the surface, and over time it should dry all the way through and end up with a candy-like texture, similar to like a Smarty or button candy.
What a brilliant, helpful post! Thank you. I will be trying it out and using your tips.
My pleasure Jessica! Hope you enjoy!
I am planning my sons kindergarten Christmas party. I have decided to do graham cracker ginger bread houses. I will be preparing them at home using your frosting recipe. I want to make enough for the kids to use the frosting at the party to decorate but afraid if I make it in advance it’ll harden before the party. What would you suggest so the frosting is nice and soft? How soon in advance should I make it?
Hey Amie! That sounds like a lot of fun. You can make this icing the day before and keep it in an airtight container. As long as it's covered tightly it won't harden. Good luck and enjoy!
Would I be able to use this for a gingerbread house? Or is that another type of icing?
Yes this is typically what is used for a gingerbread house.
Can it be frozen and rethawed?
Hi Charles! I'm afraid I wouldn't recommend it. I have not tried it, in all honesty, but in my experience the royal icing typically only lasts for a few days before it starts to separate. Over time it can also become grainy. Luckily it's really quick and easy to make, so I usually just make up a new batch every time I start a cookie decorating project. You could also halve the recipe without a problem, if it seems too much.
How many average size cookies will this recipe frost?
What size would you consider average?
You make this look so easy! What size tip do you use?
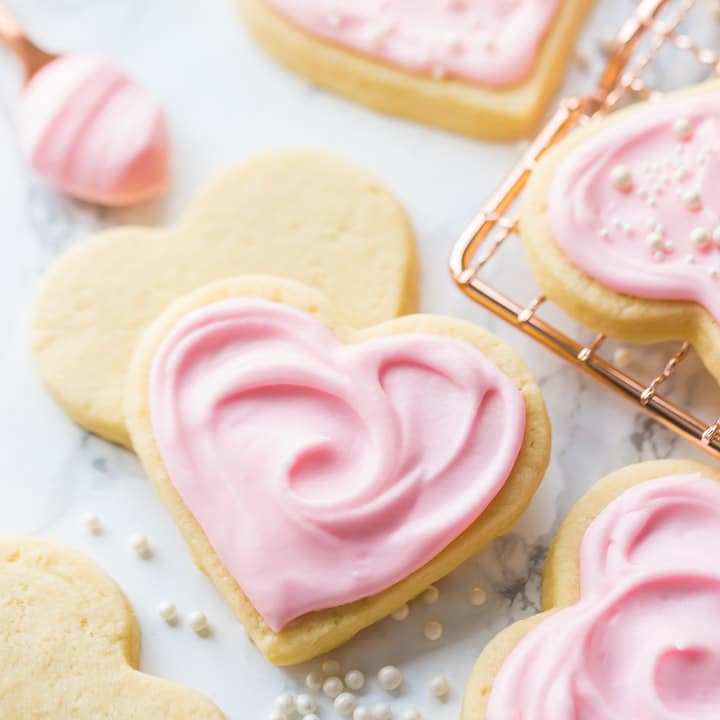
Hi Sheryl! It depends on the kind of decoration you're looking to do. I think for the plain, flood iced cookies you see here it was probably a #3 round tip. Thanks for reading!
I just made your sugar cookies and chocolate cookies. I also made the royal icing for the sugar cookies and I'm wondering how long does the icing take to harden so I can pack them up. I don't want to stack them too early. Thank you so much for these delicious recipes and videos. They are my go-to's from now on.
Hey Kathy! Thanks so much for trying my recipes and thank you for the great question. It's going to depend a lot on the humidity level in the air, but I find that overnight usually does the trick. I hope that's helpful! And I'm so glad you like the cookies!
I’m going to use this recipe today. How did you get that beautiful baby blue color?
Hey Teresa! I used icing colors to tint it. It's explained and linked within the body of the post, then linked again just above, as well as within, the recipe card. I used the blue color. Good luck and enjoy!
GORGEOUS
Yes, absolutely perfect! Love it!
This is perfect for making pretty cookies!!
Perfection! Thank you for this!
Such a classic versatile recipe!
You are a master at making beautiful decorated cookies and yours is the royal icing I will make from now on!
Thank you so much for your instruction and video tutorial. I had to make decorated cut out sugar cookies for a baby shower and your post was invaluable. I made simple pink & white onesies and got so many compliments.