Royal Icing
As an amazon associate I earn from qualifying purchases.
The only royal icing recipe you'll ever need! Perfect for decorating cookies, cakes, cupcakes, & gingerbread houses. Easy, pipes smooth, & dries hard.

*Originally published 6/14/2018. Updated 12/9/2021.*
Today I have a basic recipe for you that every good baker should know how to make: Royal Icing!
It's a total staple. You'll love this royal icing recipe because it's easy to make and perfect for so many things.
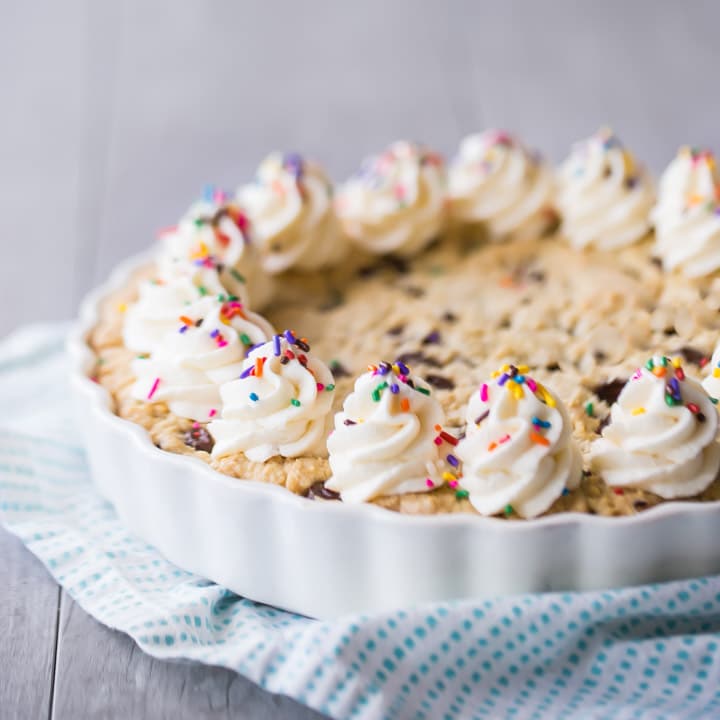
You can use it to make transfers, pipe roses or intricate embroidery-like accents on cakes, to glue together a gingerbread house, or my favorite way: as a cookie icing.
I have a few great cookie recipes on this site that are just begging for a little royal icing embellishment! Be sure to check out my Cut-Out Cookies that Don't Spread, Chocolate Cut-Out Cookies, Gingerbread Cookies, and Soft Cut-Out Sugar Cookies.
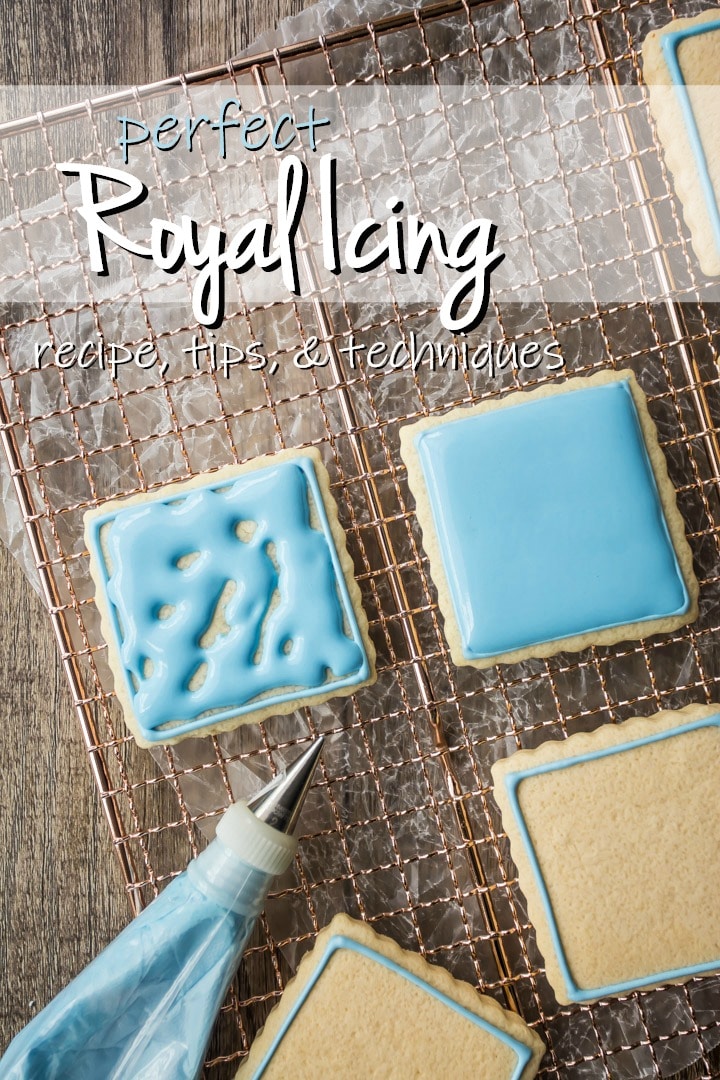
Table of Contents
- What is royal icing?
- What makes this the best royal icing recipe
- What does royal icing taste like?
- Ingredients
- Special equipment
- How to make royal icing for sugar cookies
- How to tint royal icing
- How to get the right consistency
- How to dry royal icing
- How long will it last?
- Can you freeze it?
- Can I make this recipe with real egg white instead?
- Expert tips
- A few more of my favorite icing recipes
What is royal icing?
Royal icing is an easy-to-make icing that's made from just 3 simple ingredients: meringue powder, water, and powdered sugar. (Some recipes call for egg whites instead of meringue powder, but I prefer to use the powder because the results are more consistent and it's safer to eat.)
As it dries, it hardens to the consistency of candy, similar to like button candy or a smarty. Hard enough to not smear, but not so hard you can't bite it easily.
It's perfect for piping on cookies. Pipe out your image, flower, or whatever, then set it out to dry for a few hours or overnight.
What makes this the best royal icing recipe
- Consistent results: You can count on this to work well, time and time again.
- Few ingredients: You only need 3 ingredients.
- Easy to make: It only takes a few minutes to whip this up.
- Versatile: It can be tinted and flavored with all sorts of different extracts.
What does royal icing taste like?
Royal icing mostly just tastes like sugar. It's very sweet, and most meringue powders will also give it a subtle vanilla flavor.
You can jazz up the taste by adding lemon juice or any other kind of extract, but just be aware of how liquids can affect the consistency. Decorating with royal icing is ALL about the consistency!
Ingredients
Meringue powder: This ingredient can usually be found in craft stores, in the cake decorating section. You can also order it online: Meringue Powder. It's safer to eat than raw egg white and it gives a more consistent result since the size of eggs can vary.
Water: To reconstitute the meringue powder.
Powdered sugar: Because it's so finely milled, powdered sugar dissolves easily and ensures a smooth, lump-free icing. Granulated sugar won't work because it's too crystalline.
Special equipment
- Measuring cups and spoons: For measuring out the ingredients. Use this guide: How to Measure Ingredients for Baking.
- Mixing bowl: In which to mix up the icing.
- Electric mixer: A stand mixer or a powerful handheld mixer, fitted with the whip attachment.
- Gel paste food coloring: Optional, for tinting.
- Piping bags and tips: For applying the icing decorations to your baked goods.
How to make royal icing for sugar cookies
This recipe for royal icing comes together in just 2 simple steps.
Step 1: Dissolve the meringue powder
Place the meringue powder and the water in your bowl and give them a quick stir to get them combined.
Step 2: Add powdered sugar
Next, add the powdered sugar, and whip.
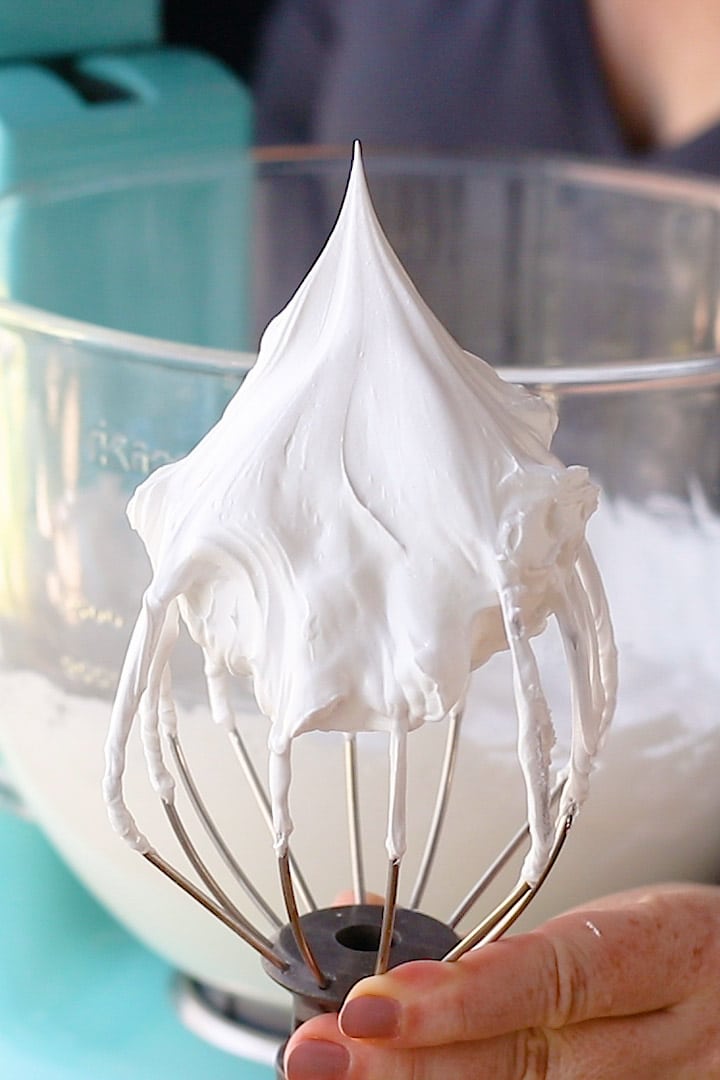
Start the mixer on a low speed, so that the ingredients don't fly out of the bowl, and gradually increase the speed all the way up to high.
Allow the mixture to whip until it's very stiff. It should hold a stiff peak.
Even if you prefer to work with a thinner consistency, you want to start it out stiff. You can always thin it out later.
How to tint royal icing
You can tint royal icing in all sorts of colors.
Use any kind of food coloring you like, but I have a strong preference for gel paste icing colors. They are highly concentrated, so not only do you not need much, but you don't have to worry about them diluting the consistency.
How to get the right consistency
Like I said, when it comes to royal icing, the consistency is so important!
You want to start out by making your icing as stiff as possible. Whip it for a long time so it gets lots of air in it.
Then, scoop a little into a small bowl, and tint it with your icing colors.
Finally, thin it down to the consistency you need.
If you are making a gingerbread house, you probably want it to be very stiff so that it can hold the structure together. Same goes for piping roses or any other kind of flower.
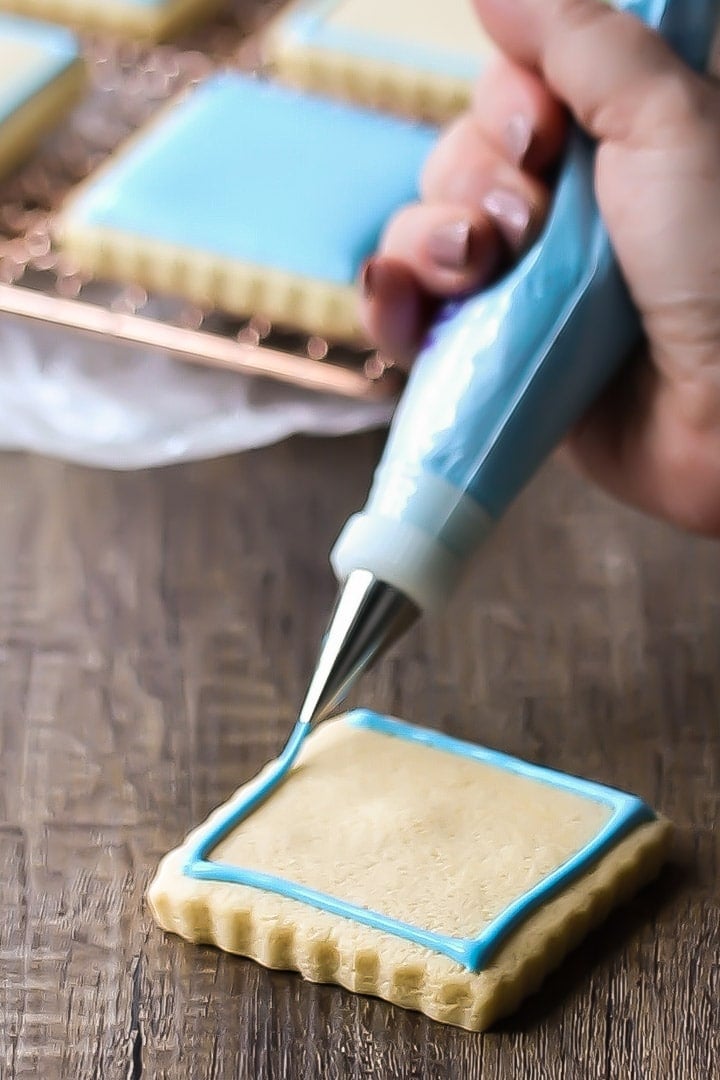
If you are making a royal icing transfer or decorating cookies, it's nice to have 2 different consistencies: one that's pretty thin for flooding (or filling in), and one that's a little stiffer for outlining.
The flood icing will sort of self-level. In other words, when you pipe it out, it will naturally spread and smooth over perfectly flat.
The outline consistency icing will hold the flood icing within its barriers, so it doesn't spill over the sides of the cookie. You can also use it for accents here and there, to give the decorated cookies a little more dimension.
Stir a few drops of water at a time into the bowl of tinted cookie icing, until you get the thickness you're after. If you're not sure, take a peek at the video (in the recipe card) to see what flooding icing and outlining icing should look like.
Go really slow here and add the tiniest amount of water at a time. Once you've added it in, it can't really be taken out.
As you stir, take up a spoonful of icing and allow it to drizzle off the spoon. Look carefully at what it does as it falls into the bowl.
Does it immediately disappear into the puddle of icing? Or does it hold its shape for a few minutes and then melt?
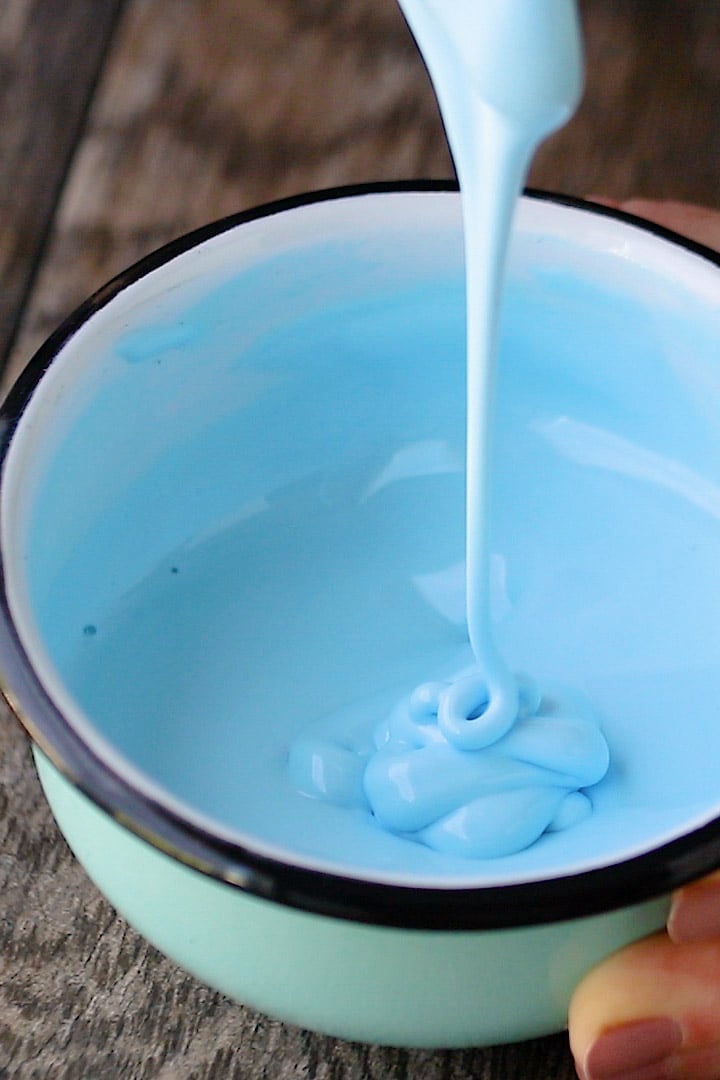
The picture above shows a good consistency for flooding. It's thin enough that it melts into the puddle after a few seconds, but thick enough that it will stay on the cookie without running over the sides.
How to dry royal icing
Once your royal icing has been piped on, you can set it out to dry. After just 15 to 30 minutes, it will form a thin crust on the surface, but it generally will stay wet underneath for several hours.
I usually set my cookies out (in a single, flat layer, on parchment-lined baking sheets) overnight to dry. They won't get stale that quickly, because the royal icing actually serves almost like a barrier from the air.
I would not recommend drying royal icing in the refrigerator or freezer. The humidity levels can be funny in there, so room temperature is best. If you need to speed up the process, just set up a fan nearby.

How long will it last?
Royal icing really won't ever spoil, because the sugar content is so high that bacteria can't grow. It's really a lot like candy. But having said that, you will notice the quality will degrade over time.
After 24 hours, the royal icing will become more thin and watery. You can thicken it back up with a little more powdered sugar if needed.
After 36 hours, it may start to separate. You can stir it though, and it will come back together.
After about 48 hours, you might start to notice a grainy texture. I don't think there's any way to recover it from that state, so I generally try to either use up or throw away any leftover royal icing after 2 or 3 days.
Can you freeze it?
I probably wouldn't recommend freezing leftover icing, since it's so easy to just make a fresh batch, and fresh is always best.
However, if you want to make and decorate your sugar cookies ahead of time and keep them in the freezer until they're ready to be eaten or gifted, you absolutely can.
I'd suggest placing decorated sugar cookies (completely dried) in a single layer in an airtight container, with sheets of parchment in between each layer. This way, if the color bleeds at all, it won't mar the other cookies above it.
And when you are ready to thaw, take the lid off and make sure there's lots of airflow around every cookie. So any condensation that may occur doesn't disturb the design.
Can I make this recipe with real egg white instead?
I don't like to do it this way, but it is possible.
You can use 3 large egg whites in place of the meringue powder and water, or about 120 grams of egg white.
Expert tips
Keep it clean: I like to reuse my piping bags (even the disposable plastic ones sometimes), so I included a little trick in the video below that makes cleanup a snap! Basically, you just enclose the icing in plastic wrap before placing it into the piping bag. That way, when you're done you can just slide out the wrapped-up icing, and you really only have to clean your tips.
Close it tight: I also like to twist the end of the bag and secure it with a rubber band or twisty tie. It keeps everything together nicely and if any cookie icing comes up the top, it doesn't harden and scatter dried icing crumbs everywhere.
Wet the end: If you've ever used royal icing before, you may remember feeling frustrated when it hardens at the tip. It only takes a few minutes for the icing in the little pinhole of your piping tip to harden, and then you can't squeeze it out at all. You can break it up with a toothpick, but then sometimes you're forcing hardened icing into your tip and creating a clog. So, try placing a damp towel in the bottom of a drinking glass, and keep your bags (tip side down) in there. That little bit of moisture in the paper towel will prevent those clogged tips from happening.

A few more of my favorite icing recipes
- Marshmallow Frosting
- Whipped Chocolate Ganache
- Cream Cheese Frosting
- Whipped Cream Frosting
- Swiss Meringue Buttercream
Do you like to decorate with royal icing? Have you ever made a recipe like this? Do you have any other great tips that make things easier? If so, I hope you'll share in a comment below!
This post contains affiliate sales links.

Ingredients
- 2 tablespoons (29.57 g) meringue powder
- 6 tablespoons (90 g) water
- 2 ⅔ cups (320 g) powdered sugar
- gel paste icing colors, for tinting (optional)
- additional water, for thinning (optional)
Instructions
- Place the meringue powder and water in a large mixing bowl, and whip (with the whisk attachment) until foamy (about 3 minutes).
- Add the powdered sugar, and whip on medium speed until very stiff and thick (the royal icing should hold a stiff peak).
- Tint as needed with gel paste icing colors.
- Thin with additional water, a drop at a time, to get the desired consistency.


Is it possible to use royal icing as glue for butter cookie structures? I made a colossal mess back in the last century and haven’t tried it since!
I can't imagine why not? It works well for gingerbread houses so I would think you could do the same for any type of cookie. Good luck!
What’s the best number tip used for outline and the number tip use for filling. Can I use the same tip number for outline and filling. Thanks Kristin
It all depends on the design you're trying to create. You just want to choose the best size tip for the image you're making... it doesn't matter if you use the same one for outline and filling, as long as it gets you the look you're after.
Just discovered your site today. Am very impresses with your complete information, tips and processes included with each recipe. Truly showing patience and sharing knowledge of tips and processes not necessarily known by everyday cooks such as myself. Thank you for showing how to line pans for lemon bars, etc; how to thin royal icing; using regular royal icing as an outline to “fill”. Your recipes include the methods to produce recipes from my kitchen that not only taste good but also look well done the very first time you attempt the recipe. Thank God I found you!
That is so nice to hear Tina! I'm so happy you're enjoying my content. This really means a lot to me!
Allie - can you add extract flavoring to the icing recipe?
Hey Dawn! You can, but usually the meringue powder already has vanilla flavoring added, so just keep that in mind. Good luck and enjoy!
Very nice recipie. Love it
So happy to hear it. Thanks Veronica!
Unfortunately I cannot get my whisk to make this amount because it’s too small it seems. My whisk just skims over the top of it all. I have a kitchenaid pro, so maybe the bowl is deeper? I’ll need to double the recipe I think! I typically mix it by hand, so I was curious to try this method but it doesn’t seem to be working as well for me
If you look under the top part of the mixer, you should see a screw. Turning this screw will raise/lower the whisk. I think that should help bring the whisk down to the level it should be at. Good luck!
Thank you for that tip! I've had my Kitchen Aid for...ahem.......FIFTEEN YEARS and never knew about the screw adjustment! I made this icing yesterday and had a similar issue just initially with the meringue powder/water, so I stopped it a few times and just whipped that together with a hand whisk; once I put the sugar in, there was enough volume for the whisk to catch and pull everything off the bottom. This will be so helpful for next time, though!
So glad I could be of help!
If I want to make the cookies 4 to 6 weeks ahead of time can I freeze them or is that just not possible with royal icing?
You can try it, but there's a chance the colors could run after the cookies have thawed. It would probably be better to save the decoration until a few days before you plan to serve the cookies. Good luck!
Can I add any vanilla extract to the icing to flavor? If so, how much?
Most meringue powders already contain vanilla flavoring, but you can certainly play around a little bit if you'd like.
What a perfect icing! Thank you for sharing the recipe, video and tricks. I just had a hard time trying to get dark brown with a fluid consistency but it took so much water and dried uneven. It was a figure with many colors and dark brown the largest part of it. It worked for the other colors though... Could not find out what went wrong with dark brown, mabe to much gel colors to get it dark... I'll definetely try your recipe!
I tried this, the icing never set completely hard, I am not sure what I did wrong
I cannot seem to get the flooding consistency. About how much water from the original recipe do you add to reach flooding? It takes me a lot of water to get there and then I have an issue of the royal icing never drying although the cookies look good, it doesn’t dry.
The amount of water needed can vary quite a bit based on your environment. It could be anywhere from a few drops to a tablespoon or more. It will usually take at least 8 hours for the icing to dry- and it could need even longer if it's a very humid day.
Attn: Allie - Can you please remove my previous comment with my full name; I didn't realize that would be posted....
Thank you for your awesome recipes! I’m going to try making the Vanilla Cutout Cookies that don’t spread with royal icing for my sons party! I’m just worried about how to make/store them prior. I understand that I should not put a completed cookie in the freezer/fridge because you mentioned that the icing should be left at room temp. Being a beginner, I want to give my self sometime to do steps so it’s not so overwhelming. But at the same time, I dont want stale cookies (especially if I’m giving them as favors). If a party is Saturday – when is a good time to start and what would you do if it were a party? Would you start say – Wednesday? How long can a completed (with royal icing) be good for if left out? Do you have information on this (how to properly store, etc.)? Thank you!
No problem Chelsea, I've deleted your previous comment so your last name will not display. To answer your question, I think if you start on a Wednesday you should be good for a Saturday party. There is no need to put them in the freezer or fridge. The icing will "seal" the cookies and keep them from drying out. Once the icing has hardened, you can pop them into zip top bags or an airtight container, and they should stay good for a few weeks at least. Good luck!
Hi - wondering if you use the same tip for piping and flooding?? I see that the consistency in the icing is changed but can you use the same tip? Thank you!
It doesn't matter what tip you use. Use whatever tip you need to create the design you're after.
How can I substitute the meringue powder?
This recipe only has 2 ingredients + water. I really wouldn't advise using anything else but what's listed.
Hi, if I don’t have meringue powder what can I substitute for it?
Where do you get your cookie cutters? Are they rust resistent?
I have all kinds. Some are and some aren't. Stainless are my favorite kind since they stay sharp and never rust. Amazon is a great resource but I buy them wherever I see them, at cooking stores, Walmart, etc. Hope that's helpful Marilynn!
This recipe came out really nice and neat! Perfectly sharp edges, no spreading or distorting while they were baked, and a nice solid texture for decorating without being too tough. (Your royal icing recipe is also perfect, btw!) Putting the cut cookies in the freezer before baking helped with the shape also. However, I wasn't really a fan of the flavor. The corn starch gives the cookie dough kind of a corn chips flavor/smell that is really persistent. I ended up adding some nutmeg which complemented it and baked it a little over until the cookies started going golden. Mellowed out the corn taste, but it still didn't go away entirely. I wonder if maybe different brands have less flavor?
Hey Suzanne! I'm wondering if you used cornmeal rather than cornstarch? Cornstarch is a very fine white powder and it is completely flavorless. I usually use Argo brand and there is no corn flavor at all.