How to Make a Lattice Pie Crust
As an amazon associate I earn from qualifying purchases.
Weaving a lattice pie crust is actually pretty easy! Follow my step-by-step photo & video tutorial to learn how to make a lattice pie crust.

*Originally published June 15, 2018. Updated February 10, 2022.*
There's nothing more homey and old-fashioned than a freshly baked pie with a lattice top crust, cooling on a window sill. Am I right?
I bet you have admired this look many times, but maybe you thought it looked too intricate and challenging to create.
Well, guess what? It's really pretty simple. Today, I'm going to show you how it's done!
This technique can be used on all your favorite pie recipes. And it's especially great for fruit pies, like apple pie, peach pie, cherry pie, or blueberry pie.
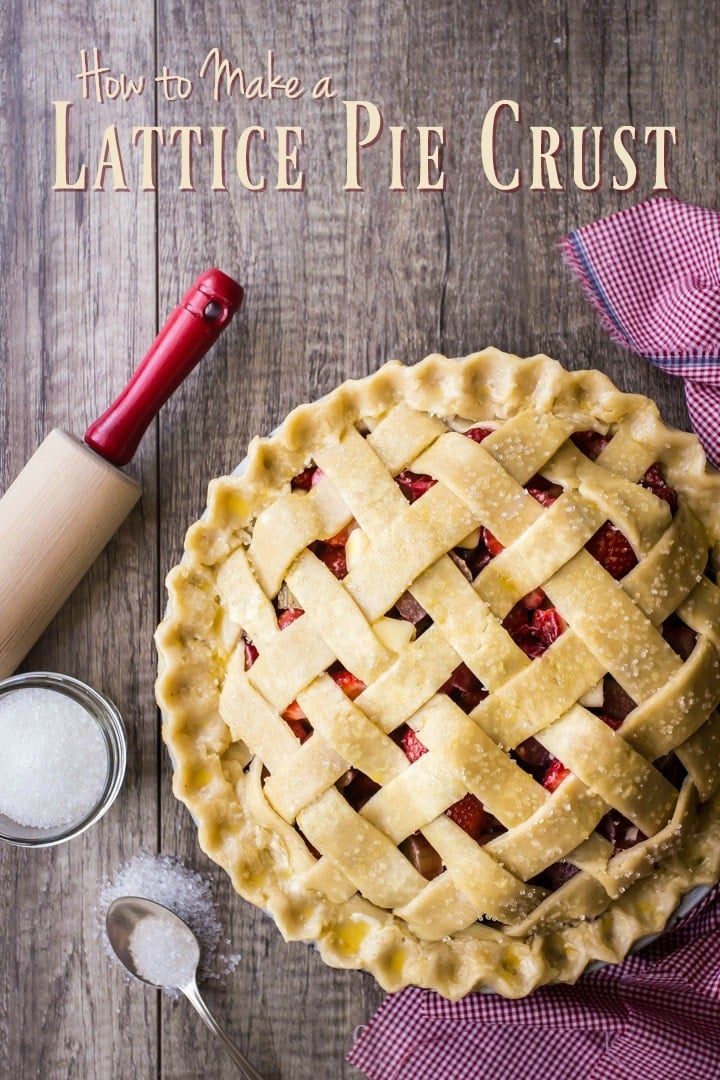
Table of Contents
- Why make a lattice pie crust from this tutorial
- Ingredients and notes
- Tools and equipment
- How to make a lattice pie crust
- Expert tips
- FAQS
- How to serve
- How to store and keep
- A few more of my best baking tips
Why make a lattice pie crust from this tutorial
- Step-by-step photos and video.
- Visually stunning. The interwoven strips of dough create an intricate and decorative pattern that makes a beautiful pie.
- Offers a delightful contrast in texture between the crisp, golden-brown crust and the tender, juicy filling. The exposed filling gets caramelized during baking, creating a delicious contrast with the flaky pastry.
- Lets the colorful and flavorful pie fillings to be partially visible, enticing your guests with a sneak peek of what's inside.
- Allows steam escape during the baking process.
Ingredients and notes
Pie crust dough: If you want to make a lattice pie, you first need to start with the crust. I have 2 pie crust recipes I think you'll love: Simply Perfect Homemade Pie Crust and Chocolate Pie Crust. Either one of these would work beautifully for a lattice pie.
Flour: Used to help roll out the dough and keep the pieces of pie crust from sticking together.
Egg wash: It's just one egg, beaten with a little water and brushed on top to create a glistening, golden finish.
Tools and equipment
A good rolling pin and a rolling pastry wheel, pizza cutter, or knife will help you create even strips of dough.
How to make a lattice pie crust
You can recreate this beautiful look in just 5 easy steps.
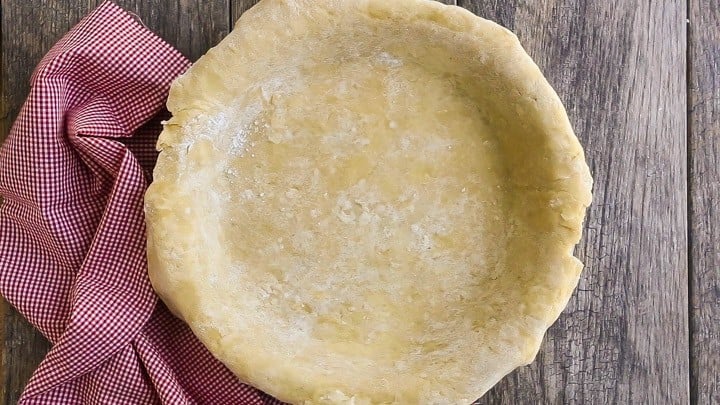
Step 1: Bottom crust
Roll out your bottom crust on a lightly floured surface.
Use half the dough to roll out a circle about 2 inches bigger than your pie dish. Place it in your pie pan and gently ease it into place, allowing the excess to drape over the sides of the pan.
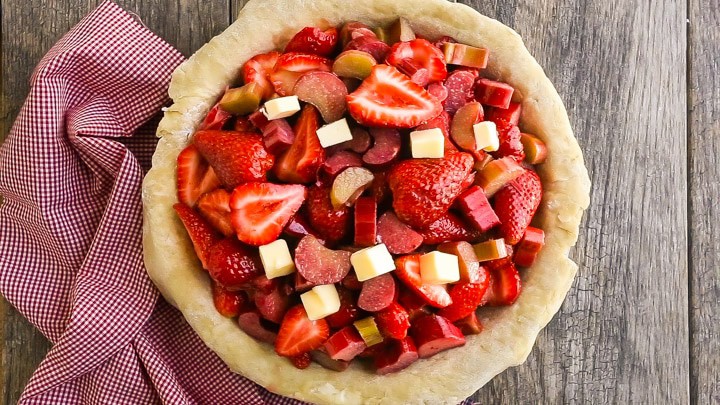
Step 2: Filling
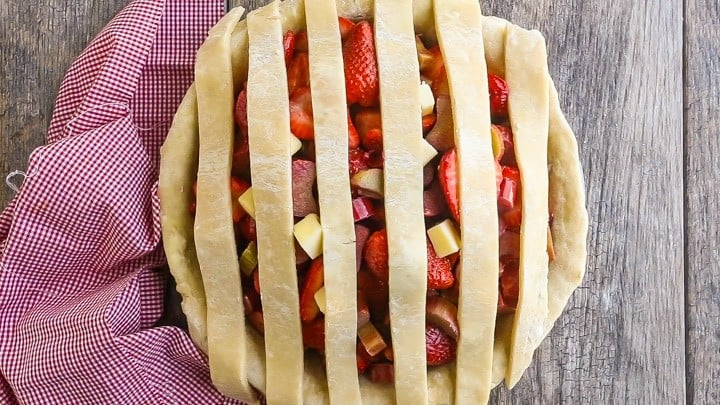
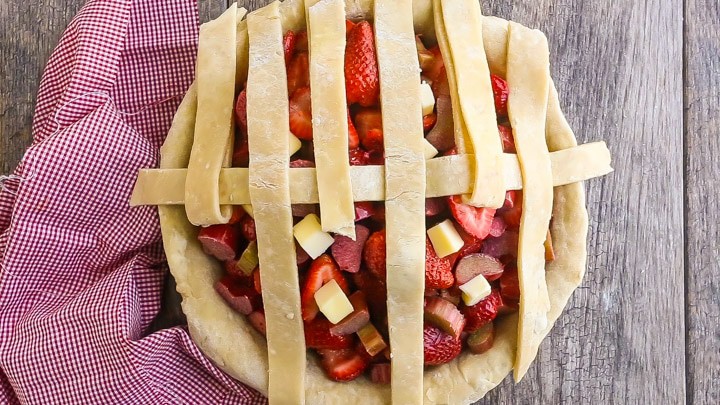
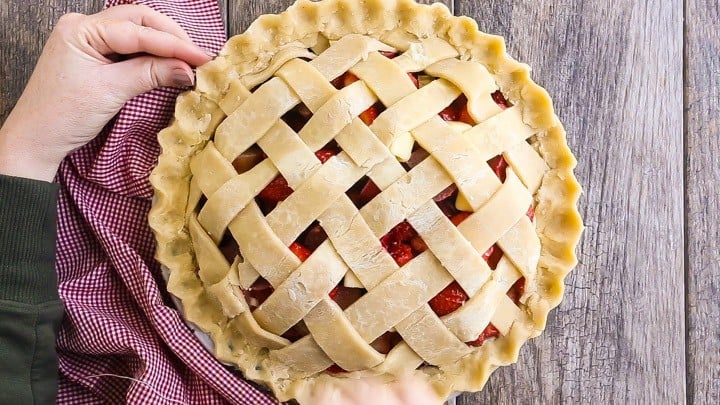
Add your pie filling of choice. Here I've added a homemade strawberry rhubarb pie filling. Dot the top with cold butter cubes for added richness.
Step 3: Top crust
Roll out the other half of the dough. It should also be about 2 inches wider than your pie plate. (You need longer strips so that you have some hanging over the edge to crimp.)
Cut it into strips using a pastry wheel, pizza cutter, or sharp knife.
It's totally up to you how thin or thick you want your strips to be. For the pictures you see here, I chose to go with a medium width of about 1 inch, but you can cut wider or thinner strips for a different look.

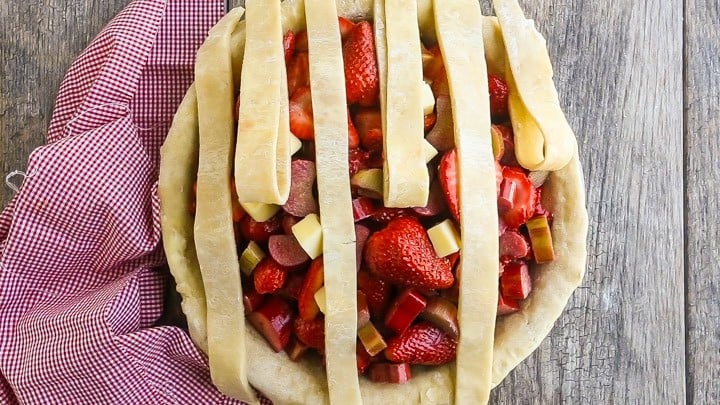
Arrange half the strips of pie dough over the filled pie in parallel lines. Again, it's up to you how you want to space them. They can be close together, far apart, or anywhere in between.
Now fold up every other vertical strip to about the mid-line of the pie.
Lay a horizontal strip of pie dough perpendicular to the others at the center of the pie.
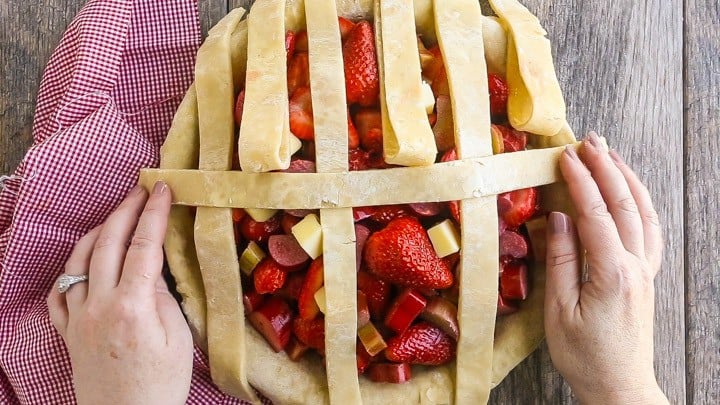
And fold the vertical strips back down...
...and then all the other dough strips up to the perpendicular strip.
Lay another horizontal strip.
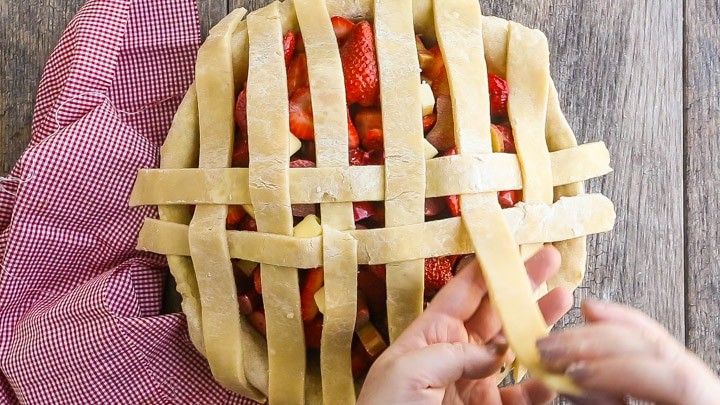
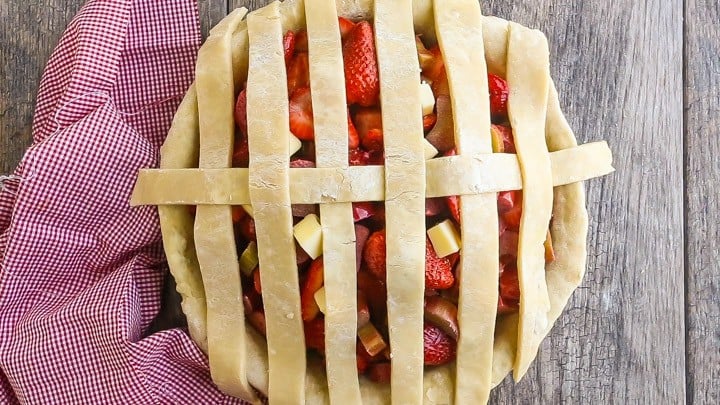
Keep repeating this process until all the strips have been used and the top of the pie is covered with the lattice crust.
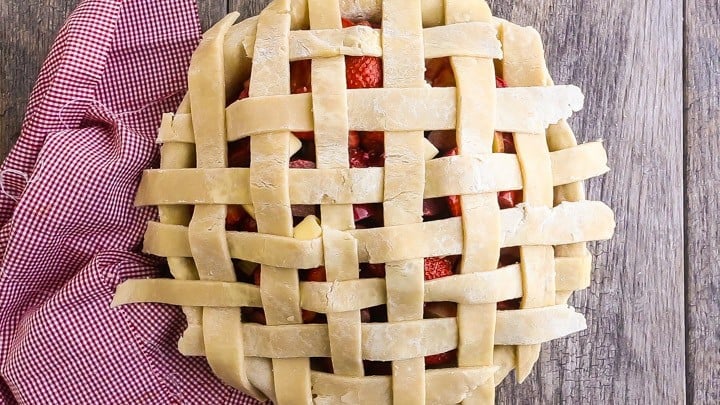
Seal the edge of the pie by trimming away any long pieces hanging over the edge. You only want about 2 inches of excess. Then, fold/roll the excess dough up and over the edge of the pie. Give it a little press so it sticks together.
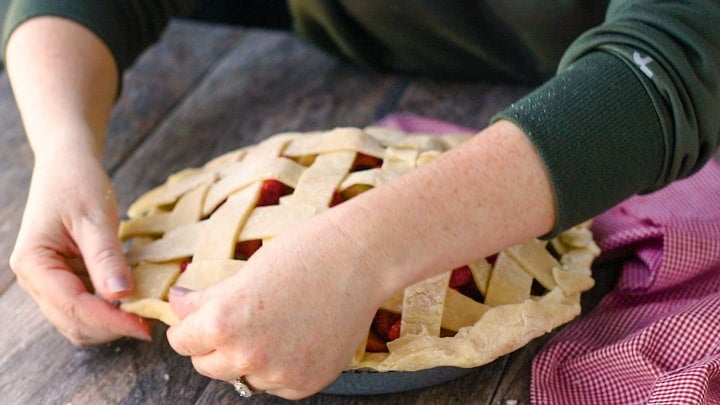
Step 4: Crimp
There are lots of ways to crimp the edge of the pie crust. You can use a fork or spoon to seal it in a decorative way, or pinch it with your fingertips.
But my favorite way is to push it into a fluted edge using my knuckles. It makes a pretty zig-zag shape. Watch the video below to see exactly what I mean!
Step 5: Egg wash
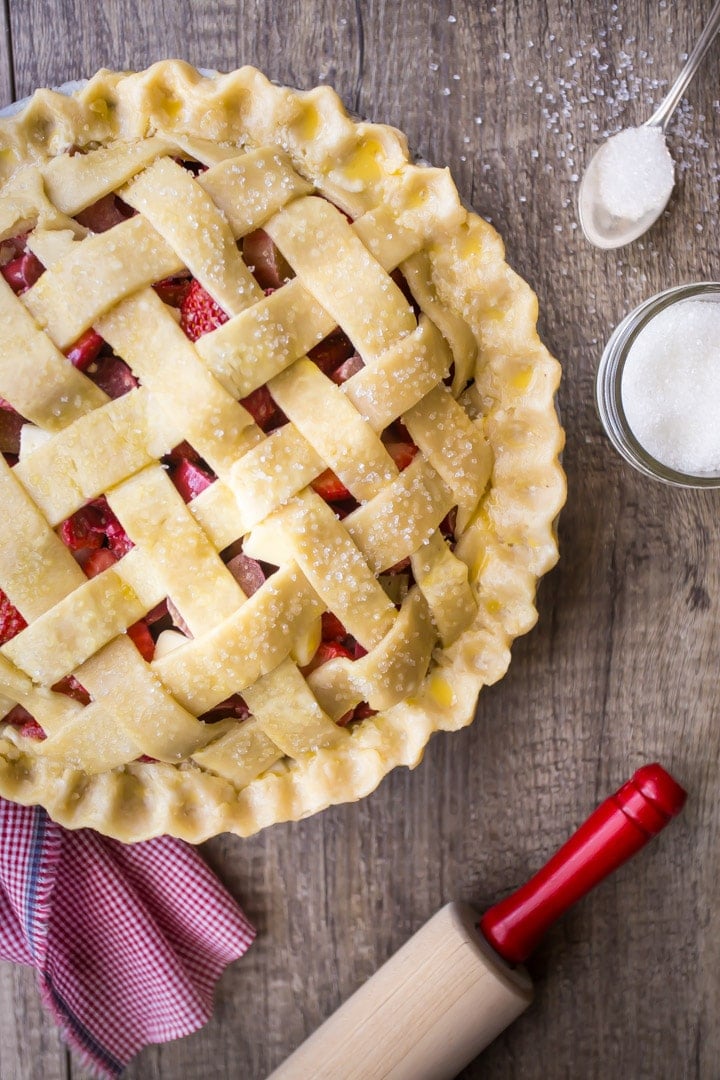
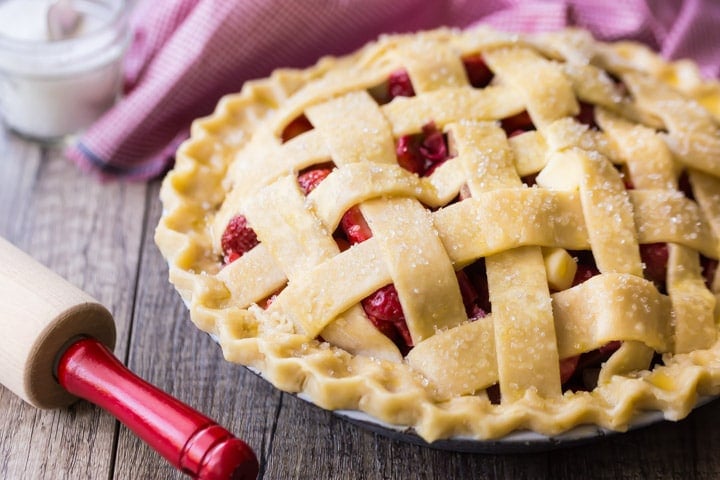
To give your lattice pie crust a gorgeous, golden-brown, glossy finish, brush it with a little egg wash.
Egg wash is just an egg beaten with a tablespoon of water, milk, or cream to thin it out.
You can then sprinkle a pinch of clear sanding sugar on top of your pie for a little added texture and sparkle. It's totally optional, but it really adds a nice texture and a pretty look!
Expert tips
Chill: Start with well-chilled pie dough. This will make handling easier and prevent it from becoming too soft as you work with it.
Stay cool: Keeping the dough cold is the most important thing when working with pie pastry. So work fast, and if you notice things getting soft, stop what you're doing and slide everything into the fridge or freezer to chill and firm back up. This will guarantee your pie crust will bake up flaky.
Cover with foil: If any part of your pie is starting to get too brown as it bakes (this often happens around the edges), cover it with a little foil. This way, your lattice pie crust will bake perfectly even and golden.
Make smooth cuts: Use a sharp knife or a pizza cutter to cut strips of dough.
FAQS
A lattice pie crust looks gorgeous, but did you know it serves a functional purpose?
When a pie is filled with a juicy, bubbling fruit filling, the steam must escape somehow, or you could have a disaster on your hands!
All those little windows in the lattice pie crust make perfect vent holes. It's a brilliant solution!
Trim off any excess overhang, then turn the outside edge up and over. You can then crimp it to make the sea.
Start by laying all the vertical strips, then fold up every other one and add in the horizontal strips. Every time a horizontal strip is placed, the vertical ones can be folded back down. Then this is repeated, alternating.
How to serve
Fruit pies: Lattice pie crusts work best with fruit pies such as cherry pie, peach pie, strawberry pie, or blueberry pie.
A la mode: Warm slices of lattice pie pair wonderfully with a scoop of vanilla ice cream or a dollop of whipped cream. The warm-cold contrast is delightful.
With coffee or tea: Serve lattice pie as a dessert, pairing with coffee, tea, or even a glass of dessert wine. The flaky crust and sweet filling complement the flavors of these beverages.
How to store and keep
Cool to room temperature: Allow the lattice pie to cool completely at room temperature. This helps prevent condensation from forming inside the pie, which can make the crust soggy.
Cover: Cover the pie with plastic wrap or aluminum foil once the pie has cooled. Ensure the covering is snug to prevent air and moisture from getting in.
Refrigerate: If you plan to enjoy the lattice pie within a day or two, you can store it in the refrigerator. Refrigeration helps prolong its freshness. Place the wrapped pie in the fridge. Pies are best enjoyed fresh, so try to finish them within 2-3 days.
Hopefully, now you feel confident and ready to make a lattice top pie! If not, and you still have questions, don't hesitate to ask in a comment below.
Or, if you're already a lattice pie crust pro, and you have some helpful tips, I'd love to hear about them!
A few more of my best baking tips
- How to Measure Ingredients for Baking
- How to Stock your Baking Pantry
- How to Brown Butter
- Basic Streusel Recipe
- Homemade Vanilla Extract
This post contains affiliate sales links.

Ingredients
- 1 batch pie crust
- flour, for dusting the work surface to prevent sticking
- 1 egg, beaten with a tablespoon of water
- clear sparkling sugar, for garnish
Instructions
- Dust the work surface liberally with flour, and roll out half the pie dough to about 3 inches wider than the width of the pie dish.
- Transfer the dough to the pie plate, and press it lightly into place, allowing any excess to drape over the sides of the pan.
- Fill with pie filling.
- Roll out the other half of the dough to about 3 inches wider than the width of the pie dish.
- Cut the dough into strips.
- Arrange half the strips over the pie, in parallel lines.
- Fold every other strip up to about the mid-line of the pie.
- Lay a strip over the middle of the pie, perpendicular to the others.
- Fold the parallel strips back down, then fold up all the other strips.
- Lay another perpendicular strip down, and repeat until all the strips have been used.
- Trim any excess dough to about a 2-inch overhang.
- Fold up the excess, pressing to adhere.
- Crimp the edge of the pie.
- Brush the pie with egg wash, and garnish with clear sparkling sugar, to garnish.
- Bake according to recipe directions.


What kind of pie is this in the lattice pie crust video it looks delicious?
Strawberry rhubarb 🙂
Thank you for this!
My daughter and I baked and apple pie using your lattice technique. Turned out beautifully! Thank you so much - just love your website!
Aw, thank you! I'm so glad to hear that!
Thank you for this tutorial. I have been hesitant to try a lattice crust, and it was actually easier than a full one lol I have your blueberry pie in the oven right now with the lattice top, my husband can't wait!
Ooh yay! So glad you're trying the blueberry pie and so happy to hear that you mastered the lattice top! Hope you and your husband enjoy!
Such a pretty crust! Super tasty for just about any pie too!
ah love this tutorial!
Love your tutorial! Lattice crusts always look so nice.
Great job on the video tutorial! The lattice pie crust looks so gorgeous!
this is the perfect pie!!
Wonderful instructions and tips! Useful for not just this recipe but others. Pie is in the oven now. Will have to work on my edge pinching. 😉
So happy you've been pleased Heidi!