Peach Pie Recipe
As an amazon associate I earn from qualifying purchases.
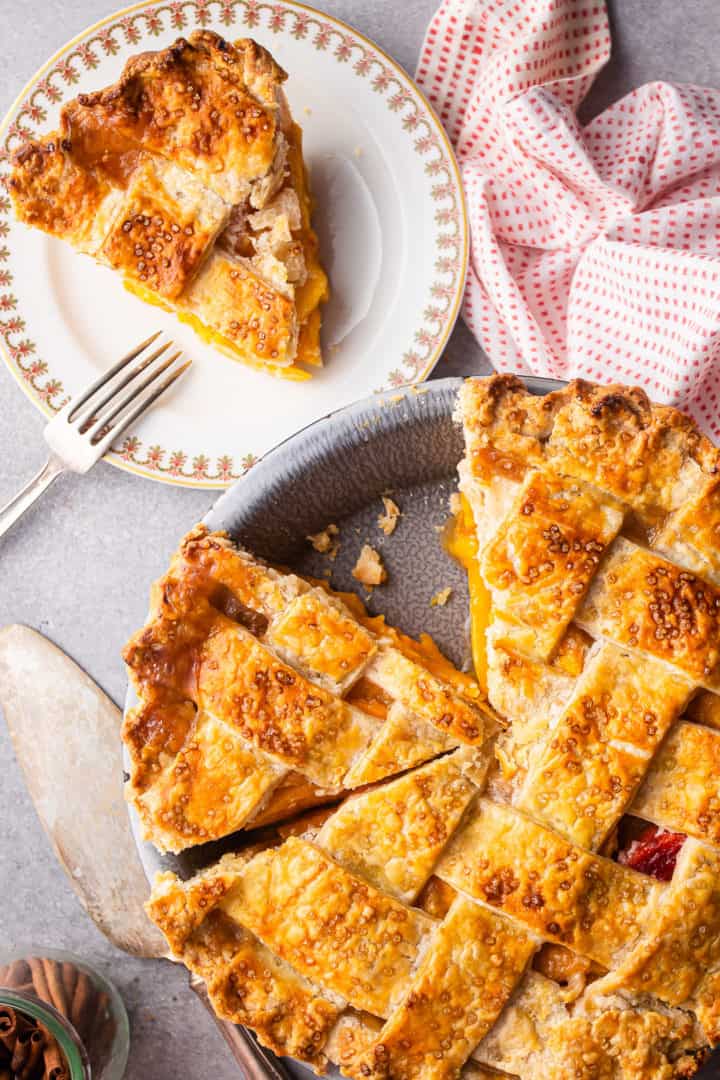
This Peach Pie Recipe is absolute perfection! Juicy summer peaches slicked in a sweet glaze and cradled in a buttery, flaky crust. You'll swoon!

Table of Contents
- Here's Why You'll Love This Recipe
- Ingredients You'll Need
- In Photos: How To Make A Homemade Peach Pie
- Storage Tips
- More Pie Recipes
I love making pie recipes in the summertime, especially fruit pies! There are so many delicious fruits at this time of year, and they're at the absolute peak of their season!
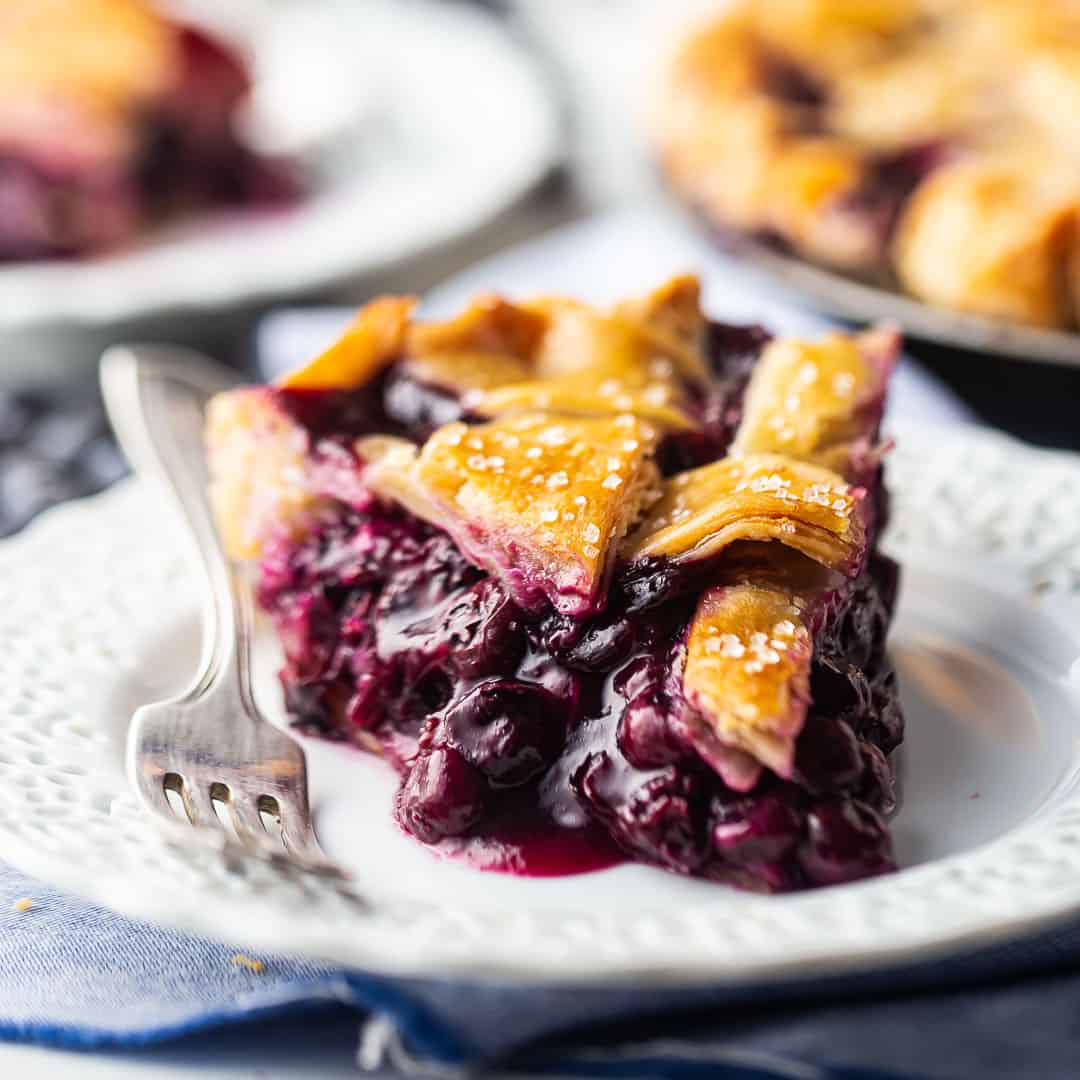
I try not to ever let a summer pass without making at least one blueberry pie, cherry pie, and strawberry rhubarb pie. These are special treats that my family and friends look forward to all year.
Last year, I developed this peach pie recipe, and it is absolute perfection! The filling is thick, loaded with juicy fruit, and just sweet enough, with a hint of warm spice to bring out all the best peachy flavors. And it's tucked into the butteriest, flakiest crust you could ever imagine!
Sadly, I didn't take photos! So I've been hanging on to it all this time, waiting for the perfect time to share it with you.
It's your lucky day, haha!
You can use fresh or frozen peaches for this recipe!
If you are using fresh, you'll want to peel, pit, and slice them first. A veggie peeler works great to take the skins off. One pound is 3 to 4 peaches, so you'll need around 9 to 12 peaches.
Frozen peaches are often more economical and easier to get during the off-season. My grocery store sells frozen peach slices in 1-pound bags, so I picked up 3 bags and was off to the races. You don't even have to thaw the peaches before you start.
If you're thinking about using canned peaches, just know that they're often sweetened with sugar or fruit juice, so you'll probably want to adjust the amount of sugar you use. You also don't want to cook them too long, because they've already been cooked and they could fall apart or turn mushy. Fresh or frozen is probably the better option.
Here's Why You'll Love This Recipe
- This peach pie is everything a summer dessert should be! It's bursting with juicy peaches, wrapped up in a thick, glossy filling, and baked inside a buttery, flaky crust.
- The filling is cooked on the stovetop first, so the peaches soften just enough and the juices thicken into that perfect, sliceable texture. No runny pie here!
- You'll also love that this recipe works with fresh or frozen peaches, so you can enjoy that sweet peach flavor even when they're not in season. Add a pretty lattice crust, a brush of egg wash, and a sprinkle of coarse sugar, and you've got a showstopper that tastes just as amazing as it looks.
Ingredients You'll Need
The recipe card at the bottom of the post contains the full list with all of the amounts. Refer to that when you're cooking.
- Peaches: Fresh summer peaches are incredible here, but frozen peaches work beautifully too. If using fresh, peel, pit, and slice them first. Frozen peaches do not need to be thawed before cooking.
- Granulated sugar: Sweetens the filling just enough while still letting the natural peach flavor shine.
- Cornstarch: Thickens all those juicy peach juices into a glossy, spoonable glaze so the pie slices cleanly.
- Lemon juice: Brightens the flavor and balances the peaches' sweetness.
- Ground cinnamon: Adds a gentle warmth that brings out the best in the fruit.
- Nutmeg: A little goes a long way! Freshly grated nutmeg gives the filling the most wonderful, cozy flavor, but pre-ground nutmeg will work too.
- Unsalted butter: Dotted over the filling before baking to make the pie taste even richer.
- Pie crust: A homemade flaky pie crust makes this pie extra special, but store-bought can be used in a pinch.
- Egg wash: Brushed over the top crust to help it bake up shiny and golden brown.
- Coarse sugar: Optional, but so pretty! It adds sparkle and a little sweet crunch on top.
In Photos: How To Make A Homemade Peach Pie
Any time I make a pie, I like to start with the crust so it has plenty of time to chill. It's best for the pie crust to be cold when it goes into the hot oven. This way, the butter releases steam, and that creates layers of flaky pastry.
You can use store-bought pie crust if you like, but my homemade recipe is seriously the bomb. I use a special technique that makes it so incredibly flaky. It's also so short, tender, and buttery-tasting. If you want to give it a try, here's the recipe: Flaky Pie Crust.
Step 1: Make Filling
Start by placing your peaches in a large pot, along with sugar, cornstarch, lemon juice, cinnamon, and nutmeg.
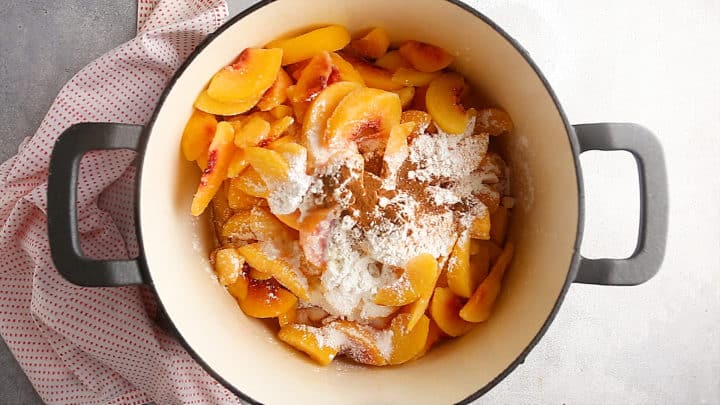
I like to use whole nutmeg that I freshly grate on a microplane. If you've never experienced it, it yields the most incredible fresh flavor.
Pre-ground nutmeg will work too, but you may need to use a little more of it to get a similar taste.
Toss all of the ingredients together lightly, to get the fruit evenly coated, then cook the mixture over medium heat.
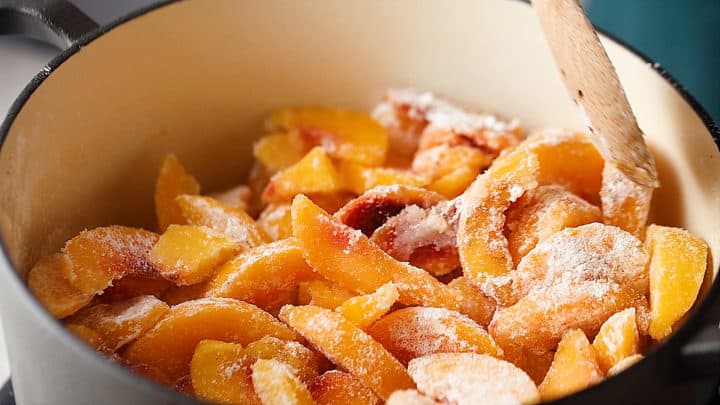
After a little while, you'll see the peaches will start to release their juices. Then, when things really heat up, the peaches will soften a little and the juice will thicken into a glaze-like consistency. This is when you know your filling is done!
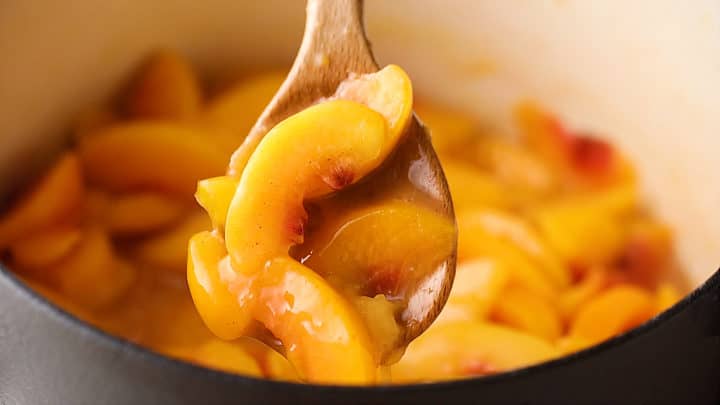
Remove it from the heat and allow it to cool completely before starting the next step. If you put warm filling into your pie shell it will melt the butter in the dough and that's no good.
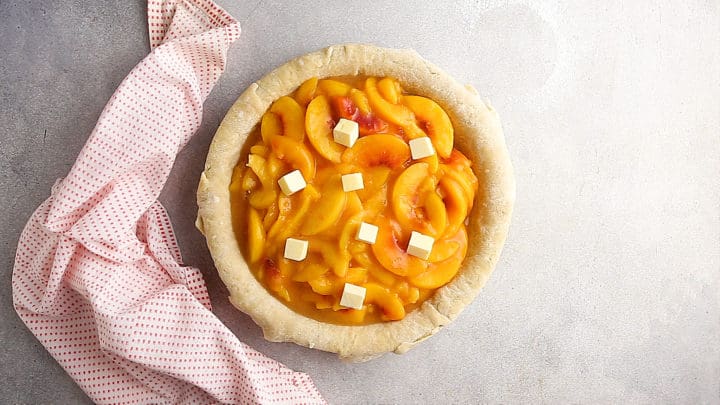
Step 1: Assemble The Pie
While the filling cools, roll out your bottom crust to an inch or two larger than your pie dish and slip it in, tucking it down into the hollow gently and allowing any excess to drape over the edges.
Then, pour in the filling.

Dot small cubes of butter over the filling to enrich the flavor.
Step 3: Add Top Crust
Next it's time for the top crust.
You don't have to add a top crust if you don't want to; you can just halve the pie crust recipe and do an open-faced pie.
Or you can add a crumb topping instead. Here's my favorite recipe: Crumb Topping Recipe.
If you do want a double-crust pie, I love a lattice top. It's so pretty, plus it has built-in steam vents!
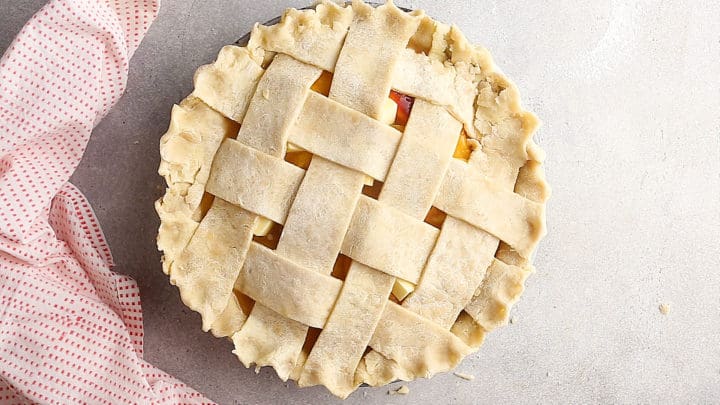
My tutorial for making a lattice top can be found here: How to Make a Lattice Pie Crust.
If at any point during this process the pie dough becomes soft, pop the whole thing into the fridge until it's cold. It's best for the butter to be so cold it's hard when the pie goes into the oven.
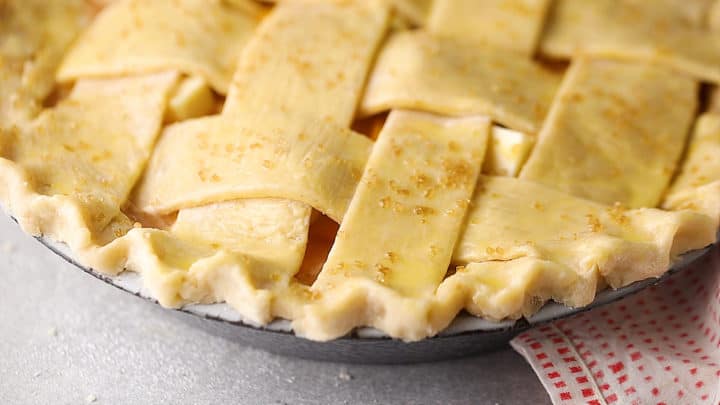
Brush the edges and top with egg wash, and sprinkle with coarse sugar.
Step 4: Bake
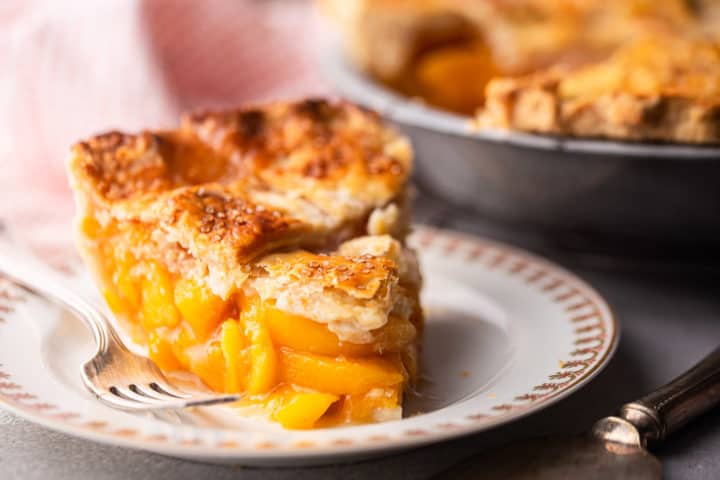
Because you've already cooked the filling, you really only need to bake this pie until the crust looks done. It should be crisp and brown around the edges, and a deep golden color towards the center.
You'll definitely want to wait until the pie is cool before taking a slice. This allows everything to firm up a bit, so that when you cut into it, the filling doesn't slide out the sides. I'll often chill mine in the fridge overnight, then let it come back to room temperature (or warm it slightly in a 170°F oven) before serving it.
Helpful Tips and Tricks
- You can make your peach pie filling in advance. It's great to break up the steps like that because making a pie can be a bit of a production, especially if you're using homemade crust.
- If you're thinking you'll make your pie in the next few days, just transfer the prepared filling into an airtight container and store it in the fridge.
- If you want to have peach filling on hand for a few months, you can either freeze it or process it in sterilized canning jars. I've got instructions on how to do that here: Strawberry Jam Recipe. Properly sealed jars of peach pie filling can be stored for up to a year at room temperature.
Storage Tips
It's fine to leave this pie out at room temperature (covered) for a day or so.
Any longer than that, and you'll probably want to refrigerate it. It should keep in the fridge for at least 5 days.
It can also be frozen. If you go this route, you'll probably want to make it in a foil pie pan, so your regular pie dish isn't tied up in the freezer for a long time.
For a pre-baked pie:
Wrap it tightly in plastic wrap, slip it into a plastic bag, and it should keep in the freezer for 6 to 8 months. Thaw it at room temp or in the fridge. It can be warmed in a 170-degree F oven until heated through.
For an unbaked pie:
Wrap it tightly in plastic wrap, slip it into a plastic bag, and it should keep in the freezer for 6 to 8 months.
Thaw it in the fridge, then bake according to the recipe directions.
More Pie Recipes
- Peach Cobbler Recipe
- Brown Butter Peach Crumble Ice Cream
- Toasted Pecan Pancakes with Brown Butter Bourbon Peach Syrup
- Peach Blueberry Pot Pies

Ingredients
- 3 pounds (1.36 kg) peaches,, peeled, pitted, and sliced (fresh or frozen)
- ½ cup (100 g) granulated sugar
- 3 tablespoons (24 g) cornstarch
- 2 tablespoons (30 g) lemon juice
- ¼ teaspoon (0.5 g) ground cinnamon
- ⅛ teaspoon (0.25 g) nutmeg
- 2 tablespoons (28 g) unsalted butter, , cubed
- 1 batch pie crust
- egg wash, (1 egg beaten with 2 tablespoons water)
- coarse sugar, (optional garnish)
Instructions
- Place the peaches, sugar, cornstarch, lemon juice, cinnamon, and nutmeg in a large pot and toss to coat.
- Cook the mixture over medium heat until the peaches are slightly softened and the juices have thickened (approximately 15 minutes).
- Allow the peach pie filling to cool completely, then transfer it to the prepared bottom pie crust, and dot with cubes of butter.
- Preheat the oven to 425 degrees F.
- Arrange the top crust in a lattice pattern, trim the excess, and crimp the edge.
- Brush with egg wash and sprinkle with coarse sugar.
- Bake until the filling is bubbly and thick, and the crust is golden brown (approximately 40 to 45 minutes).


Bussin 11/10 absolutely 🔥 💯
TYSM!