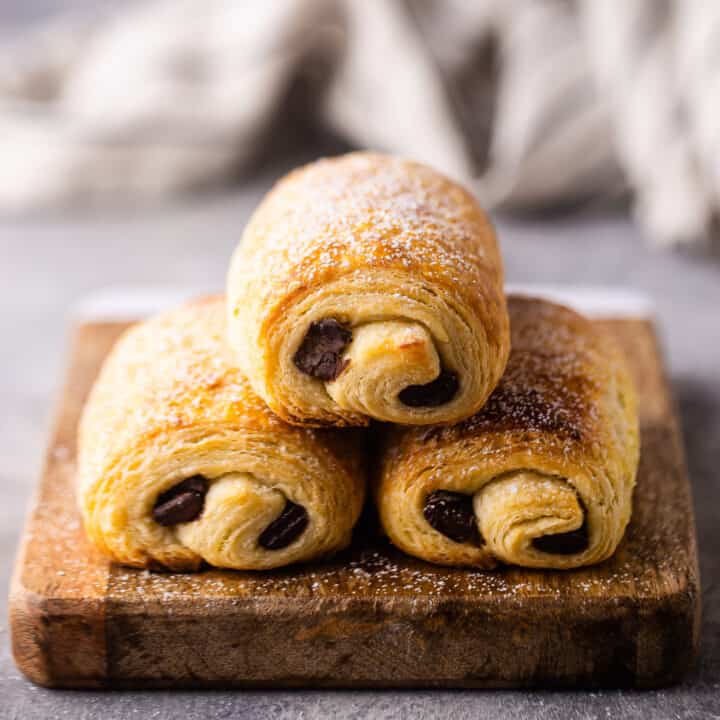
Pain au Chocolat
As an amazon associate I earn from qualifying purchases.
Pain au Chocolat, aka: chocolate croissants! This simplified recipe is so much easier! Flaky, buttery pastry wrapped around rich chocolate.
If calories didn't exist, I would totally be eating a pastry every morning for breakfast.
To me there is no greater pleasure than sipping on a mug of steamy coffee or tea and nibbling on a blueberry muffin, or scone, or slice of chocolate chip banana bread.
Chocolate and coffee go so good together!
That's why my favorite indulgence of all is pain au chocolat. Aka: the chocolate croissant.
You may think making pain au chocolat is way too difficult, but I've got news for ya: it doesn't have to be!
I created a stripped down, simplified, way easy croissant recipe a few years back and it's been a huge success for so many people. Over 300 comments and counting!

WHAT IS PAIN AU CHOCOLAT?
Pain au chocolat is a French pastry consisting of flaky, buttery croissant dough, wrapped around two batons of dark chocolate and baked.
Croissant dough is made with yeast and it's laminated, or folded, several times to create alternating sheets of dough and cold butter.
When the butter hits the hot oven, steam is released. This steam puffs the layers apart and creates countless flaky layers.
The result is light, a little crisp on the outside, and buttery-rich, stretchy, bready, and moist on the inside.
It's an incredible taste and textural experience that's only improved by the addition of deep, rich, melty dark chocolate.
WHAT MAKES THIS RECIPE SO EASY?
Traditionally, making croissants starts with forming a large, flat square of butter, then chilling it and encasing it in dough before beginning the rolling and folding process.
I've eliminated that butter square step entirely.
Sounds risky, I know! But trust me, it still works. Just check out all those flaky layers inside!

This easy method works every bit as well as the fussy French way, but it's so much less intimidating and more approachable.
HOW TO MAKE CHOCOLATE CROISSANTS
I'm going to break this down into two phases:
- Making the croissant dough, and
- Shaping and baking the pain au chocolat.
MAKING THE CROISSANT DOUGH
I have a much more in-depth explanation of how to do this on this post: Easy Homemade Croissant Recipe. There's even a step-by-step video tutorial!
But today I'm just going to outline the basics.
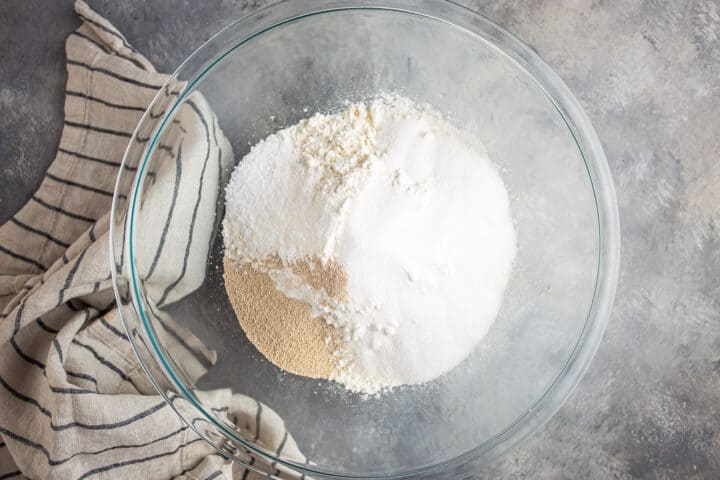
Start by combining flour, sugar, active dry yeast, and salt in a large bowl.
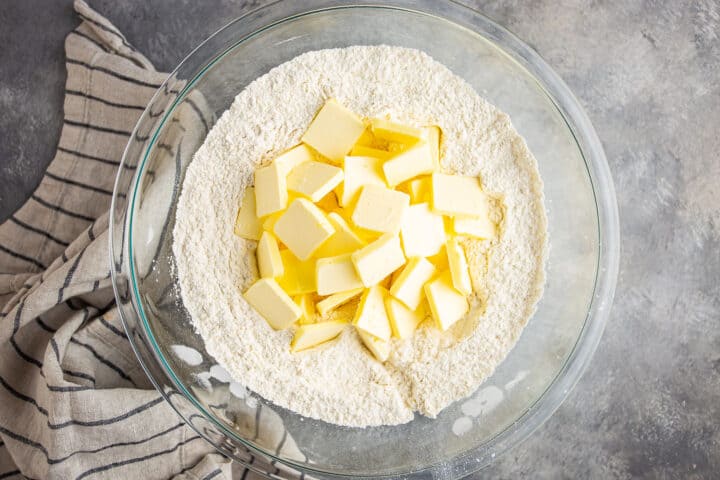
Whisk these ingredients together just to get them combined, then add the butter.
The butter should be ice-cold and cut into slices, approximately ⅛-inch thick.
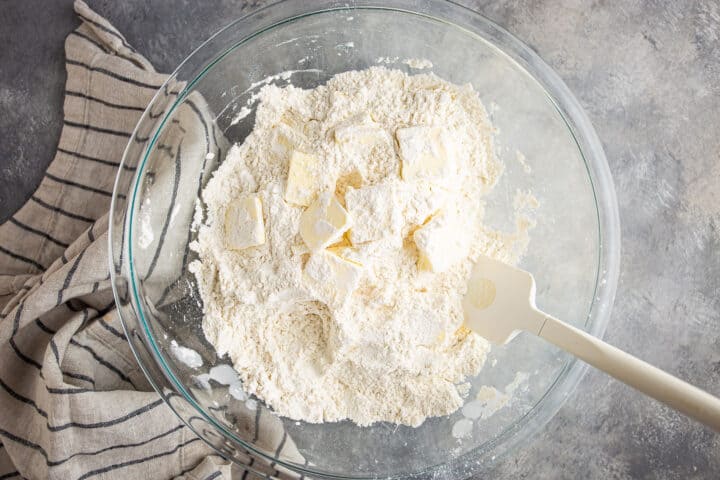
Toss the butter in the flour mixture, just to get it coated.
Then start stirring in the milk.
The amount of milk you will need can vary, based on a lot of different factors. You're looking for what's called a "shaggy dough." Here is what that looks like:
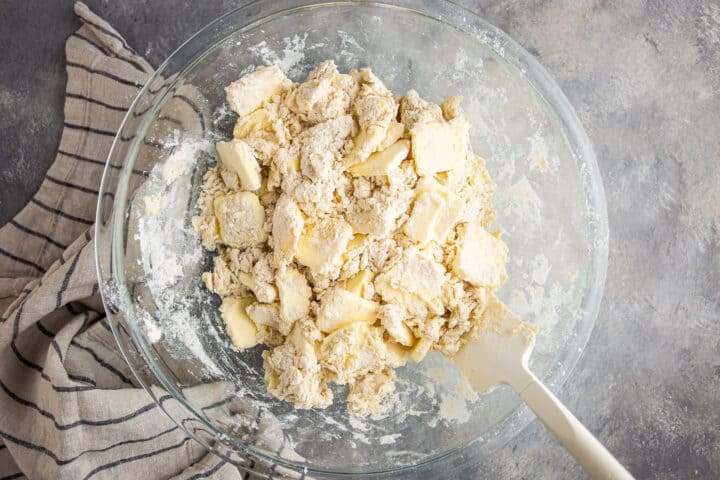
As you can see it's pretty dry and crumbly. Keep in mind that it will become more moist as it rests.
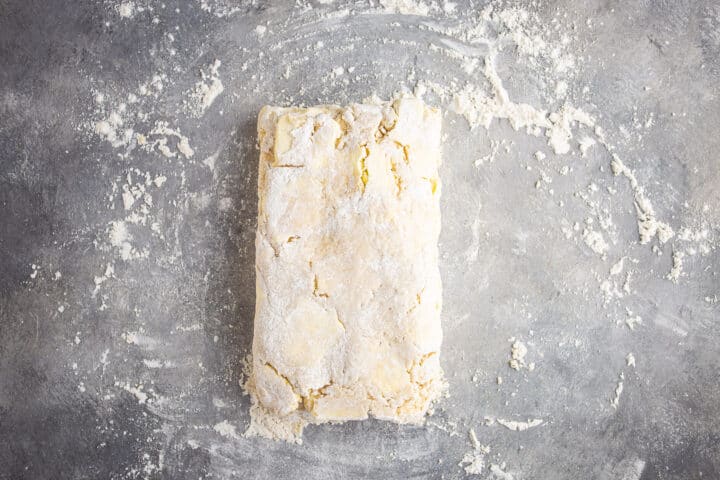
Once you've stirred in enough milk to create that shaggy dough, dump the contents of your bowl onto a big sheet of plastic wrap.
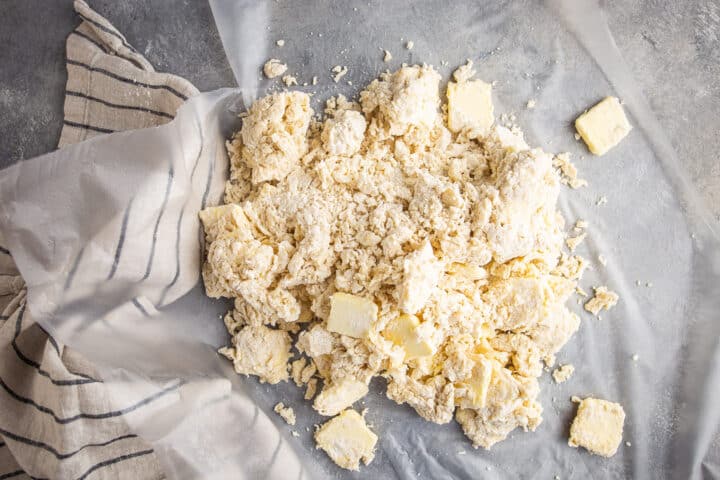
And use the wrap to pull it all into a flat, roughly rectangular shape.
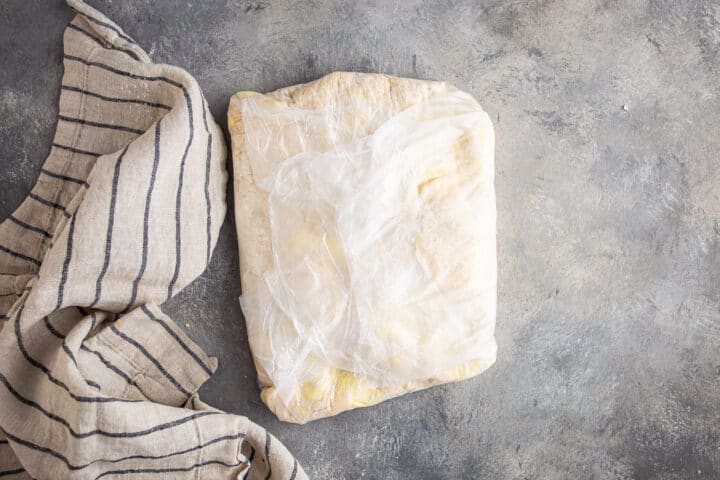
Chill the dough for one hour in the fridge.
Now it's time to laminate.
Remove the dough from the fridge, flour your work surface and your rolling pin, and roll it out to a long rectangle.
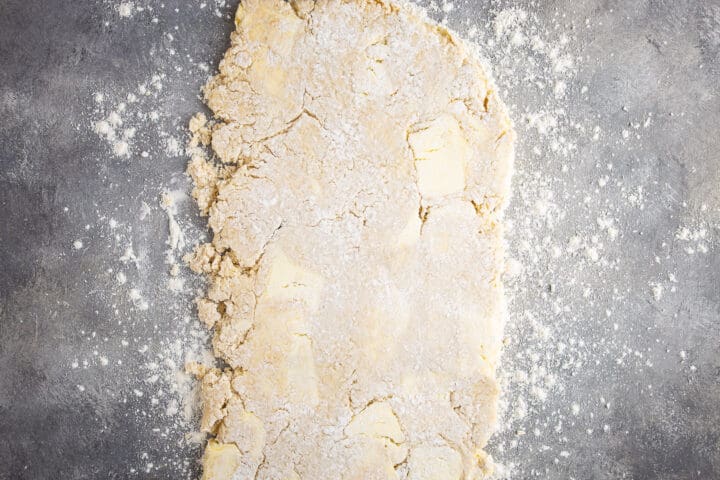
It really doesn't matter what size or thickness, you just want it flat enough to fold into thirds.

Then repeat this process a few more times.
At first, the dough will be really bumpy, with big chunks of butter running all through.
But as you roll and fold, it will become silkier and easier to work with.
You should see large streaks of butter, but the dough should lie flat and smooth.
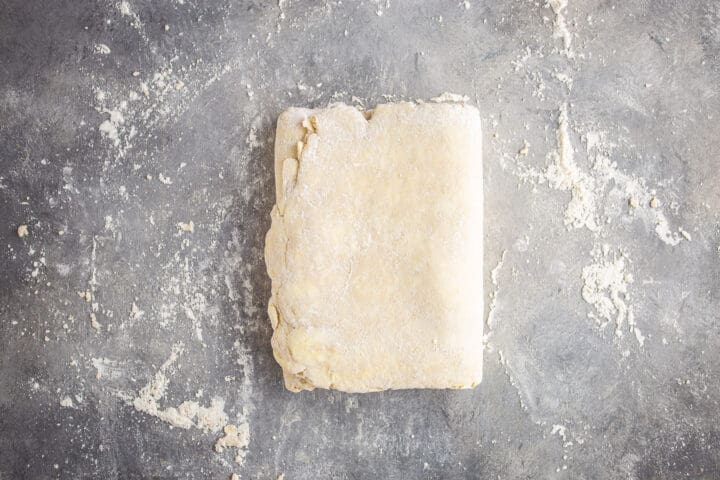
I find the sweet spot to be somewhere between 4 and 6 folds.
Once you've done that, place the dough back in the fridge for another hour to chill. It's really important that this dough is kept ice-cold at all times! You do not want that butter getting at all soft.
SHAPING AND BAKING THE PAIN AU CHOCOLAT
After the dough has its second nap in the fridge, it's time to shape!
This is really the most fun part.
Once again, on a floured surface, roll the dough out to a square shape. You want to shoot for about 17-inches in each direction.
Trim off any uneven edges, so you have a square that's about 15x15-inches.
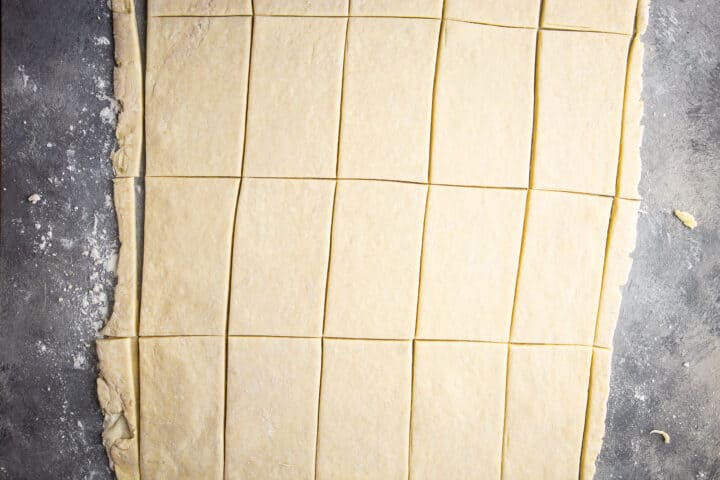
Then cut it into 15 rectangles, about 3-inches by 5-inches.
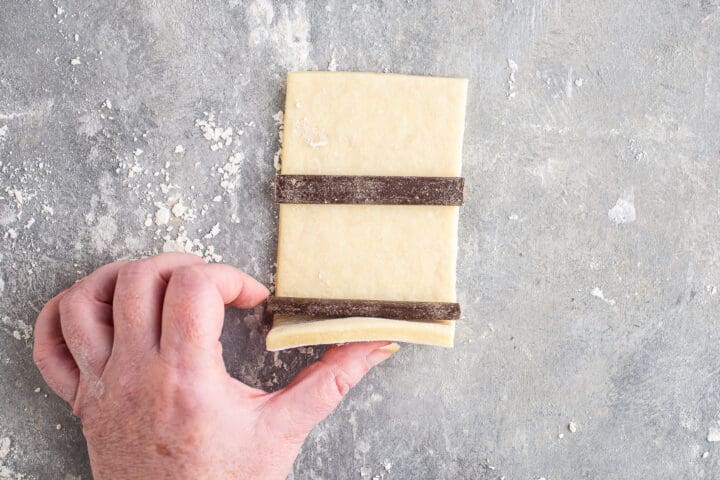
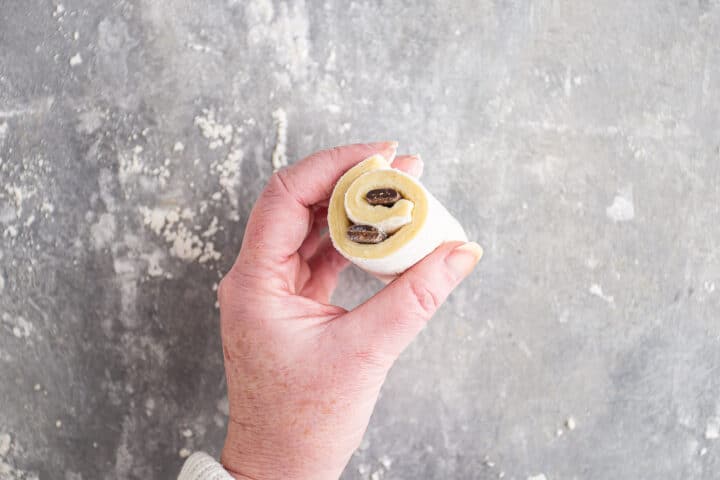
Place a chocolate baton at one of the shorter ends, and roll gently.
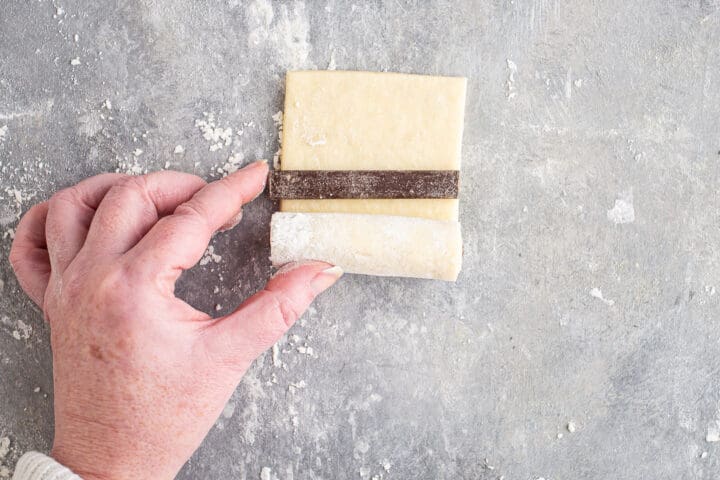
Place a second chocolate baton about 1 ½-inches from the far end, and continue to roll, tucking the cut edge under the chocolate croissant.
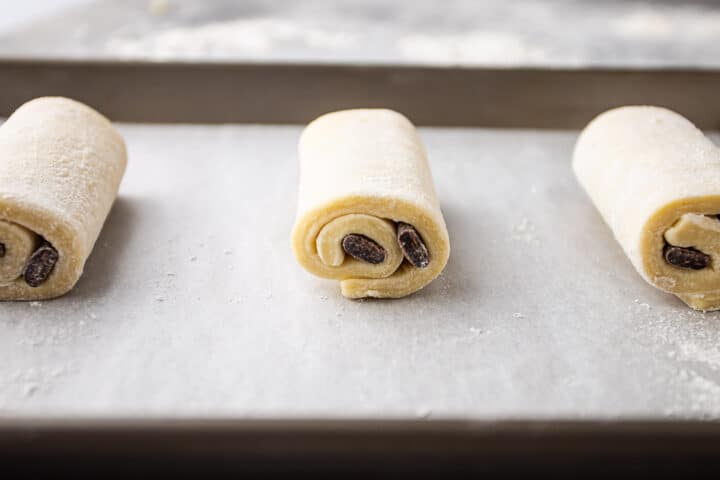
Set the rolls on a parchment-lined baking sheet, cover them lightly with plastic wrap, and allow them to rise at room temperature for 1 to 2 hours.
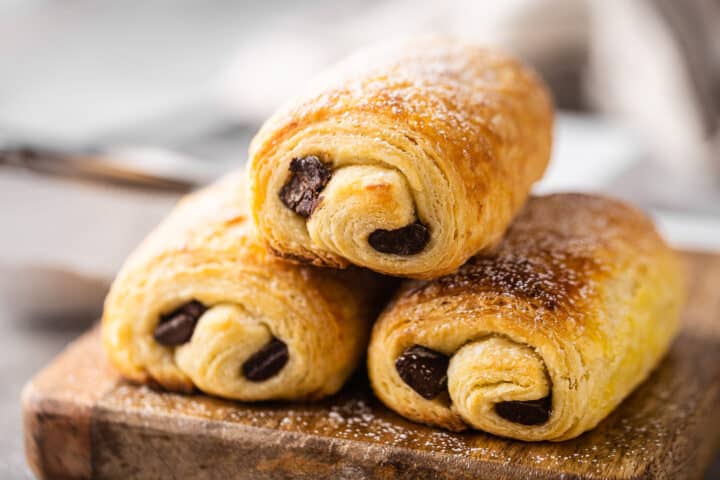
Then brush them lightly with egg wash for shine, and bake them in a hot oven until they're puffy, golden brown, and flaky.
If you can, eat one while it's still warm and fresh from the oven. They are absolutely at their best at this stage! Unbelievably delicious!

WHAT KIND OF CHOCOLATE TO USE
The easiest way to make pain au chocolat is to use chocolate batons. I purchased mine here: Cacao Barry 44% Dark Chocolate Sticks.
One pound is enough to make several batches.
In a pinch, I would imagine you could probably substitute with a regular chocolate baking bar, cut into sticks. Or maybe just line up chocolate chips in a row?
But to me that seems like it could be hard to keep the chocolate in as your rolling. May be a little too fussy!
The chocolate batons work beautifully and make the shaping process really simple and quick.
OVERNIGHT PAIN AU CHOCOLAT RECIPE
If you want to split up the prep over 2 days, it's really easy to do.
Just chill the unbaked chocolate croissants overnight, after you form them.
The next morning, remove them from the fridge and allow them to come to room temperature and rise. Once they're around 1.5 to 2x their original volume, brush them with egg wash and bake them in a preheated oven.
This way you can enjoy freshly baked pain au chocolat for breakfast, warm from the oven! Talk about living your best life.
HOW TO STORE
These pastries will keep for 2 to 3 days (covered) at room temperature. Or for 5 to 7 days in the fridge.
They can also be frozen. Baked, they'll last for a couple of months in an airtight zip-top freezer bag. Unbaked, they should last for 2 weeks before the yeast dies.
Reheat the leftovers in a 170 degree F oven until warmed through, or in the microwave for 10 to 15 seconds.
A FEW MORE OF MY FAVORITE FRENCH PASTRY RECIPES:
As an amazon associate I earn from qualifying purchases.

Ingredients
- 4 cups (500 g) all-purpose flour
- ⅓ cup (66.67 g) granulated sugar
- 4 teaspoons (12.44 g) active dry yeast , (or two ¼-ounce packets)
- 2 ¼ teaspoons (13.5 g) kosher salt
- 1 ¼ cups (283.75 g) unsalted butter,, cold (2 ½ sticks)
- 1 cup (244 g) milk, (add up to ¼ more if needed)
- egg wash, (1 large egg beaten with a teaspoon or two of water)
- 30 (840 g) chocolate batons
- powdered sugar, (optional garnish)
Instructions
- Place the flour, sugar, yeast, and salt in a large bowl and whisk together until combined.
- Slice the butter into ⅛-inch thick slices and toss in the flour mixture to coat.
- Add the milk and stir together until a shaggy dough forms (bear in mind that the dough will become more moist as it rests).
- Wrap the dough tightly in plastic wrap and chill for 1 hour.
- On a lightly floured surface, roll the dough into a long rectangle shape.
- Fold it into thirds (like a letter), turn 90 degrees, and repeat 4 to 6 more times, or until the dough has large streaks of butter in it but it is smooth and flat. (If at any point the butter starts to feel soft, chill it in the refrigerator or freezer until stiff.)
- Wrap tightly and chill for 1 more hour, then roll it out to a rough square shape (approx. 17-inches wide by 17-inches long).
- Trim off any uneven edges and cut the dough into 15 rectangles (about 5-inches by 3-inches).
- Place one chocolate baton at the short end of each rectangle, then begin rolling the dough around the chocolate.
- Place another chocolate baton about 1 ½-inches from the other short end of the rectangle, and continue to roll, tucking the seam on the underside of the unbaked croissant.
- Place on a parchment-lined baking sheet, cover loosely with plastic wrap, and allow to proof until doubled in size (1 to 2 hours).*
- Preheat the oven to 375 degrees F, and gently brush the croissants with egg wash.
- Bake for 15 to 20 minutes, or until puffed, golden brown, and flaky.
- Dust with powdered sugar (optional).

Hey, I'm excited to try the recipe this Christmas weekend, but to make sure every thing comes out at the right time, if I make the dough the night before and fridge it, then take it out in the morning, about how long do you think it would take to rise before putting in the oven? Thank you!
Hey Sarah! I'm so happy you are going to give this a try! And thank you for the great question. I think the answer would depend on how warm it is in your kitchen. That said, I'd probably aim for around 30 minutes bringing them up to room temp, plus the 1 to 2 hours for them to rise. Does that make sense?
Oh my goodness, thank you so much for the super prompt reply, because I wanted to start making these tomorrow, and was worried I wouldn't get a response. My kitchen is just a bit cooler than room temp, generally. So about 1.5 hours minimum? How easily do they fall/over proof? Like, would 10 minutes too long make a huge difference? I was considering going grocery shopping while they proofed, but if it needs to be monitored, I will change my plans.
I think you should be able to have 10 minutes of wiggle room! Good luck I hope it works out exactly the way you are wanting it to!
I am new to baking and never made a pastry like this before. I attempted and they didn’t rise at all during any proofing step and this is definitely due to something I did. I have a question, in the first step it looks like the yeast is dry so I put the it in that way, un bloomed. I may have gotten the wrong type of yeast. Do you have any thoughts.
Hey Britney! I'm so sorry to hear you had trouble. Typically, enriched doughs like this do not rise quite as much because the fats and sugar kind of inhibit that rise. But once they go into the hot oven they should puff up a lot, in spite of that. The yeast will bloom as the dough rests, just from the moisture in the liquid ingredients. I hope this is useful info!
Recipe is fine. However as a beginner baker, I think adding photos would be extremely helpful to help visualize what we are doing for parts that can be messed up.
Im not sure what you mean- there are 19 photos on this post, 14 of which are detailing every step of the recipe process. ??
Hello, I was wondering if you could use chocolate chips or pieces of chocolate instead of chocolate batons?
Hey Amanda! You certainly can but I found the batons a little easier to work with. Good luck and I hope you enjoy!
Can I use instant yeast? I bought instant yeast instead of active dry and wondering if instant yeast will be ok to use
Hey Dannah! I do prefer the regular kind but instant should work ok in a pinch. Good luck!
Very Simple
So happy you liked it! Thank you for the 5-star review.
Great treats for friends and family! Make sure you start it earlier in the day. I live in higher elevation, and this was perfect! My friends loved them and my family did too.
So happy to hear that! Thanks so much Violet!
I'm so excited to make these--my kids love chocolate croissants and I was becoming totally overhwelmed by trying to understand the traditional cold-sheet-of butter-method. Question about freezing - if freezing the unbaked pastries, would you thaw them / let them rise before baking? Or bake straight from frozen? If the latter, any adjustment to baking time or temp? Thanks in advance for any perspective on that!
Thanks so much for the great question and I apologize for the late reply. You would want to thaw them and allow them to rise first. So after step 10 you'd freeze them, then proceed with step 11, allowing them to double in size. You shouldn't need to adjust the bake time, but do keep in mind that every oven is different and you'll want to look for puffy golden brown pastries rather than rely solely on the time given. Good luck!
This looks like a delicious recipe for pain au chocolat! I love that you can make the dough in advance and freeze it for up to two weeks. I'm curious, do you have any other ideas for making the croissants even more flavorful?