Red Velvet Chocolate Chip Cookies
As an amazon associate I earn from qualifying purchases.
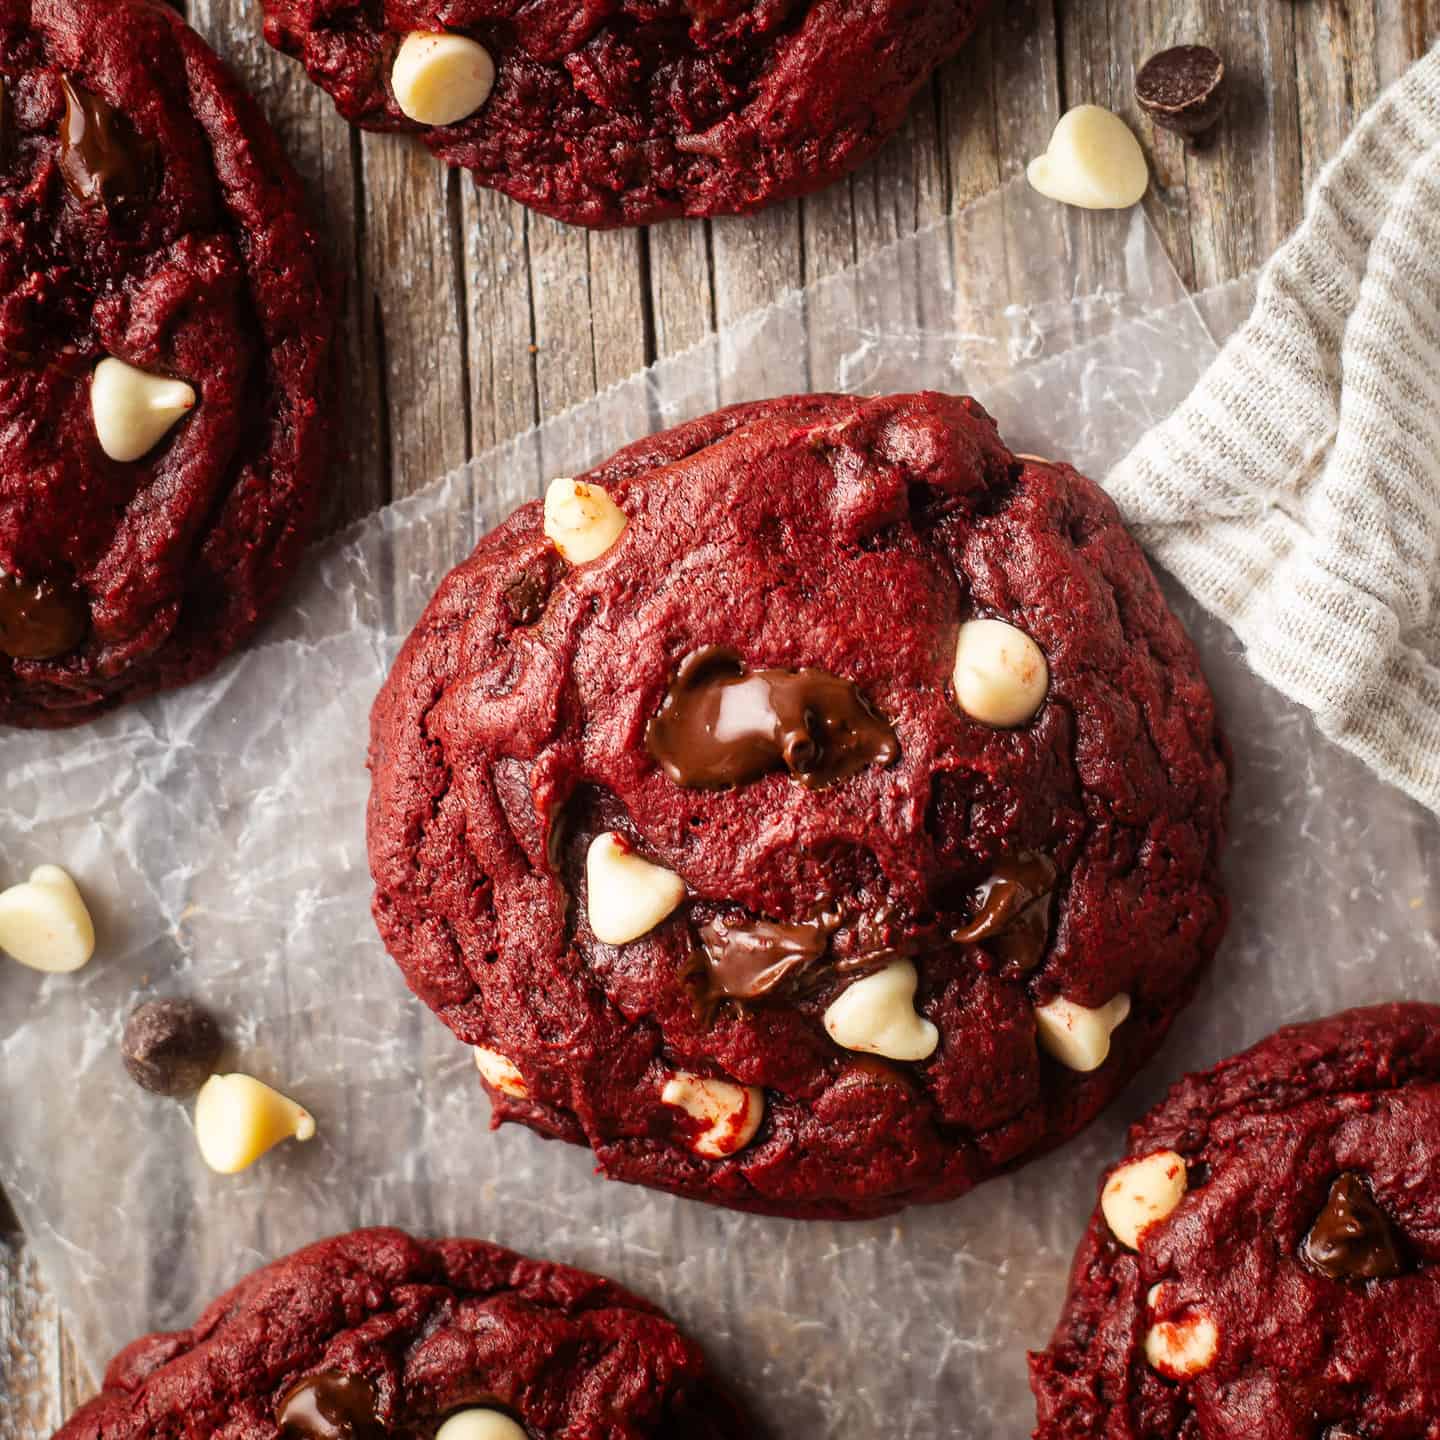
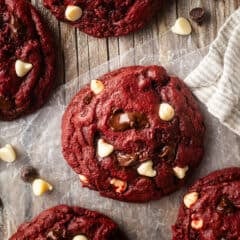
Red velvet chocolate chip cookies that bake up so incredibly soft & tender, and stay that way! With a hint of tangy cream cheese & cocoa.
Bringing you another fabulous cookie recipe for the holiday season!
Red velvet chocolate chip cookies!
YES!
Just like my soft chocolate chip cookies, oatmeal chocolate chip cookies, and peanut butter chocolate chip cookies, these bake up ooey-gooey soft and so scrumptious!
Plus they're so eye-catching! With their deep red color, they're perfect for the winter holidays, and they'd be great for Valentine's Day and the Fourth of July too!
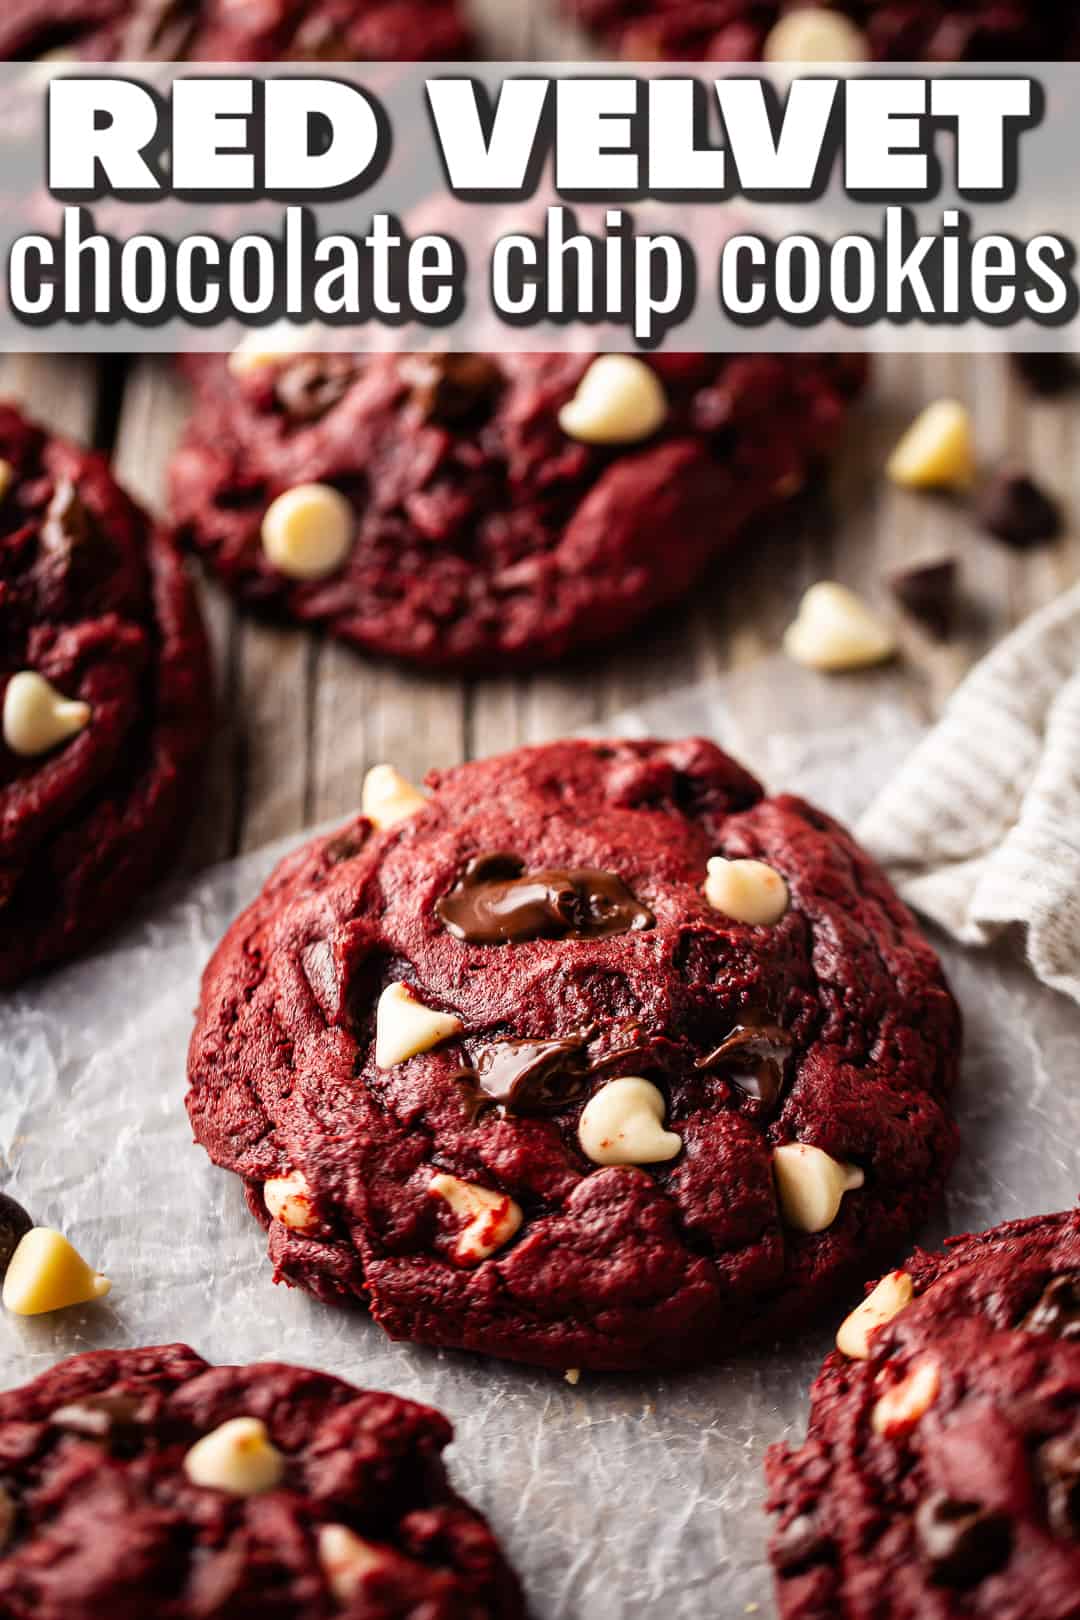
Table of Contents
- What are red velvet chocolate chip cookies?
- What's great about this recipe
- What do red velvet chocolate chip cookies taste like?
- Ingredients
- Special equipment
- How to make red velvet chocolate chip cookies
- How to serve
- Expert tips
- Frequently asked questions
- A few more of my favorite cookie recipes
What are red velvet chocolate chip cookies?
This cookie recipe was inspired by that southern classic: Red Velvet Cake.
It's a moist buttermilk cake with just a hint of cocoa and the most gorgeous red color. Typically, it's filled and covered with cream cheese frosting, and that contrast of rich and tangy flavors is so spot on.
These cookies aren't much different!
You get that same vibrant color, with a whisper of tangy cream cheese and a kiss of cocoa powder. But it's in chocolate chip cookie form!
What's great about this recipe
- Tastes amazing: The cookie itself has that same tangy/mildly chocolate flavor that's so beloved in red velvet, plus tons of melty chips!
- Incredible texture: These cookies are incredibly soft and moist, and they stay that way!
- Easy to make: You'll have freshly baked cookies, warm from the oven, in around half an hour.
- Generously sized: You're going to love how big, thick, and chubby these cookies are!
What do red velvet chocolate chip cookies taste like?
These cookies bake up a little chewy around the outside edges, with soft, gooey centers.
There's a slight tanginess from the cream cheese and a little added richness from cocoa powder. They're buttery-rich and so crave-able!
And they're loaded with chocolate! I like a combination of white and semisweet chocolate chips, which go all melty and sinful (shame!) in the oven.
Ingredients
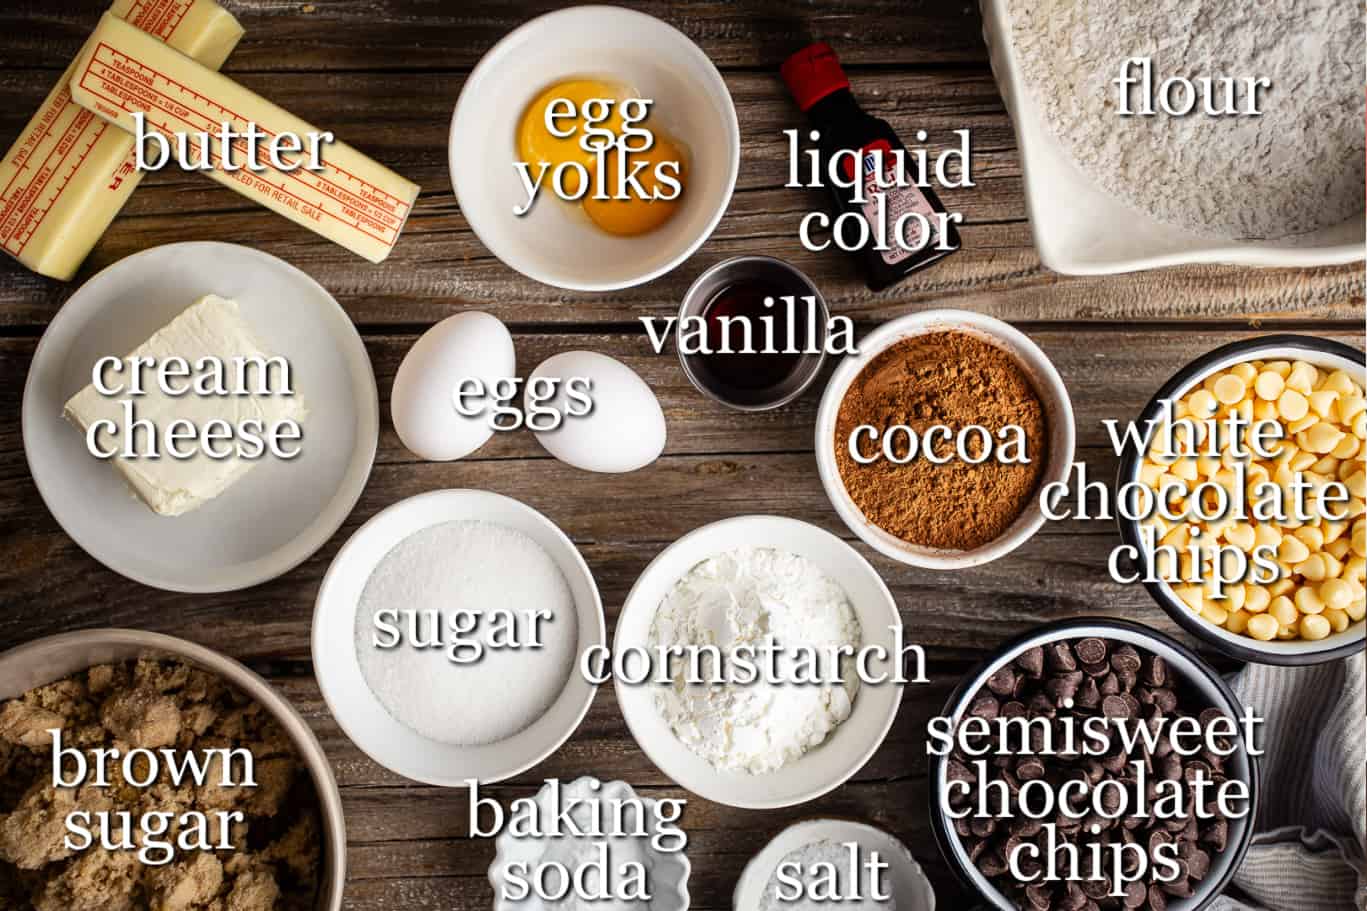
Butter: I like to use unsalted butter because it lets me control the amount of salt in the dish. Different brands of butter can contain different amounts of salt, so this way you get a more consistent result. For a vegan or dairy-free red velvet cookie recipe, use a plant-based product that can substitute for dairy butter 1:1. This recipe works best if you allow the butter to come to room temperature first. You can set it out on the counter a few hours ahead of making your recipe, or you can microwave it for 10 seconds, turn it over, and microwave it again for another 8 seconds.
Cream cheese: Cream cheese adds richness and a slightly tangy flavor that's traditional in red velvet desserts. Use the kind of cream cheese that comes in a brick; it has the least amount of water or air added to it.
Sugar: I like a combination of light brown sugar and regular granulated white sugar here. The brown sugar adds a warm flavor and helps to keep the cookies soft, while the white sugar gives a little more structure.
Eggs: Use large eggs, preferably at room temperature. You'll need 2 whole eggs plus 2 additional yolks.
Color: I use liquid red food coloring, but gel paste color will work too. If you're using gel, you'll need much less of it since it's so highly concentrated.
Vanilla: Vanilla extract adds a subtly sweet flavor without being at all sugary.
Flour: All-purpose flour is my go-to, but you can swap it out for any kind of whole-grain option if you like. You may need slightly less if you go that route. A gluten-free flour blend that can sub 1:1 for regular flour should also work just fine, if you'd like to make gluten-free red velvet chocolate chip cookies.
Cocoa: Regular, unsweetened cocoa powder, not Dutch-processed.
Cornstarch: Cornstarch is a colorless, odorless, and flavorless starch that is used to thicken the filling. Make sure you're using cornstarch, which is white and powdery, and not cornmeal, which is yellow and gritty and tastes like corn chips.
Baking soda: Baking soda is used to help the cookies rise in the oven. It also provides a more tender mouthfeel. If you're having issues with your cookies spreading too much or not enough, try decreasing or increasing the amount of baking soda by like 1/16th of a teaspoon. The tiniest bit can make such a difference!
Salt: Salt carries the flavors and intensifies them. The end result won't taste salty, but it will make everything so much more flavorful! I like kosher salt best because it doesn't have any additives (table salt usually contains iodine which can leave a bitter taste), so the flavor is pure. It's also inexpensive and easy to find in a regular grocery store.
Chocolate: I used half white chocolate chips and half semi-sweet chocolate chips for what you see here, but you can use all one or the other, or you can do milk chocolate if you like!
Special equipment
- Measuring cups and spoons: For measuring ingredients accurately. Follow this guide: How to Measure Ingredients for Baking.
- Mixing bowl: In which to prepare the dough.
- Electric mixer: It's a stiff dough, so you'll want either a stand mixer or a powerful handheld electric mixer.
- Silicone spatula: Reaches and incorporates any ingredients that might be hiding from the mixer, and helps to get every bit of dough from the bowl!
- Trigger scoop: A 4-ounce trigger scoop makes portioning the dough effortless, and ensures that all your cookies will bake in the same amount of time.
- Parchment paper sheets: Prevents the cookies from sticking to the pan, and makes cleanup a snap!
- Baking sheets: On which to bake the cookies.
How to make red velvet chocolate chip cookies
This easy recipe comes together in just a few simple steps.
Step 1: Cream the butter and sugars
Place the butter, cream cheese, brown sugar, and white sugar together in a large mixing bowl.
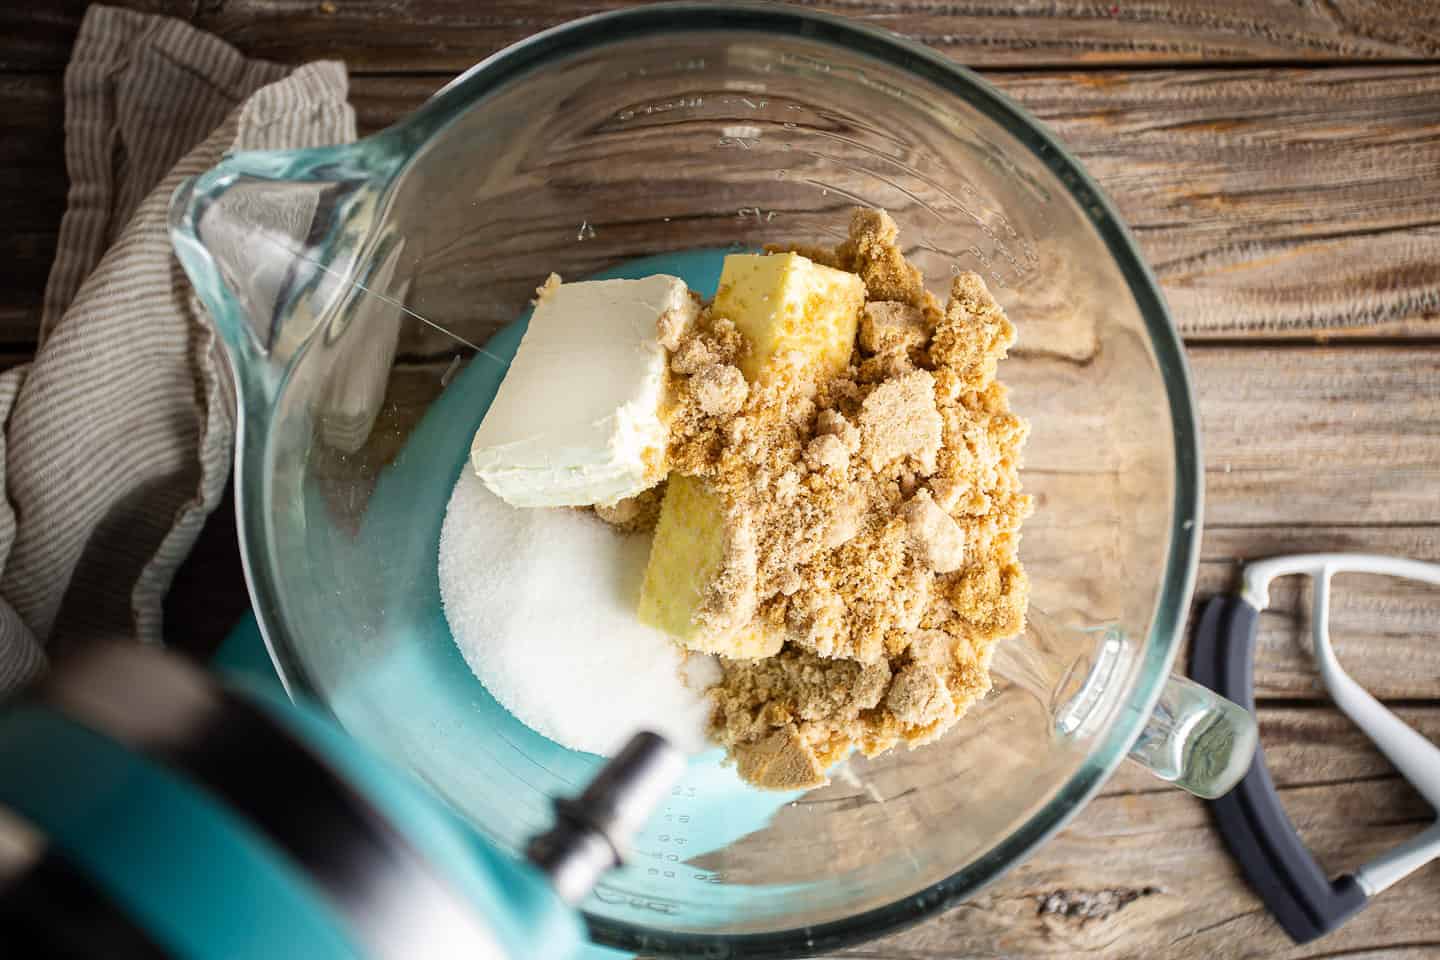
Cream these ingredients together on medium-high speed for at least 3 to 5 minutes. Set a timer!
It's important not to skimp on this step. It makes the cookies light and puffy and so melt-in-your-mouth good!
Step 2: Add the eggs, color, and vanilla
Next, add the liquid ingredients to the mix.
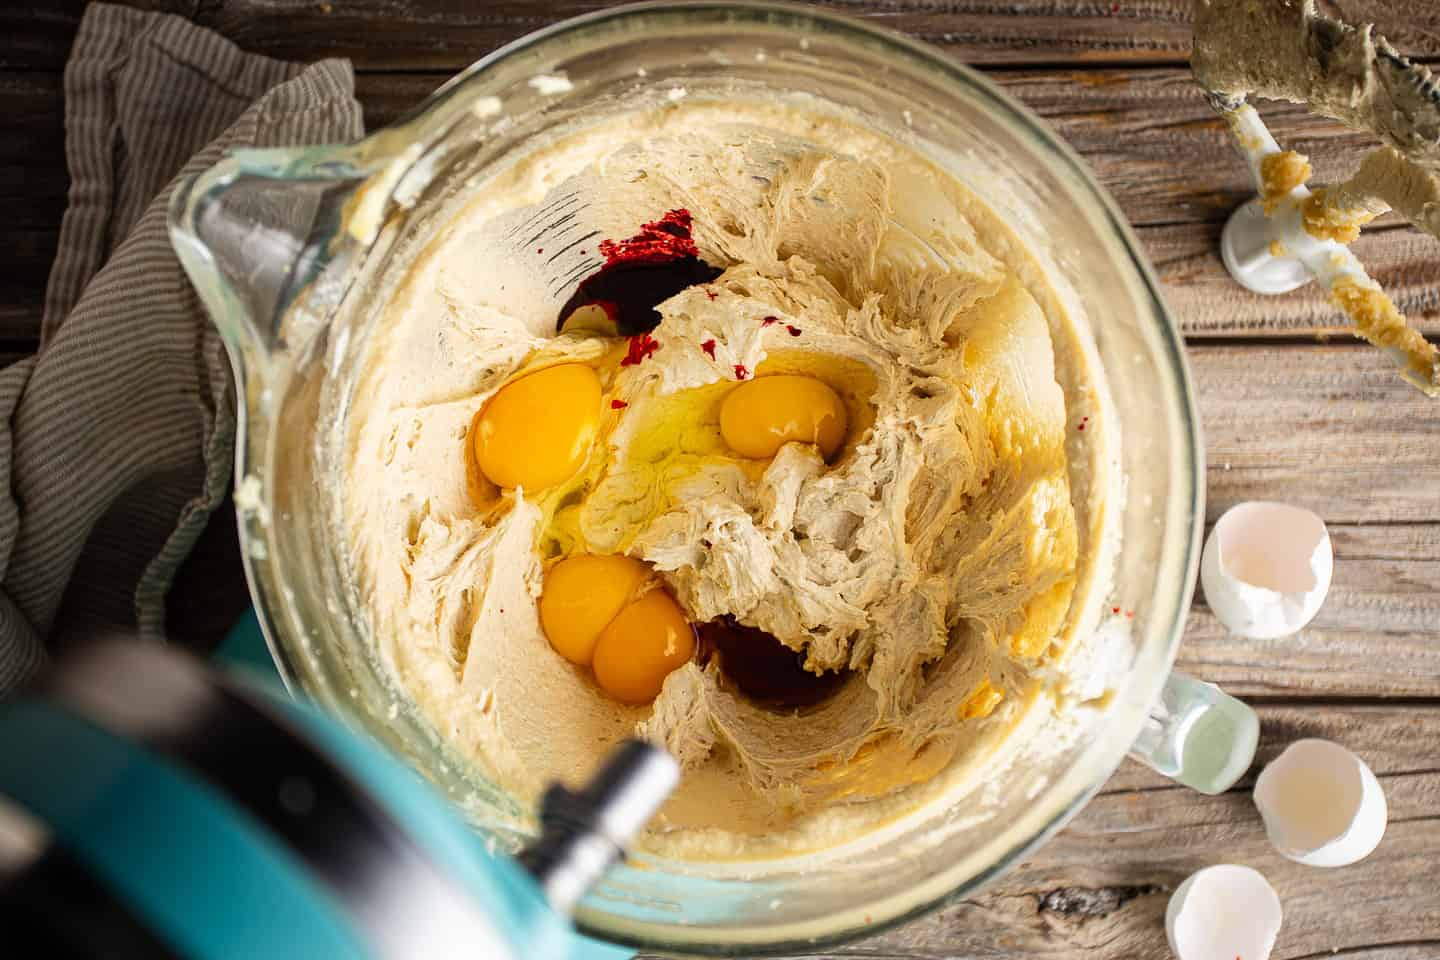
Eggs, food coloring, and vanilla extract.
These get stirred in just until you have a smooth mixture.
Step 3: Work in the dry ingredients
Next add in the dry ingredients.
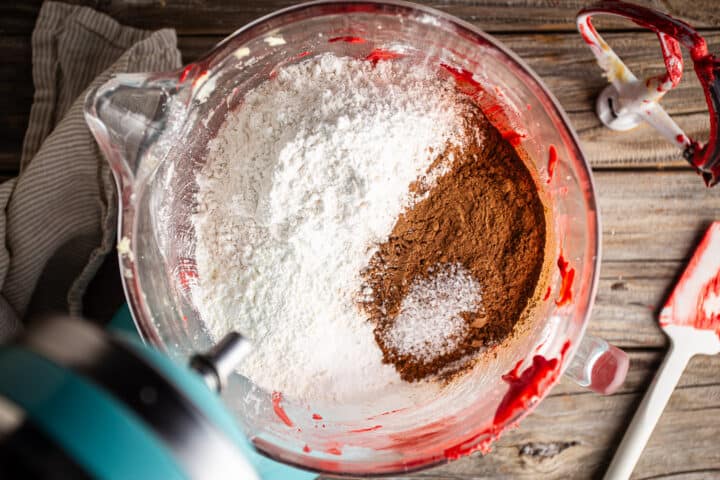
Flour, cocoa, cornstarch, baking soda, and salt.
At this point, you want to mix as little as possible. Once the flour goes in, it can make the cookies tough if the dough is overworked.
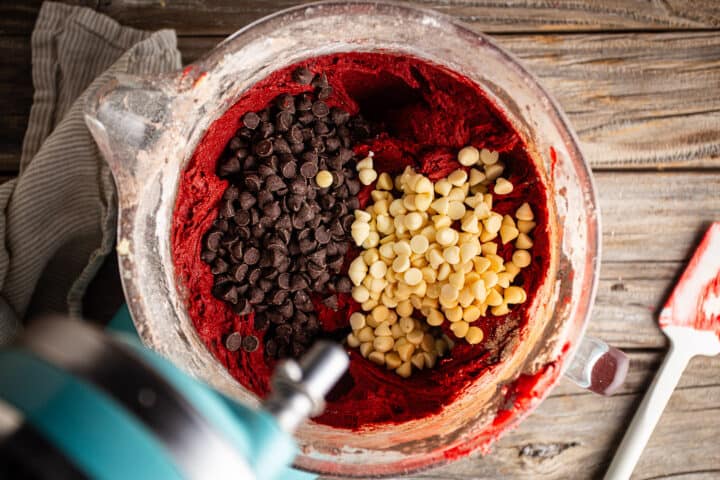
Step 4: Fold in the chocolate
Add in your chips, and give everything the quickest of quick stirs to distribute them.
Step 5: Scoop & bake
These cookies are sized generously!
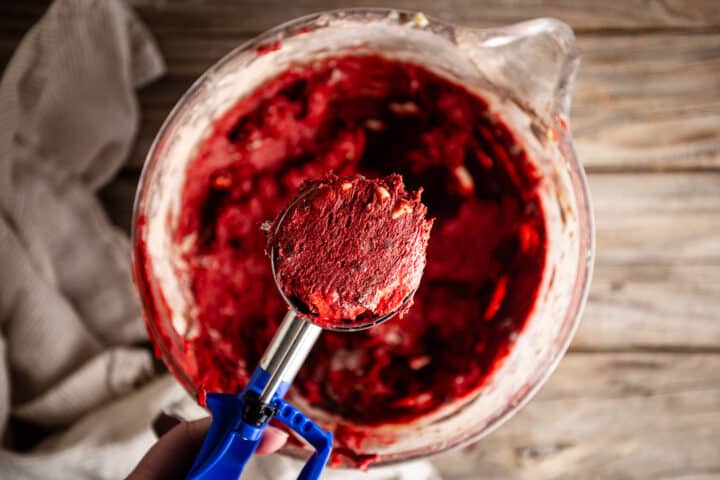
I like a ¼-cup trigger scoop for portioning out the dough. It makes cookie baking so easy!
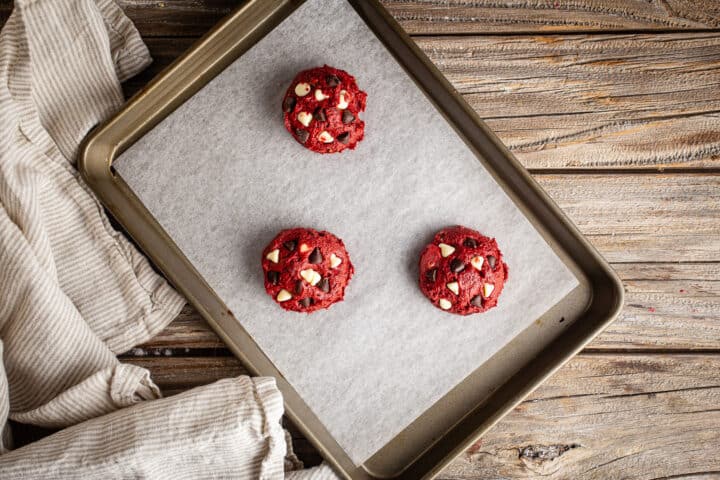
Slide the cookies into a preheated oven.
You'll know they're done baking when the edges feel set but the centers are still very soft and maybe even a little wet-looking. Remember, they'll continue to cook and firm up a lot as they cool!
How to serve
These cookies are perfect as-is!
Try enjoying them with a hot cup of coffee, tea, or cocoa. Such a comforting treat!
You could also sandwich them around a filling. I'm thinking marshmallow or cream cheese frosting? Or whipped chocolate ganache? Ice cream would be great too!
Expert tips
Really whip the butter and sugar: If you want to get the proper yield here, and you want them to spread right and be light and soft, you don't want to skimp on this step. Whipping lots of air in in that first step is essential!
Add eggs one at a time: I find I get a nice smooth batter if I add the eggs in one at a time, allowing each one to fully incorporate before adding the next.
Give it time: When you first add in the food coloring, you might worry that the color is too pale. Don't fret! Red food coloring deepens over time, and by the time you're putting the cookies in the oven, the color will likely be perfect.
Scrape: Don't forget to scrape the bottom and sides of the bowl and paddle attachment. Sometimes butter and sugar can cling and hide, and this will affect the texture of your final product.
Don't overmix: Once the flour has been added, you want to stir the dough as little as possible. Overmixing can cause the cookies to come out tough.
Slightly under-bake: Don't forget about carry-over cooking! This is the idea that foods will continue to increase in temperature for several minutes after they've been removed from the heat source. If you bake the cookies even a minute or two too long, they won't be soft.
Allow them to cool: These cookies will be extremely tender when they're fresh from the oven. It will be difficult to remove them from the baking sheet without them falling apart. Allow them to cool on the baking sheet.

Frequently asked questions
These cookies will keep at room temperature for several days. It's best to cover them lightly to prevent them from drying out, or you can put them in an airtight container once they're good and cool.
Pop them into the fridge to extend their shelf life to a week or two.
You can also freeze them! Baked, they should keep in the freezer for a couple of months.
Or you can freeze the dough balls and keep them in there for whenever the craving strikes. Frozen dough can go straight into the oven to bake. You don't have to let it thaw first, but you may need to extend the bake time by a few minutes.
This batch makes about 30 large cookies. Each cookie equals one serving.
The nutritional info in the recipe card below reflects a serving size of one cookie.

A few more of my favorite cookie recipes
As an amazon associate I earn from qualifying purchases.
Ingredients
- 1 cup (227 g) unsalted butter, softened
- 4 ounces (113.4 g) cream cheese, softened
- 2 cups (440 g) light brown sugar, (loosely packed)
- ½ cup (100 g) granulated sugar
- 2 (88 g) eggs, large
- 2 (36 g) egg yolks, large
- 1 ½ tablespoons (22.5 g) red food coloring
- 1 tablespoon (13 g) vanilla extract
- 3 ½ cups (437.5 g) all-purpose flour
- ¾ cup (64.5 g) unsweetened cocoa powder, (regular)
- ½ cup (64 g) cornstarch
- 2 teaspoons (8 g) baking soda
- 1 ½ teaspoons (9 g) kosher salt
- 12 ounces (340.2 g) white chocolate chips
- 12 ounces (340.2 g) semi-sweet chocolate chips
Instructions
- Preheat the oven to 375 degrees F and line baking sheets with parchment paper.
- Place the butter, cream cheese, brown sugar, and granulated sugar in a large mixing bowl, and cream together on medium-high speed until very pale and fluffy (approx. 3 to 5 FULL minutes).
- Add the eggs, red food coloring, and vanilla extract, and beat on medium speed until smooth (approx. 1 minute).
- Scrape the bottom and sides of the bowl with a silicone spatular, then add the flour, cocoa, cornstarch, baking soda, and salt, and stir together until just barely combined.
- Add the white chocolate and semisweet chocolate chips (witholding a handful of each for garnish), and stir together until just barely incorporated (do not overmix at this stage).
- Use a ¼-cup trigger scoop to portion the dough onto the prepared baking sheets, allowing at least 3 inches in between for spreading.
- Garnish the cookies with the remaining chips, and bake until set around the edges but still a little wet towards the centers (approx. 8 to 12 minutes).
- Cool completely on the baking sheet.*


I use this recibe for my business! And my clients (and I) love it. Super soft and delicious cookies.
I just changed the baking soda for baking powder, and added 1/8 tsp of baking soda.