Simply Perfect Apple Pie
As an amazon associate I earn from qualifying purchases.
A mountain of tender, cinnamon-spiced apples nestled under a buttery, flaky homemade pie crust makes this the most perfect apple pie recipe. Perfect for your Thanksgiving dessert table or any time of year! Serve it with a scoop of vanilla ice cream for the ultimate dessert. Whether for a holiday table or a cozy family dinner, this apple pie is always a crowd-pleaser!
I originally published this recipe in 2013 and have since added new photos, success tips, and more clear recipe instructions.

Table of Contents
- Here's Why You'll Love This Apple Pie Recipe
- Start With Quality Pie Dough
- Key Ingredients You Need (For The Filling)
- How To Make The Perfect Apple Pie (In Pictures)
- 4 Apple Pie Success Tips
- FAQs
- More Favorite Pies
A reader, Kelli, commented: "I just made this pie this afternoon and it's already half gone! My family loves it! Thank you so much for sharing this recipe, it tastes just like my Grandma's (which is a huge compliment!) and I will for sure use it again! ★★★★★"
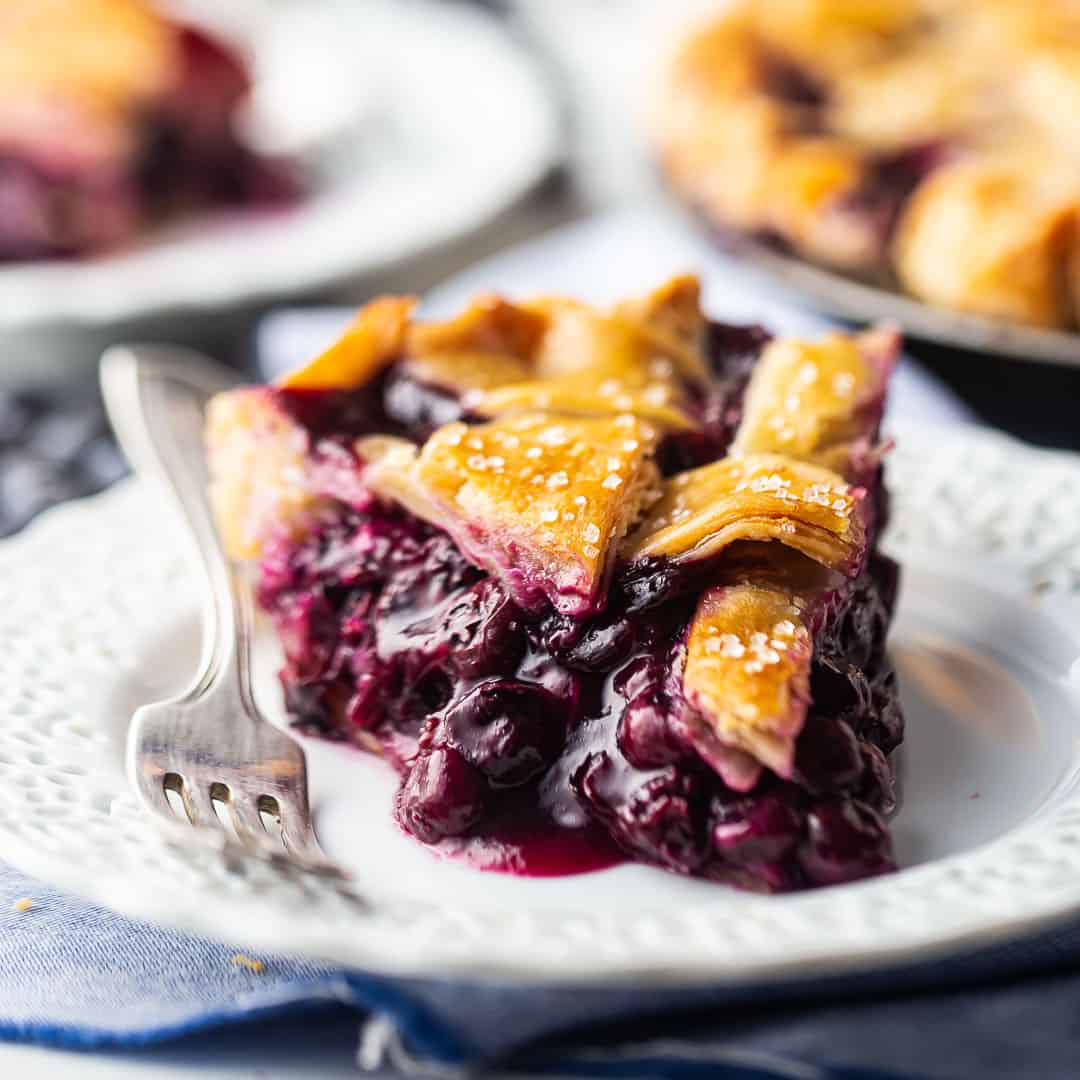
Here just in time for Thanksgiving, but I certainly don't limit this apple pie to the holiday season. I have shared many homemade pies over the years but this apple pie recipe is a classic- up there with pumpkin pie and pecan pie. Tart and sweet juicy apples tossed in warm spices, tucked within a buttery pie crust.
Here's Why You'll Love This Apple Pie Recipe
- Class recipe, nothing complicated
- Filled with deliciously sweet and tart, cinnamon-spiced apples
- Buttery, flaky pie crust provides a crunch against the soft and juicy filling
- So much comforting flavor
- With a scoop of vanilla ice cream on it, it's the ultimate dessert!
Start With Quality Pie Dough
With so many apples, you need a sturdy pie crust to hold them all. There's nothing quite like homemade pie crust- whether you're an experienced baker or just starting off, I encourage you to try my pie crust recipe. (I also know how chaotic the holiday season can be and don't blame you if you choose store-bought).
A reader, Debra, commented: "68 yr old happy baker just found the BEST pie crust recipe I have ever used!! The ingredients, perfect! But what shines, shines, shines are the instructions! Only thing I changed, out of necessity to meet a dinner deadline, was that each of my chillings was only 20 minutes. Worked absolutely perfectly!! THANK YOU, beautiful young former pastry chef! ★★★★★"

Key Ingredients You Need (For The Filling)
Once your pie dough is ready, you can gather the rest of the ingredients. Make-Ahead Tip: Save yourself time if you make pies for for the holidays- simply prep the dough in advance, cover tightly, and store in the refrigerator for up to 3 days or the freezer for up to 3 months.
- Apples: You can use your favorite apples, but it's best to use firm apples for baking, like Granny Smith. Because Granny Smith is more tart, I sometimes pair it with a sweeter variety like Honeycrisp. If using a softer apple, like Gala, I recommend slicing a little thicker than instructed so they don't get too mushy when baked.
- Spices: It's not apple pie without the warm spices like cinnamon, nutmeg, and cloves. If you're not a fan of nutmeg, you can leave it out.
- Sugar: Sugar helps sweeten the pie filling. You can use white granulated sugar or brown sugar.
- Lemon: Don't worry, you don't actually taste the lemon, but just a splash prevents the apples from browning and enhances the overall flavor.
- Flour: The flours thickens the pie filling.
How To Make The Perfect Apple Pie (In Pictures)
Start with rolling out the bottom pie dough. Remember, you'll need need 2 pie crusts, one for the bottom and another for the top. (Keep the other in the refrigerator until you need it). Carefully place into a deep-dish pie plate.

Toss the filling ingredients together in a large bowl. Make sure it's well combined, each apple slice should be coated spices, flour, and sugar.

Arrange the apple slices into the pie dish. Don't just pour the apples- make sure the slices are compact. Then, add the second pie crust on top. Brush with egg wash to get the beautiful color and sprinkle with coarse sugar, if desired. I have a tutorial on how to make a lattice pie crust, which is how I top the apple pie pictured. You can also lay the second rolled-out pie crust on top and slit some vents on the top with a sharp knife.

It's time to bake! Place the apple pie on a baking sheet and the apple pie until the crust is golden brown, and the filling is bubbling through the vents, about 1 hour.

Top each slice of apple pie with vanilla ice cream and, if you're feeling fancy, a drizzle of salted caramel sauce, or even dulce de leche. Or keep it simple with a dollop of whipped cream.
4 Apple Pie Success Tips
- Uniform Apple Slices: It's important that your apple slices are the same thickness. You don't want some solid apples while others are mushy. You want them all to be tender, with a slight crunch.
- Refrigerate Pie Dough/Crust: Keep the pie crust dough in the refrigerator when you're not using it. Remember, cold pie dough is important.
- Pie Dish Size: There are a ton of apples in this pie so it's important that you use a deep-dish pie plate (it also works wonderfully for non-deep-dish pies too). You want the pie dish to be at least 1.5 or 2 inches deep. If you don't have one, you can slightly reduce the amount of apples.
- Arranging the Apple Slices: You will be shocked to see how many apples can fit into a pie crust when arranged neatly and not just poured in. You want minimal air pockets throughout.
FAQs
You can! You can prepare the pie crust up to 3 days in advance.
Absolutely! Once the pie is fully assembled, wrap tightly in 2 layers of plastic wrap. Freeze the pie for up to 3 months. Thaw overnight in the refrigerator before baking.
If there's even any apple pie left... it will stay fresh at room temperature for 1-2 days, and in the refrigerator for up to 1 week. Though it's best to eat within the first few days as the crust may begin to get soggy. You can also freeze the pie for up to 3 months. Allow it to cool completely, then wrap it tightly in 2 layers of plastic wrap. Thaw overnight in the refrigerator or at room temperature.
More Favorite Pies

Ingredients
- 1 batch Perfect Pie Crust from Scratch, , prepared & chilled
- 10 apples, peeled, cored, and sliced ¼-inch thick
- ½ cup (100 g) granulated sugar
- 3 tablespoons all purpose flour
- 2 tablespoons (2 tablespoons) lemon juice
- 2 ½ teaspoons (2.5 teaspoons) ground cinnamon
- ½ teaspoon (0.5 teaspoon) ground nutmeg, (or ⅛ teaspoon freshly ground nutmeg)
- ¼ teaspoon (0.25 teaspoon) kosher salt
- ⅛ teaspoon (0.13 teaspoon) ground cloves
- 2 tablespoons (29.57 g) unsalted butter , (cold), cubed
- egg wash, (one egg beaten with a tablespoon of cold water)
- 2 teaspoons raw sugar, , for garnish
Instructions
- Roll out half the pie dough to about 2 inches wider than your pie dish, place it in the bottom of an ungreased pie plate, and refrigerate.
- Place the apples, sugar, flour, lemon juice, spices, and salt in a large bowl and toss to coat evenly.
- Fill the chilled pie shell with the apple mixture, working carefully to mound the apples evenly and with as few empty spaces between apple slices as possible.
- Dot with butter and refrigerate.
- Roll out the second disk of pie dough, (large enough to overhang the sides of the pie by at least an inch), and drape the dough over the pie, pressing lightly to conform to the shape of the apples.
- Trim off any excess dough, leaving about a one inch margin all around the pie.
- Roll the top and bottom crusts up and over, pinching together to seal, and crimp.
- Cut steam vents in the top crust with a sharp knife or kitchen shears, brush with egg wash, and garnish with raw sugar.
- Refrigerate the pie for 15 to 20 minutes.
- Preheat the oven to 425 degrees.
- Bake the pie for 45 to 60 minutes, or until the crust is golden, the juices are bubbling, and the apples are softened but still a little firm (not mushy).
- Cool the pie for at least an 2 hours before slicing.


OMG! This pie is the perfect excuse to use the pie bird I bought just because it was on sale! 😀 So beautiful and yummy!
Yay! I love those little things! I want a pie bird too! 😉
Your pie looks BEAUTIFUL!!!! The crust looks amazing, baked to PERFECTION!!!
Thank you, Maria! I love the crust... it's so flaky and buttery. That folding and rolling method gives great results! I'm so happy you enjoyed the post, thank you so much for your sweet comment <3
Wow, Allie, I've never seen such a beautiful pie! Your photography, your finished product - it's all totally scrumptious. The name is right - simply perfect!
I'm not much of a baker but you've inspired me to give this a try.
Have a great weekend. Found you at Show Stopper Saturday and I'm a new follower.
Hi Robin! Thanks so much for popping over from Show Stopper Saturday! I'm so happy you liked my pie and so happy you took the time to say hello. I hope to see you here again. Happy Holidays! 😀
I'm so excited about this simply perfect apple pie! I would love to try it with a generous scoop of vanilla bean ice cream and a large spoonful of caramel sauce drizzled on top, although I'm sure it's delicious just on its own. My stomach is seriously growling at the thought of such combo. Simply delicious!
Oh, Vane, you are totally speaking my language! Nothing's better than warm apple pie with ice cream and caramel at this time of year! 🙂
Allie, this is seriously the mother of all pies. 12 apples?! I love it! I've never made an apple pie before, crazy right? Now that I'm getting over my fear of making the crust, I have to try this. I doubt mine will look as lovely as yours - that's a perfect pie crust you have there! I especially love that your hubs could smell the pie from the driveway. If I were your neighbour, I'd be following my nose to your food all the time.
Ha ha, thanks Nancy! My neighbors don't mind too much at all especially since I give them food all the time! But this one was devoured before I even had a chance... So happy you liked the post and thanks for the awesome comment! 🙂
Wow -- now THIS is a pie! Love that this pie is so very full of apples. And your crust looks perfectly lovely -- golden, flaky, and crispy, just like pastry should be!
Thank you so much, Jamie! It's all about the apples for me, I try to stuff as many in there as it'll hold! I'm so happy you liked the post, thanks for reading and for the sweet comment! Hope you have a great weekend!
Allie, this looks absolutely gorgeous! I do not blame your boy for eating 3 slices in one sitting--I'd vote to eat the entire pie 🙂
Ha ha, it didn't last very long! Thanks so much for the sweet comment, Amy! Hope you and Warren have a lovely holiday... 🙂
Hmmmm sounds delicious Allie, I like how the apples stay crisp within the pie, nobody want's mushy apples now do they!
I don't know, my hubby likes mushy but I don't get that. Go eat some applesauce if that's what you want! I like to know I'm eating apples, personally. Oh well, it didn't stop him from devouring a slice or two 😉
Oh my Allie!! This is beyond simply perfect. It's mind blowing. I love the detailed instructions for the recipe and the care in making this the perfect pie filled with love and tender apples! I LOL when I read this : This baby’s got thermal mass! I cannot agree more. I love your styling very much as well. I don't know how you make brown shine so well 🙂
Ha ha, only a fellow blogger could understand how hard brown on brown can be! You are so right and I did struggle with that. I'm so happy you like the post. I've been making apple pie this way for a long time, and my family loves it! Just had to share what I've learned over the years. <3
Wow. Just wow. I am blown away by this pie. It is gorgeous! And you captured it's gorgeousness so well with these stunning pictures. Man would I love me a slice of this...or two!
Thank you Mimi! It's not that easy to make a brown pie with brown filling look nice, so I'm glad to hear you like the pics! 😉
Now that is a perfect apple pie! It looks so full and flaky, just how I love it. Thanks for sharing, Allie!
I'm so happy you like it, Ashley! I like it full too, a flat pie is kinda disappointing to me, lol!
Wow, look at that flaky crust! PERFECT apple pie!!!
Thanks, Liz! That folding technique gives such great results. Thank you so much for reading and for the sweet comment!
No wonder why this is your kid's favorite dessert! It would be mine as well, since it looks terrific! 12 apples??? That's fabulous, I love apple desserts which actually taste of apples instead of tons of sugar! This baby is going straight to my list, it sounds so awesome 😉
I feel the same way, Consuelo. I want to taste the tart apple flavor, not just cinnamon and sugar. I hope you like the pie! Thanks for reading <3
Wow! This Apple Pie is amazing! I have never seen apple pies that look so gourmet! Your family is very lucky! I will definitely make a gluten free version of this for Thanksgiving. Thank you so much for sharing!
Thank you so much Ester! I'd love to see your gluten free version, I hope you'll share it! Happy Thanksgiving!
If it is half as good as yours...I will share it 🙂
This pie looks incredible Allie! So true, nothing says love more than a homemade pie. Hehe, I can just imagine how amazing this smelled baking up in the oven - your hubby must have dashed into the house after a whiff of this magnificent pie 🙂 Thanks for sharing all the great tips and step-by-step photos, this truly sounds like the perfect apple pie! Pinning 🙂
He did, Kelly! I'm so happy you like it, and thank you so much for pinning! xoxo
I am at a loss for words here. You've taken such care with every ingredient and step that this pie is more than *simply* perfect. It is utterly perfect. I have never been great at pies, so have always been a little scared of making them, but just seeing how you break down each step makes the whole process so much less intimidating. Thank you so much, Allie! I can't wait to give this a try 🙂
Wow, Nora! Thank you so very much for your sweet comment! Pies can be scary, I agree, but practice makes perfect and I tried and tried until I got the result I was after. I really hope that the hours I put into learning can help give you a great result! Thanks so much for always being one of my biggest cheerleaders 🙂