New York Bagel Recipe
As an amazon associate I earn from qualifying purchases.
My homemade New York Bagel Recipe is simple and produces bakery-style bagels right at home with no special equipment needed!
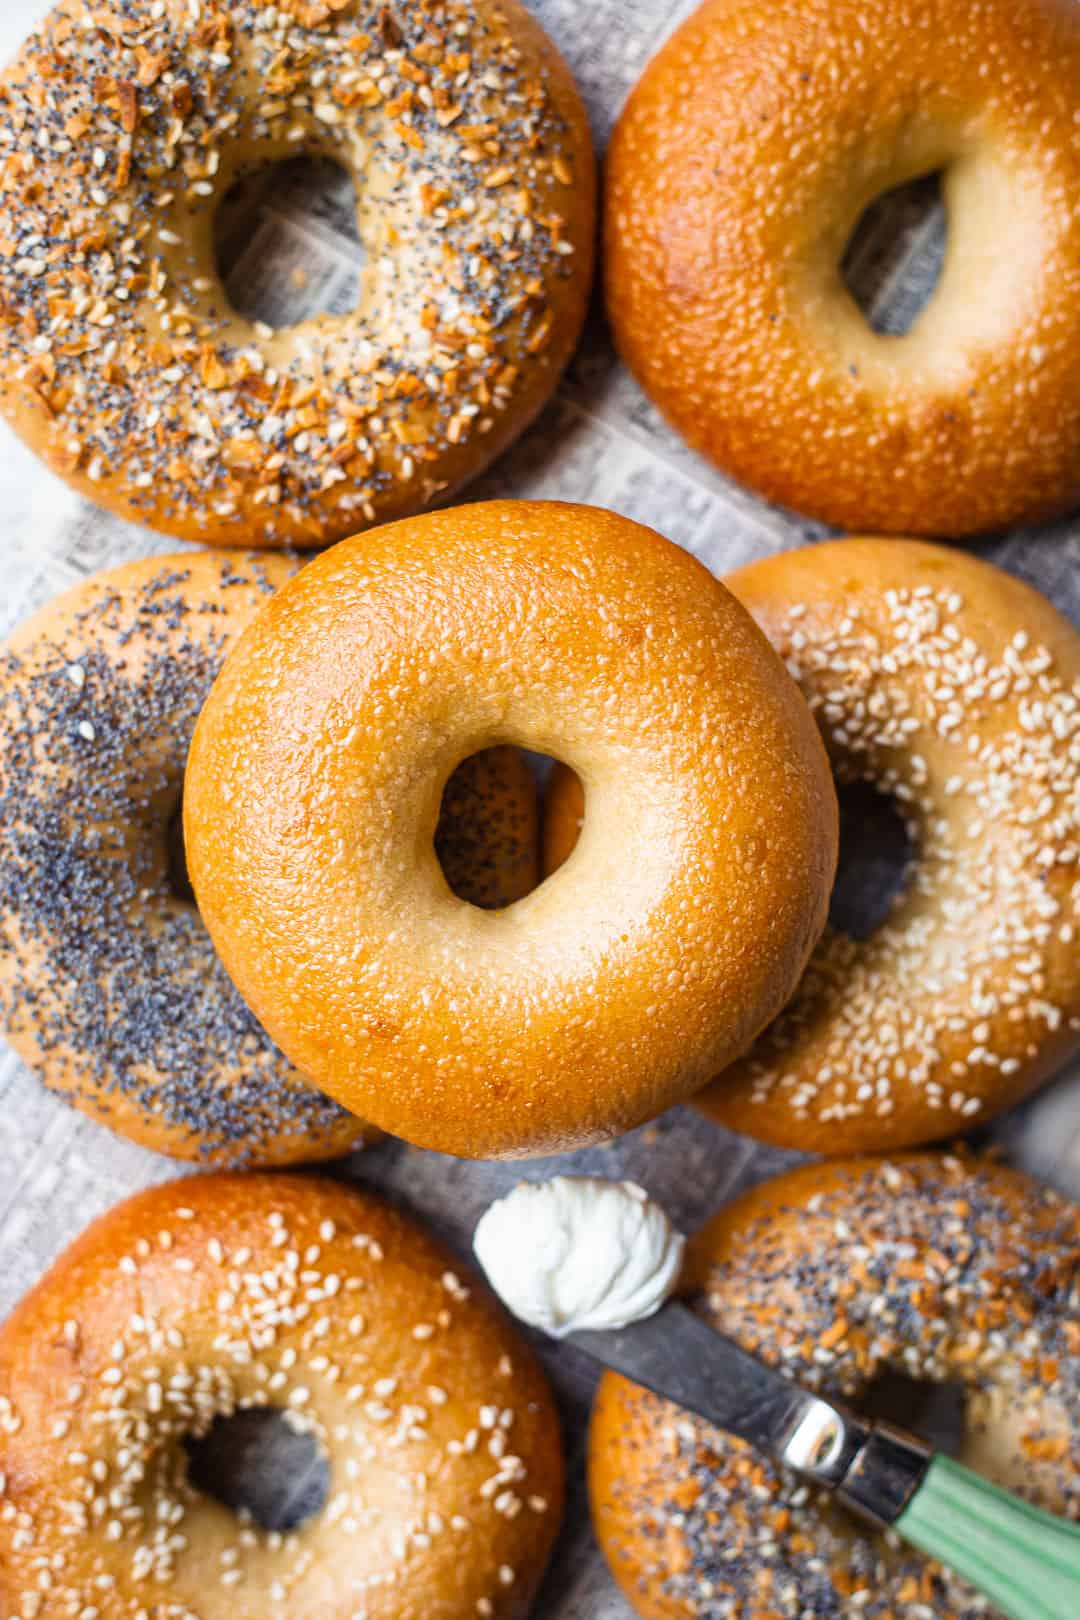
Table of Contents
- Here's Why You'll Love This Recipe
- Ingredients You'll Need
- In Photos: How To Make Homemade New York Bagels
- Bagel Toppings
- More Homemade Bread Recipes
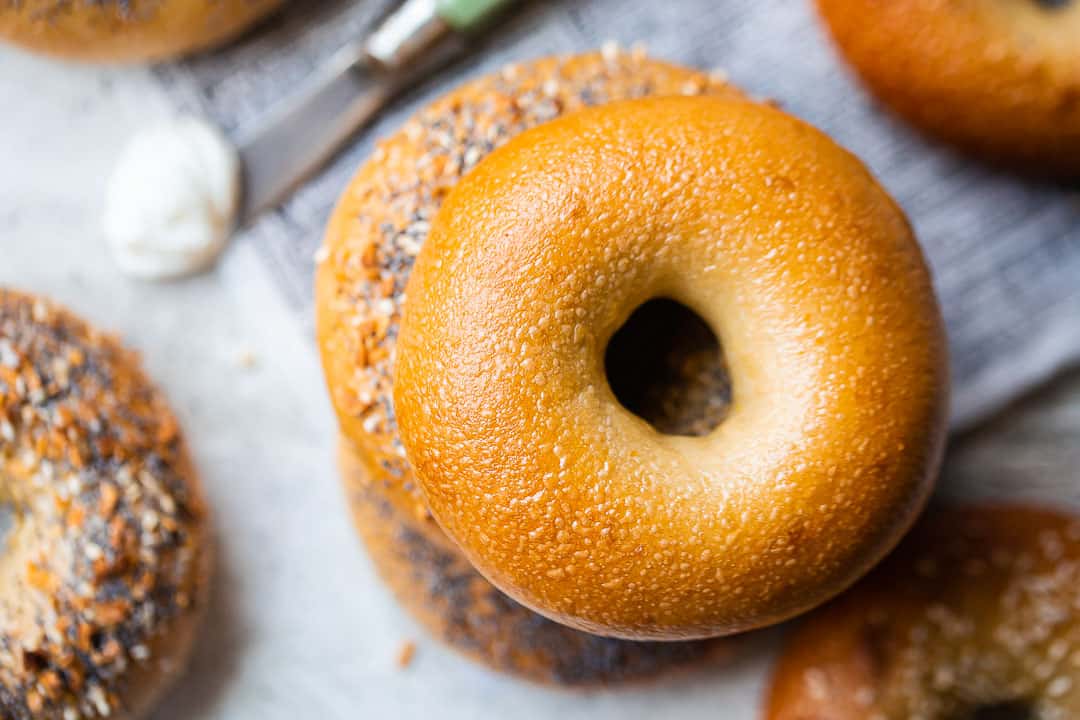
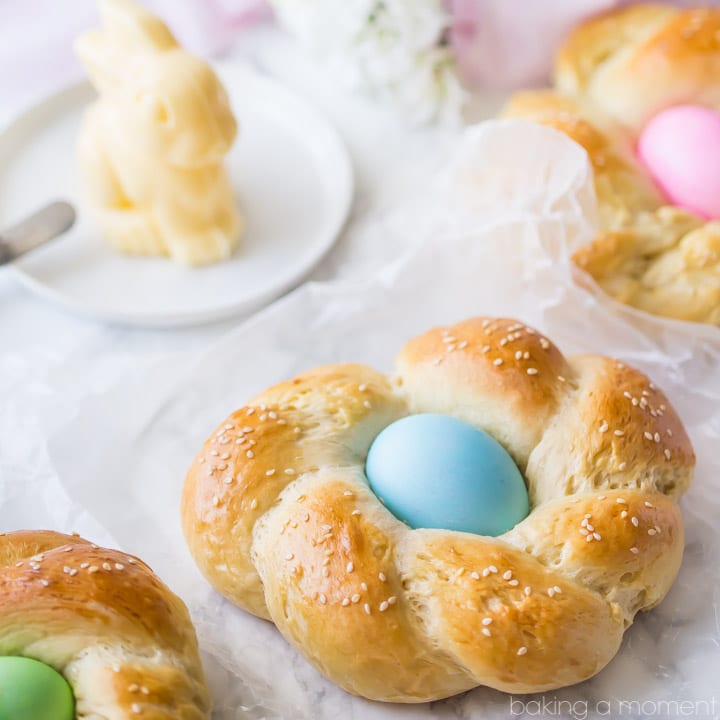
Have you ever had a New York bagel? New York is famous for its bagels. They are chewy and flavorful, with a blistered, crusty exterior. They're soft and yeasty in the middle, and they taste great with cream cheese and all the fixings (more on that below!). Next time you're there, be sure to grab one for breakfast, with a nice, tall cup of hot coffee. It's pure bliss!
However, if you can't get to NYC anytime soon, don't worry. This homemade bagel recipe is every bit as good. You can make it from ingredients you probably already have in your pantry; it's not at all difficult, and it's a fun way to spend an afternoon.
Even better, the next day you'll have freshly baked bagels coming out of your oven! And you won't believe how great these taste.
Chewy, shiny, and golden with that signature crisp crust and tender interior, New York bagels are iconic for a reason. The best part? You can absolutely make them right at home! With just a handful of pantry staples, a little time, and a few pro techniques, you'll have a batch of freshly baked bagels that rival the best delis in the city.
Let's walk through every step so you can master these bakery-style beauties from your own kitchen.
Here's Why You'll Love This Recipe
- These New York-style bagels have that authentic chewy texture and rich flavor you love, thanks to a slow, overnight rise that develops depth and character.
- They come together with just a few basic ingredients that you likely already have on hand.
- The dough can be made ahead, allowing you to enjoy freshly baked bagels with minimal effort in the morning.
- They're incredibly customizable with your choice of toppings or left plain for a classic touch.
- And because they freeze beautifully, you can stock your freezer and always have a delicious bagel ready to toast.
Ingredients You'll Need
There are a lot of recipes out there that call for weird specialty ingredients like diastatic malt powder, high-gluten flour, and barley syrup. You won't find any of that in this bagel recipe. I wanted to make this easy, so anyone who's not a professional baker can feel comfortable making bagels.
The recipe card at the bottom of the post contains the full list with all of the amounts. Refer to that when you're cooking.

- Cool water: Helps hydrate the dough slowly, resulting in better texture and flavor development.
- Honey: Adds a subtle sweetness to the dough and enhances browning when added to the boiling water.
- Active dry yeast: Leavens the dough, creating those signature airy pockets inside.
- Flour: Bread flour is ideal for chewiness, but all-purpose flour works, too.
- Kosher salt: Enhances flavor and strengthens the dough structure.
- Cornmeal: Keeps the bagels from sticking to the pan and adds a bit of texture.
- Water for boiling: Essential for the traditional boil that gives bagels their chewy crust.
- Baking soda: Alkalizes the water, which helps the bagels brown deeply in the oven.
- Egg wash: Gives the bagels a beautiful shine and helps toppings stick.
- Optional toppings: Sesame seeds, poppy seeds, minced onion, or coarse salt for extra flavor and crunch.
In Photos: How To Make Homemade New York Bagels
Step 1: Proof The Yeast
Start by adding the cool water to a large mixing bowl. Stir in 1 tablespoon of the honey. Sprinkle the yeast over the surface and let it sit for 5 to 10 minutes, until foamy.


Step 2: Add The Flour
Add the flour and mix until you get a stiff, shaggy dough.


Step 3: Add Salt & Knead
Add the salt and knead until the dough becomes smooth, elastic, and passes the windowpane test (about 15 to 20 minutes of kneading by hand).

How To Do The Windowpane Test
Pinch off a small piece of dough and, using your fingertips, gently stretch it outward from the center. You should be able to pull it tissue-thin without it tearing. It should be so thin you can see light passing through it, just like a windowpane.

Step 4: Shape the Bagels
Divide the dough into eight equal portions. Roll each into a smooth ball, keeping the others covered to prevent drying.
Place the dough balls onto a parchment-lined, cornmeal-dusted baking sheet. Cover and let them rest for 5 minutes.
Use your thumb to poke a hole in the center of each ball, then gently stretch to form that classic bagel shape.


Return the shaped bagels to the baking sheet, cover loosely with greased foil, and refrigerate overnight (12 to 18 hours).

A long, slow nap at a cool temperature will allow the flavors to really develop. This is called "retarding," and it slows down the yeast fermentation, allowing the natural bacteria to produce acids that give the bagels a more complex flavor, and allowing those signature "fish eyes" (also known as tiny blisters on the surface) to form.
I would recommend completing everything up to this point by late afternoon/early evening. That way, you can wake up and finish baking your bagels first thing in the morning.

Boil and Bake
Preheat your oven to 450°F. Bring 1 ½ gallons of water to a boil and add the remaining tablespoon of honey and the baking soda. (It may foam up briefly.)
Boil the bagels for 20 seconds per side, then transfer them to a wire rack to drain.
Move them to a lightly greased, parchment-lined baking sheet. Brush with egg wash and sprinkle with toppings, if desired.
Bake for 12 to 18 minutes, or until golden brown and blistered.
Helpful Tips and Tricks
- When I make any kind of bread, I use active dry yeast. It's fine to substitute with the same amount of instant yeast if that's what you have on hand.
- If you'd like to use sourdough starter in place of the yeast, use 1 cup of starter and subtract ½ cup of water and ¾ cup of flour to compensate for the water and flour in the starter (source: How to Convert Recipes to Sourdough).
- If you'd like to use fresh yeast instead of dry, you'll need about 0.6 ounces for this bagel recipe.
- The higher the protein level in your flour, the chewier your bagels will come out. Many bakers reach for bread flour for recipes like this one, and it's a great choice since it's got around 3 to 4% more protein than all-purpose. This results in stronger, more developed gluten structure and a really satisfying texture.
Bagel Toppings
Check your cupboard; if you have:
- Sesame Seeds
- Poppy Seeds
- Dehydrated Minced Onion
- Coarse Salt (like kosher salt or sea salt)
... then you can make your own everything bagel seasoning. Just mix about 2 tablespoons of each of these ingredients in a small bowl, and there you have it.
Egg wash is optional, but I really think it makes these bagels extra-pretty. It gives them a glossy look, and allows them to become deeply golden-brown as they bake.
If you're using egg wash, brush it on before adding your toppings. If not, just sprinkle the toppings right on the boiled bagels. They will feel a little sticky from the boil, and the toppings will adhere beautifully.
How To Serve Homemade Bagels
There are so many delicious ways to enjoy a bagel! I especially love them split horizontally, toasted, and topped with cream cheese and a slice of fresh tomato. But really, the sky is the limit!
Here are a few other ideas, if you're thinking of doing like a DIY bagel bar or something swanky like that:
- Butter
- Cream cheese
- Smoked salmon, aka: lox
- Thinly sliced red onion
- Capers
- Fresh dill
- Thinly sliced tomato
- Fresh sliced cucumber
- Fresh sliced avocado
- Scrambled or fried egg
- Bacon, sausage, or ham
- Any kind of cheese
- Peanut butter or almond butter
- Honey
You could also make pizza bagels! These are always a big hit. Just spread on a little pizza sauce and add shredded mozzarella and pepperoni slices, then pop them into the oven until melty and delish.
You can make this dough, shape the bagels, and freeze them on a tray. Once they're frozen solid, transfer them to a zip-top freezer bag, and they will be good in the freezer for 2 weeks.
When you're ready to bake them, place them on a parchment-lined, cornmeal-dusted tray (covered) in the fridge and allow them to thaw and slow-ferment as usual. Then, continue with the recipe from there.
Once they're thoroughly cooled, slip your bagels into an airtight bag, and they will last at room temperature for a few days. After that, pop them into the fridge and they should keep for about a week or two.
Homemade bagels, like most breads, freeze beautifully. If wrapped tightly, you can expect your bagels to last for up to 2 months in the freezer. Thaw them at room temperature or in the fridge before serving.
More Homemade Bread Recipes
- French Baguette
- Homemade Croissants
- Soft Whole Wheat Bread
- Sticky Buns
- Pizza Dough
- Hawaiian Rolls
- Soft White Bread

Ingredients
- 1 ¼ cups (295.74 g) cool water , (around 80 degrees F)
- 2 tablespoons (29.57 g) honey,, divided
- 1 packet (7 g) active dry yeast* , (¼ ounce or about 2 teaspoons)
- 4 cups (500 g) flour , (bread flour OR all-purpose flour; approximately, you may need slightly more)
- 2 teaspoons (9.86 g) kosher salt
- cornmeal, (for dusting the pans)
- 1 ½ gallons (5678.11 g) water
- 1 tablespoon (14.79 g) baking soda
- egg wash, (one large egg beaten with a few teaspoons of cool water)
- sesame seeds, poppy seeds, dehydrated minced onion, and/or coarse salt, (optional garnish)
Instructions
- Place the cool water in a large bowl and stir in 1 tablespoon of honey.
- Sprinkle the yeast on top and allow it to dissolve. (After about 5 to 10 minutes, the mixture should start to look foamy.)
- Stir in the flour, mixing until a stiff, shaggy dough forms.
- Add the salt, and knead the dough until it gathers into a ball and becomes smooth and elastic.
- Continue kneading the dough until it passes the windowpane test** (about 15 to 20 minutes).
- Divide the dough into 8 equal portions, rolling each one into a smooth ball. (Cover the dough as you're working so it doesn't dry out.)
- Place each ball of dough on a parchment-lined baking sheet that's been generously dusted with cornmeal, cover, and allow to rest for 5 minutes.
- Using a thumb or finger, poke a hole into the center of each ball of dough, then stretch the hole wider to form the bagel shape.
- Place the shaped bagels back onto cornmeal-dusted, parchment-lined baking sheets, tent with lightly greased foil, and refrigerate for 12 to 18 hours.
- Preheat the oven to 450 degrees F, bring the water to a rapid boil, and add the remaining honey and the baking soda (the water will foam up briefly).
- Gently place the bagels in the hot water, allowing them to boil for 20 seconds on each side.
- Carefully remove the bagels from the hot water with a spider or slotted spoon, allowing them to drain on a wire rack.
- Transfer the bagels to a baking sheet that's been lined with lightly greased parchment paper.
- Brush them lightly with egg wash and sprinkle on toppings (if using), then bake until golden brown and blistered (approximately 12 to 18 minutes).


I followed your recipe, and used all- purpose flour. I weighed it out to make sure I wasn't adding too much. I left my mixer do most of the kneading for about 5 minutes. I then starting kneading with my hands. It never got stretchy no matter how long I needed it for. It was tearing very easily. I live in Arizona were it's very dry. Should I have used less flour?
Perhaps! Bread recipes can be tricky. It's rarely ever exact, if you know what I mean. You need to use your judgement because the humidity level in your kitchen can have a significant impact. Stop adding flour when the dough is no longer sticky- that could be slightly more or less than the amount stated in the recipe card. It's a lot by feel. I hope your bagels still came out decent, even if the dough seemed a little off!
Hi! I really want to make these bagels but I have one question before I do. I have been under the impression that active dry yeast needs warm water between 105°F and 110°F to bloom, whereas you mention to use cool water at around 80°F. Just wanted to make sure this was correct for your recipe and possibly understand the reason behind the cool water. Thanks! 🙂
Hey there! Thanks for the great question. We are using cool water because we want a slower fermentation on this dough. Hope that's helpful!
This is an easy recipe to follow and the results were absolutely fantastically delicious 😋
This recipe is outstanding. The directions are easy to follow and the bagels are beautiful and delicious.
We're so glad that you loved the bagels! Thank you for leaving a review!
Super tasty and easy recipe, came out great on my first try. I did have 1 question : some of my batch came out rounder and some were a little flat. Any tips on what I can do to improve or what I may have done incorrectly ? many thanks !
Hey Rosanna! That's great to hear! I can help you to troubleshoot if you give me some more specifics. At what point did you notice that some were flat? Was it after proofing the shaped bagels, after boiling, or after baking?
thanks for the reply Allie! I notices the flattening after the boil and a lil after baking
Ok I think this can happen because they are puffed up with air but too much handling as you're moving them from the tray into the water can knock some of that poofiness out. I've personally had the same problem A LOT with soft pretzels, so I came up with the idea of putting each one on its own little square of parchment after shaping them. This way, you can grab onto the corner of parchment and flip them into the water, with minimal handling. The parchment can go into the water too! And then you can just fish it out once it releases from the dough. Doing it this way makes a huge difference! If you want to see what that looks like, here's a link: https://bakingamoment.com/homemade-soft-pretzel-recipe/ and there is a video in the notes section of the recipe card. Hope this helps!
Could you use a bread machine to mix the ingredients and knead the dough? I have very bad arthritis in my hands so kneading by hand isn't an option for me.
Hi Valerie, You can. Most standard bread machines have just a "dough" setting to mix the ingredients, then remove the dough, and knead the dough by hand (or even in stand mixer with the dough hook attachment). If you use the stand mixer the kneading time will be less but will would easier on your hands. Let us know when you make the recipe!
Love the bagel recipe thank you. I just want to take it to the next step. Turn the recipe into cinnamon raisin, onion, everything, 3 cheese bagels etc. Do you have any ideas other than sprinkle on top. I want to incorporate the flavor into the dough it self
Hey Sandra! Sure, yeah you can just knead any ingredients you like right into the dough. I'd suggest a teaspoon or two of cinnamon + a handful of raisins, some dehydrated onion and/or onion powder, and whatever kind of cheeses you like. There are already instructions here on how to make everything bagels, under the "Bagel Toppings" heading. Good luck!
HI Allie, thanks for sharing your recipe. I'm going to try this out over the weekend.
Quick question, at what point do you incorporate the beaten egg?
Thanks again!
Edgar
Hey Edgar! You're very welcome and I'm so happy to hear that! To answer your question: that would be in step 14, the final step in the recipe instructions. Wishing you the best of luck!
Is the water amount correct? I find it difficult to imagine 4 cups of flour needing 1.5 GALLONS of water to make a stif dough.
Go back and read the recipe instructions dear! It's 1 1/4 cups of cool water in the dough and another 1 1/2 gallons for boiling the bagels. Hopefully this clears things up for you!
Honestly fool proof. Absolutely delicious. I think next time I’ll split the dough to make 6 bagels instead of 8 just because I prefer a bigger bagel. Thanks so much for the recipe it’s going to be a family staple!
My pleasure Katie! So glad you were happy with it!
Hi there! I’m trying this recipe out for the first time and I’m worried that they aren’t getting any bigger even after 12 hrs in the fridge. How much bigger should they be before the boiling and baking stage? Really hoping I got it right 🤞🏼😅 TIA
Hey there! I'm so happy you're giving this recipe a try. I think it might help if you have a look at the photo that's right under the heading "Resting the Dough." This is what the bagels look like just after they've been formed. Then, scroll down to just under the heading "Boiling the Bagels." This is what they should look like after they've risen. They're just a little chubbier. These two pics should give you an idea of what to expect. Good luck!
I think for anyone having the dry, dense issue perhaps you need to scoop, pour and level your flour into the measuring cup. Do not use your measuring cup to scoop the flour as it packs it in. ALL flour for any recipe measured should have the scoop, pour, level method or weight it. You can get up to a 1/2 C or more flour than you need if it’s not measured correctly.
Couldn't agree more! That's exactly why I wrotes this guide: https://bakingamoment.com/how-to-measure-ingredients-for-baking/.
Wonderful recipe. I've made them 3x and perfect everytime.
Awesome! TYSM for the positive feedback!
Mine turned out dense. The dough was tough to work with - on the dry side. What did I do wrong?
Sounds like maybe you could have used a little less flour? Bread baking isn't an exact science, unfortunately! It can be frustrating. Depending a lot on weather conditions, you may need more or less flour. You really have to pay attention to those sensory cues: look for the shaggy stage, when it's no longer sticky that's when to stop adding flour, and then knead it smooth. Be sure to knead it for a good long time, this will help with the texture. And same goes for the rise: the times aren't always exact, especially if it's very cool or warm in your kitchen. If it's cool, it may need longer to rise and puff up with air. I hope this all makes sense!
If using sourdough starter instead of dry yeast, should the starter be active or can discard be used?
I have to be honest: I'm not much of an expert on sourdough. But my understanding is that discard no longer has leavening power (does that sound right?). So therefore I would think that active starter would be better. Maybe another reader can chime in and confirm this?
This is THE best bagel recipe. They're perfectly chewy, and they freeze well.
So happy you like it! Thanks for the positive feedback!